4L60E Pump Pressure Regulator Valve Bore Reaming
Download information and video details for 4L60E Pump Pressure Regulator Valve Bore Reaming
Uploader:
Nick's TransmissionsPublished at:
11/14/2024Views:
827Description:
Video Transcription
hey everyone welcome back to another video today we have for you a 4l60e out of a 96 conversion it's actually the vehicle's a 82 jeep cj8 i believe and so customers running a 96 4l60e along with a 6 liter swap and basically the story here is is that i rebuilt this transmission about four years ago and it's got something like 60 or 65 000 miles on it customer drives this thing every day he takes it to the desert he you know he goes off-roading with it
And so, you know, he loves the vehicle, enjoys driving it, puts a lot of miles on it.
So when it came in for refresh, he had reported it was leaking or developed a leak in front of the transmission.
So it was either the seal or the O-ring or, you know, maybe a combination of things.
Hard to say, to be honest.
And he had, like, cleaned it, dried it, and painted it before he brought it to me.
So I couldn't see, you know, any kind of traces of leakage.
But be that as it may, he asked me to take the transmission down.
And if there was any issues with it, go ahead and remediate those issues and put a new set of clutches in it just because it's a part.
So we checked everything over.
For the most part, everything was okay until I got to testing the pump.
Now, when I built this transmission,
I did not actually test this stator initially for whatever reason.
At least I don't remember testing it.
I'll have it in my record.
So I wanted to make sure I tested it before we did anything like putting it back in.
And I'm glad I did because it's testing very weak at the pressure regulator valve.
So we'll run through the exercise and we'll go ahead and test all the circuits.
So we have inboard and outboard for the torque converter clutch.
apply valve.
We have our PR valve here and then we have our boost valve.
All right.
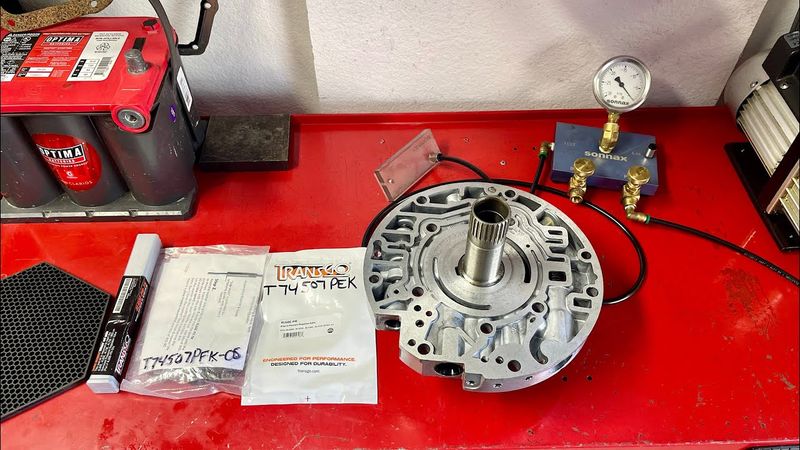
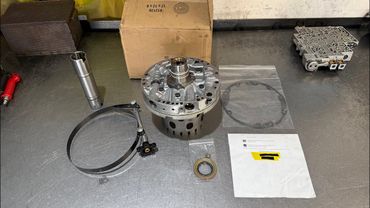
And then on the bench, we also have
a Transgo repair kit pack for these 4L60Es.
So Transgo makes two different pressure regulator valves.
They have a gently oversized drop-in valve.
These are great for the majority of these transmissions, these pump covers or stator supports where there's wear in the PR valve, but it's not...
too bad per se maybe it's pulling like 10 or 11 inches of vacuum and you really want to see 15 in these so this is usually sufficient to remediate that to get it back up to par and run it as long as the other valve trains are in good order and you know sonix makes a um an apply valve as well as the boost valve that you know i installed the boost valve four years ago and you know it's still holding pressure or i should say it's still holding vacuum just fine
And there's no reason to believe it's worn.
So there is also an oversized valve that requires reaming.
And this valve doesn't come with the reamer, but here's the reamer itself.
So it's 4L60E PR-TK made by Transgo.
And basically you have a reamer and you have...
a jig an insert if you will and this particular reamer is brand new so um either i would recommend periodically replacing your reamers if you use them frequently or have them sharpened so that you don't have an issue where you have a dull reamer and you're trying to ream out a board that'll make things markedly worse so you want to make sure your reamers are always sharp
Alright, so instructions for reaming are in the kit with the valve itself, and it comes with springs, a seat, and of course the valve.
And so we'll take a more detailed look at this if in fact this thing has to be reamed, which I'm pretty sure it does.
And you'll see why when we do the initial test.
Alright, I want to real quick show you all of the fibrous materials, you know, clutches and bands.
and their respective appearance as they came out of the transmission.
So here's your forwards.
I mean, essentially they look brand new having so many miles on them and no issues whatsoever.
Even, I mean, I would say if it has wear, we're talking very, very slight wear.
I mean, these frictions, if you were to put them back in, they would work just fine.
And same with the Coast Clutch.
Your Coast Clutch has a little bit of wear in each of these frictions, but nothing major.
Okay, reverse input.
These are pretty resilient.
Okay, same deal.
No major wear.
You know, nothing burned.
3-4 pack.
So we installed a 4L65E spec.
three, four clutch in this transmission.
So these are the steels.
And at first glance, you might think that they're burnt up, but in reality, this is the Colleen style coating that you see.
Now there is some slip marks.
The slip marks are visible.
So you had a little bit slippage in this clutch.
All right, here are the frictions.
Okay, largely unremarkable for a 3-4 clutch pack.
So we wouldn't expect to see major wear on these clutches after only 60,000 miles.
But I'll be honest, these frictions and the band have a lot less wear and tear on them relative to what I saw on initial testing of this pressure regulator valve.
And like I said, you'll see that in a little bit.
Here's a low reverse clutch pack.
He is in manual low frequently being off road.
So, you know, he'll use manual low, manual two to bring the coast clutch pack on when he's, you know, negotiating obstacles or going over rough terrain.
All right, so the band got a little toasty.
You can see here along the perimeter.
Okay, a little bit toasty there.
That could indicate a little bit of wear on the drum itself in this location.
It could also indicate, you know, less than ideal line pressure rise owing to the worn PR valve.
And it just so happened to show up on the band, but not so much the frictions.
The one thing that I did find is this.
Okay, I'm not sure how that happened.
This slide was actually a new rotor and slide kit when we installed it.
You see some wear there, but there was some debris in the pan.
There wasn't a lot of it, but it was basically coming from here.
So, you know, again, we put a new pump rotor and slide kit in here, all new internals, new vanes, new rotor guide.
And then this is the front seal.
It doesn't feel overly supple.
I mean this obviously wasn't like that when he brought it in.
This is me with the chisel pounding the seal out from the back side once the pump halves were split open.
Okay, here are the bushings.
you know, normal wear on these bushings.
So we have all new bushings in there.
I haven't installed them yet because I want to make sure that this pump cover and stator combo is going to be good to go.
Here is the O-ring.
This feels slightly hard, but nothing major.
And then here is the gasket, you know, pump to case gasket.
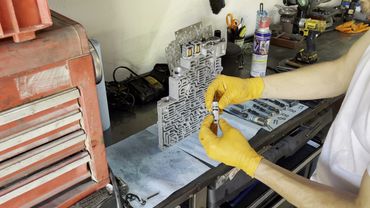
So the rest of the stuff that came out of here,
far as consumables and stuff we're throwing out.
It's largely immaterial.
I mean, just like, you know, bow body and separator plate gaskets and stuff like that.
Nothing unusual is noted with them.
They were not bonded or hardened fast to the plate.
The plate itself is a transgo plate.
It's in good shape.
So we're going to put it back in.
I'm going to use Torlon check balls this time instead of the steel balls.
I've been doing that lately as well with all my 4L60s and 80s.
Alright, let me put this aside and then let's fire up this machine.
I want to calibrate it first.
so as per our usual procedure stick your hose into the calibration receptacle okay and what you're going to do with these things especially if it's fresh out of the box you know the machine itself is brand new hooked it up to the air pump for the first time you're going to turn the machine on you want to see a steady five inches of lift and then when you turn the machine this way
you'll notice there's a calibration port right here once you have your five inches you'll go ahead and put a finger that will cause the needle to jump to between 20 and 30 inches and then you dial it in so you got two valves here your bleeder valve and your pump valve your pump valve is going to be what you use to dial in your five inches your bleeder valve is going to be what you use to adjust until you get to 25 inches with a finger over the calibration port
So pretty straightforward, but you always want to do this before you use this machine each and every time because I've noticed they can drift on you.
And I used this yesterday, so I'm curious to see if it's still holding calibration or not.
And it was yesterday I tested this pump.
All right, so we're still, we're a little off.
Okay.
We're a little off, so now we're at five inches.
put a finger right at 25 inches back to five inches one one thousand two one thousand so we're slightly below make a micro adjustment all right counterclockwise that increases um your vacuum and then clockwise decreases it on the pump valve
Okay, clockwise increases vacuum on the bleeder valve, counterclockwise decreases.
Alright, now we're good.
So you always want to go through that exercise so that you know your results are valid.
Okay.
Alright.
Let me get my notepad here so I can record results.
So first things first, we'll go ahead and test the TCC apply valve or control valve, lock up valve, whatever you want to call it.
Okay, make sure you're over the circuit.
Alright, so this is 15, and when you're testing this, you want to plug this hole where my finger is.
Alright.
That's 15.
Maybe 15 and a half.
Just shy of 15 and a half.
I'm going to record 15.
And then, for your inboard, what you're going to do is place your little gasket right over the orifice, and go ahead and
you're going to put your block on there, and then you're going to take a finger and plug the opening and push the valve inboard so that it's in the control position or the regulatory position or lock-up position.
That's 22 inches.
That's perfectly fine.
So we have 15 and 22 inboard and outboard respectively.
All right, so now we'll go ahead and do the PR valve.
So when you do the PR valve, you need to make sure that this little orifice in the valve, and hopefully that'll focus.
See that little orifice right there?
That has to be exposed.
That has to be accessible.
So when you go ahead and put your gasket and you put your test block,
If you haven't seen this done before, watch my other video on it, you'll notice that you don't really draw much of any vacuum because it's all leaking out of that orifice.
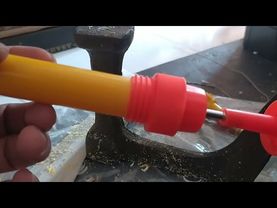
So you take your pencil with an eraser, and you go ahead and plug it.
And as you can see, we are holding seven inches of lift.
Seven inches.
Seven and a quarter inches.
I mean, that's being generous.
So we have an extremely worn PR valve here.
So that's no good.
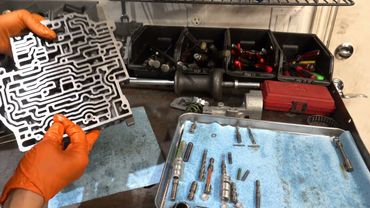
All right, so let me go gather some tools and we'll go ahead and take this valve train out, get the boost valve out of the way springs.
And then we'll go ahead and swap first
we're going to attempt to restore this board with the drop-in PR valve.
Okay, that's always your first go-to.
You know, reaming is like a last resort, but I have a feeling we need to ream this.
So if that's the case, then we'll just evacuate the whole casting and ream it.
Alright, let's get this hose and whatnot out of the way and then we gotta extract our valving.
Of course this thing wants to fight me when I'm filming.
These pliers are a little bit worn as it is.
They're not grabbing or engaging the little eye loops like they used to.
So I'm probably just gonna replace my snap ring pliers.
All right, when you have O-rings, it's going to be obviously a lot more difficult to get out, so what I like to do is I'll kind of pry forward until I can get a little bit of purchase here on the valve and spring, and then get in behind the main spring seat portion of the PR valve and pop it loose.
Okay, and then you always want to inspect your O-rings, obviously.
I have plenty of spares, so if one got cut, just replace it.
Alright, come on.
Here are our springs.
Okay, we can inspect the valve.
I see a little bit of wear, but nothing remarkable.
Alright, I don't know to what extent you can see into the bore.
from this angle.
It's pretty difficult, but you can see some visual wear there.
Like I said, I apologize in advance if you can't actually see this.
Back here, let me get a... Alright.
So there are the bores.
And I know, horrible, horrible camera angles.
I apologize.
It's going to be very difficult.
Just take my word for it.
This bore looks more worn than usual.
All right.
All right, so the drop-in valve comes with a bumper spring for your boost valve.
So this is the Sonic spring that comes in the Sonics LB14L60E kit.
Lately when I've been buying these things, they did not come with or do not come with the springs.
So I don't know if that's something that changed with Sonics or they're selling two different versions of them.
I couldn't tell you.
All right, so here's your PR valve and here's your spring seat.
So just like that, that's how you install it.
Alright, and then before I put the boost valve back in, I want to put some assembly lube.
So do the best you can to get assembly lube as far into the bore where the sleeve goes as you can, and then liberally coat the valve itself, you know, the O-rings and the sleeve.
Actually, I shouldn't say the valve itself.
I mean, you could put assembly lube in the valve too, but you don't have to.
I just put a little bit of transmission fluid in there to kind of hold it.
All right, next, follow up with your two springs.
And then with the boost valve, just go ahead and carefully insert it.
And once you've had this boost valve in and you've taken it out again, it's a lot easier to install.
So, I mean, I guess that's one good thing.
Alright, just want to double check, make sure that that snap ring is fully seated in its groove.
Okay, let's go ahead and fire up the tester.
First, let's expose the little orifice in the valve.
Figures the orifice was like literally on the exact opposite side of where I needed it to be.
Ideally 15 inches.
14 on the extremely low side.
Like 14 is okay.
If this has 14, I'm going to let it ride.
But any less than that, I want to ream the board.
I want to make sure that this stupid hose is not in the way Yeah, we're at 11 inches
So 11 inches is too low, especially on, you know, with respect to how this vehicle is used.
The engine's putting out about, I want to say, somewhere between 350 and 400 horse.
I don't know exactly, but, you know, it's not entirely factory.
Turns out this valve is not as easy to to grab up on then is the factory one Come on Okay, so we got to basically evacuate
the entire casting so that we can set it up for reaming.
So let me do that, and then we'll resume once we're ready to go with the reamer and everything like that.
I guess it's almost empty, so...
So I didn't put any bushings in or any sealing rings.
So that's why I wanted to get this sorted out before I did finish assembly or, you know, finish work on this thing.
All right, be back with you in a minute.
Okay, we're over in the side yard.
So have the stator, stator support chucked up in the vise and recall the damage on the slide.
Now you see that.
Okay, it started to come apart there a little bit.
So reading Transgo's instructions, this is going to be on their website.
Basically they give you the symptoms for wear on the PR valve, whether it be inboard and or outboard.
And for your outboard wear, burnt band and 3-4 frictions are kind of a symptom.
Now we didn't test that, but I don't see too much in the way of inboard, or excuse me, outboard wear on these two lands.
It's the inboard land that is going to be the most common, at least my personal experience.
When you have a slide into a rotor broken or damaged, the inboard land being worn is kind of a leading cause for this, unless something else goes wrong with the torque converter, maybe it catastrophically fails.
But barring that, if there's nothing else going on external to the transmission, no catastrophic subsystem failure, UV engine or the rear end or whatever, torque converter, then a broken pump rotor slide
more than likely is caused by extreme wear on the inboard land, and that's what we're here to remediate.
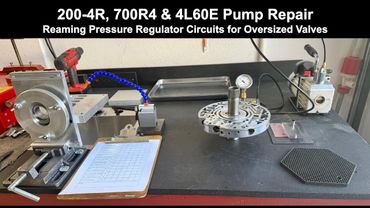
All right, so to do this, you're going to need, in addition to the reamer and the jig or the support, you're going to need a ton of WD-40 and a drill.
So I have this thing set on the lowest setting.
I'm going to bump it up to number two.
And basically, you want to use a ton of WD-40 while you're doing this.
And what they have you do is they have you set up the reamer.
Kind of follow along with the instructions here.
Set up the reamer just like it's shown here.
Okay, so you have your reamer.
Pour a bunch of WD.
And then you have your sleeve.
Now you're going to take this sleeve.
You see this little hole here, it's going to be, um, facing out or outboard.
Okay.
That's basically allowing for removal to use like a pick or something.
Okay.
And then what you're going to do and you're going to install this.
Okay.
Just like that.
Okay, it is a snug fit, and that's by design.
Alright, of course I forget a towel, so let me go get one of those, and then we'll begin the reaming process.
So when you're doing this, you basically want the reamer to do the work.
You don't want to force the reamer.
It's not like you're using a regular drill bit, and that's true of all reamers.
You just want to let the reamer do the work at low speeds, and I like to have it inverted like this so gravity can kind of help out.
And then once the reamer bottoms out, you're basically done.
We're going to have to, you know, put this back in the wash so that we can get all the shavings and whatnot out of it.
And then once we do that, it's all cleaned up.
We can go ahead and retest.
Alright, so now what I'm going to do is I'm going to slowly back the reamer out.
And I'm just going to do a visual inspection real quick.
Hey, I don't want to install the valve or anything into this bore based on, you know, shavings and whatnot being in there.
So let me go ahead and clean this thing up and then we'll be back on the bench.
We'll go ahead and install the oversized PR valve and retest and hopefully we'll be good to go.
Okay, so we have the pump mostly back together.
I opened up the packaging for the oversized pressure regulator valve.
So we have two new springs, a spring seat, and of course the valve itself.
And then we have our boost valve and our snap ring.
So the other PR valve, the drop-in valve is back in its packaging and we can use that on like another stator that's not as worn.
I should say, you know, pump cover.
All right, now you can actually test
the pr valve in the board by itself you don't really need to have the boost valve and springs in there and if you want to do it that way uh maybe a little bit easier just to line up the orifice so that you can get at it but i always install them in its entirety so it's not like i have the thing moving around when it's supposed to be you know sitting still so i have fresh assembly lube we'll put in our bumper and our pr spring
And then I guess it would help if I install the spring seat, so let me redo that.
So spring seat, then go ahead and drop it in.
And then your springs.
And then your boost valve assembly, valve and sleeve.
A little too hasty there, a little quick on the draw to get this thing in because I'm eager to test it, overeager, and I'm forgetting parts.
I'm just going to make sure that that snap ring is really in there.
So, gotta get the little orifice where it needs to be.
So I can put the pencil eraser on it.
Alright, both Sonics and Transgo tell you to test this board dry, and that's why I did not lube it with WD.
So the valve dropped right in.
And yeah, let's put the gasket over the orifice so I can't get to it at all.
All right.
Long vacuum.
About three inches, that's normal.
Okay, looks like we are at twenty and three quarters inches of lift.
Twenty and three quarters inches.
Twenty and a half.
Twenty and a half.
We'll call it twenty and a half.
Alright, I didn't test the boost valve on camera last, so let's go ahead and just do that to tie up these ends.
Alright, boost valve's giving us 21.
And this is the hole you have to plug right there when you test the boost valve.
And my gasket slipped, so...
Brand new out of the box.
O-rings will seal 25.
Used, like this one, 21.
But make no mistake, there is no issues with this boost valve.
Alright, so...
That is reconditioning fully a 4L60E pressure regulator valve and bore so that the pump cover stator half can be basically reused, reinstalled as is.
And so if you're wondering where to get those pieces of rubber that you saw me use when I had this chucked up in the vise, this is what they are.
Okay, you can use these to make your own resizers for Teflon one-piece sealing rings.
You know, you can use them in a variety of applications.
Okay, here's the reamer and the sleeve.
So, as mentioned, goes in just like this.
Or as you saw, I should say.
And then here's the original valve.
So it does have a little bit of wear here on the outboard lands.
Nothing crazy, but there's some light scoring and whatnot.
No matter.
Like I said, doing things this way will ensure that this bore is cared for.
In the long run, you know, there won't be any issues with this thing for a very, very, very long time.
And at that point, if it comes back, you know, I don't know, five years, ten years hence, this pump will be completely replaced anyway.
Alright guys, that's the video.
If you have any questions, comments, leave them below.
You can find the instructions on Transgo's website.
You can just Google Transgo 4L60E Oversized Pressure Regulator Valve and I think the second or third result in the searches will actually get you right to the instructions and you can read them over and kind of get a sense for what everything entails and what's involved in doing this procedure.
All right, until the next time we meet, take care, enjoy the rest of your day or evening, and we'll chat soon.
Thanks again.
Similar videos: E Pump Pressure Regulator Valve Bore Reaming
200-4R, 700-R4 & 4L60E: Pump Repair - Sonnax
GM 700R4 Valve Body Assembly (1988-1992) and Transgo Jr Shift Kit
Always Inspect Your Remanufactured Pumps: 4L60E & 700R4
cara buat tembakan cicak pompa tanam #1
3. GM 4L60E Rebuild - Valve Body Assembly