700R4 Performance Tips and Tricks PT1 - Valve Body
Download information and video details for 700R4 Performance Tips and Tricks PT1 - Valve Body
Uploader:
Nick's TransmissionsPublished at:
10/3/2023Views:
12.3KDescription:
Video Transcription
Hey everyone, welcome back to the channel.
I'm going to talk through some 700R4 mods that you can do for performance.
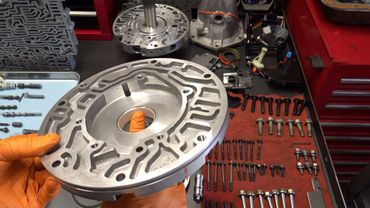
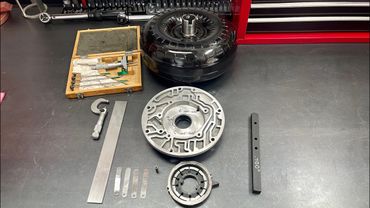
So we'll cover things you can do in the valve body, the accumulators, the pump, and the spacer plate.
And also touch on a few other things elsewhere inside the case you can do, you know, mods or parts that will, you know, further amplify the capabilities of the transmission when done in conjunction with the mods we'll discuss here in any kind of like high performance or real heavy duty application.
So we'll start with the vowel body and then we'll kind of work our way through the rest of this stuff.
All right, so what we got here is a valve body out of a 1989 unit.
However, this particular valve body is a first generation valve body from an 82 to early 87 700R4.
So if you're not sure or you didn't watch any of my other valve body videos, you can actually take a first generation valve body and install it on any year 700R4 and it'll work just fine.
That's very popular for folks installing 700s into non computer controlled applications where they don't want to mess with like an internal external lockup kit.
And they just want the converter to lock mechanically using the mechanical lockup system here that I'll touch on in more detail when we get there.
But suffice to say, there's quite a few things you could do to the 700R4 valve bodies, regardless of vintage or whether it's early or late, to kind of spruce up the transmission and get better shifting characteristics out of it.
So we'll start with the throttle valve here on this valve train.
So you have your throttle valve.
This is your main TV valve that governs line pressure in the transmission.
You have your spring, you have your plunger, and then you have your sleeve.
So the 700R4 is one of the few transmissions where I will always install a shift kit.
And I always install the junior, at least almost always.
There's a few cases where I'll install a reprogramming kit or
something, you know, a little bit higher end just based on whatever we're doing with the transmission.
But in most cases, all I'm doing is installing the junior.
And the reason for that is I want it for the updated Transgo main throttle valve that comes in that kit.
So what this valve will do is replace the factory valve and it has lands and grooves that the factory valves don't have.
So here's an example of a factory valve.
they came out of this valve body and the uh the valve is prone to sticking in the bore so you have the inboard spool here and then you have the inboard spool on the trans ago valve you see all the different lands cut into it that allow a little bit of debris and whatnot to pass through
Same thing with the outboard spool.
It's got lands here that allow debris and particulate to pass through so it doesn't get stuck.
A sticking TV valve will give you erratic line pressure conditions, no line rise, things of that nature.
And of course, that will burn up the transmission if you try to drive it like that.
now there are some uh factory tv valves uh that are slightly different than the one you see here so you'll notice this has a little id uh land here on the on the inboard stem you will have a valve uh occasionally when you take apart a lot of these valve bodies that does not have this groove here that's the case transgo tells you to reuse that valve and only install
the tapered spring which is this white spring here so you want to make sure that when you install this tapered spring you kind of force or press down on it so it kind of snaps into place on the very base of this part of the valve okay you don't want it loose and then of course you got your secondary spring which i have a little bit of assembly lube holding it in and then that goes in the board just like you see it
Okay, the other purpose that this valve serves is to allow for a faster TV response to throttle input.
Sometimes a factory valve just simply won't respond fast enough and you'll have a little bit of slip or you'll have insufficient line pressure, you know, kind of a split second basis that will ultimately wear your clutch packs out, especially the 3-4 pack.
So you replace it with the Transgo spring and they have like a little...
I don't know what the hell you want to call this thing, a little spacer.
And for diesels, they have you install this washer.
I never installed it and I don't think I've ever done a 700R4 for a diesel application.
The next thing we'll talk about is the TV plunger and sleeve.
There is a mod you can do with these, and you need a shift kit to do it, that will allow you to run wide open in fourth gear.
And it basically turns the 700 into a quasi full manual shift.
So if you plan on running wide open,
in fourth gear on a continuous or, you know, kind of like, I don't know, maybe you're doing something really exotic, high-speed racing, high-speed runs, whatever the case, and you don't want to downshift, you know, because otherwise it'll kick down when you go wide open in fourth gear, you can block off
These two holes here, this hole and this hole, and that will give you the capability to hold that wide open in overdrive.
Now, I almost never do this because there's really no reason to.
The one thing you really need to be concerned about when you're having this mod in place is that 3-4 wide open shift because that shift will stress the band incredibly, especially if you...
you know your clearance for your band is not optimal and you're running a um you know billet fourth gear servo uh don't be surprised if you actually break the band in half at the anchor points and you know that there's plenty of documented cases of that actually happening so this is really reserved for super high stall application is very specialized it's not something that you need to worry about you're not missing out on anything in my opinion if you don't do this mod but this is the whole size
And here are the holes and questions here and here.
What folks will do is they'll drill these holes out a little bit further.
They'll tap it and thread in a machine screw on each side.
And then if it's like a set screw, that's it.
They'll just leave it in there.
Or if they're using a regular machine screw, they'll lop the head off and then grind it flush with the hole so that it doesn't interfere with anything else going in.
Anyway, that's the throttle valve setup.
There may be more that I could say about this.
Sonix makes a valve sleeve and plunger that, you know, kind of improves a little bit on what the factory valve or sleeve and plunger does or addresses leaks there.
For example, if you're having problems with getting your line rise, especially when you're doing your testing, and maybe your pressure is at stall or not what they need to be,
um before you replace the valve body try replacing just the sleeve and the plunger from uh you know with one from sonics and that may help you and then the last thing i'll touch on is these uh these plungers have a number some of them do some of them don't uh the most common number you'll see is number 94. sometimes they'll be blank but if you have a number other than 94
If you're using the Transgo kit, you don't want to actually install the spring here and none of this stuff.
You just reuse the factory spring.
Additionally, if your factory TV spring is longer than the one that comes in the shift kit, you want to reuse the factory spring.
Okay, relay 4-3 sequence, not really a whole lot to discuss here.
If you, for whatever reason, want to turn your 700R4 into a 3-speed transmission,
just turn this around like this and install it just like that.
It'll go in there, the transmission will function just like it should, except that you will not have 3-4 upshift.
If you're chasing a 3-4 upshift, or I should say a no 3-4 upshift condition, maybe it was just rebuilt,
And no matter what you do with the TV cable, you know, adjustments, setup, you know, all the usual steps you would take to try and fix it, suspect that maybe whoever built the transmission stuck this valve in backwards.
TV limit valve, no real modifications or changes.
Just install it just like you see it, as is.
So here's your 1-2 accumulator valve.
So...
Depending upon what you're doing, stall speed, application, what other mods you're doing, particularly to the 1-2 accumulator, as well as the size of the 1-2 servo that you're putting in the transmission, that's going to kind of dictate what you do here with the 1-2 accumulator regulator valve.
the factory spring is fine uh you can do plenty of mods to crisping up your one two accumulator um you know or i should say one two shift without having to change the spring out so if you're not wanting to run the shift kit you can just reuse the factory spring and then do mods elsewhere with the uh
with the accumulator housing itself and the spring you install in there, as well as the 1-2 feed hole in the separator plate.
So there's different ways you can kind of arrive at the same destination based on whatever you're trying to do.
With that said, the kit will give you a few different springs.
I just have a couple examples here.
And what they will tell you is based on whatever servo you're installing, whether it be a 554, which should never be installed in anything performance, a 553, which is your standard servo, and your 093, which is your Corvette servo, you're going to choose one of these two or three springs they provide to you.
Generally speaking, the...
Softer the spring, the more accumulator fluid will be allowed to pool in that 1-2 accumulator housing.
And the shorter and stiffer the spring, the less accumulator fluid under pressure will be introduced into that accumulator housing.
And where that fluid pools is underneath the piston.
So between the piston and the spacer plate.
So the more accumulator fluid you have,
the more force of pressure it's going to take to move that piston from its rest position at the top of the housing toward the separator plate until it ceases to move.
the longer duration your shift will be from one to two and the softer the shift will be from a firmness perspective okay so if you're doing something real high stall real high performance you want whatever spring that you can get your hands on that will allow the least amount of accumulator fluid underneath that piston before the one two shift is commanded before the governor triggers it okay um
093 servos, the kit will tell you to use the black spring.
If this is Transgo, if you're running like a Superior Tech or Fairbanks or something, it's going to be different.
But you can also run the orange spring, which is what they tell you to use for the 553 servos.
And the orange spring will actually give you less accumulation, therefore increasing the shift firmness.
Okay.
So that's the deal with the accumulator valve and spring setup.
As far as the line bias valve is concerned, you can block this line bias valve off completely and that will give you access to full line pressure at all times.
So part throttle, full throttle, mid throttle, it will always be there.
For performance, especially if the stall speeds are in excess of 3,000 RPM, I would strongly consider blocking that off.
Now, with that said, there's a couple of very well-respected builders online in various forms dedicated to GM cars, trucks, and particularly transmissions.
that tell you to urge caution with respect to blocking the line bias off completely in the first generation valve bodies.
They report weird erratic shifting issues, stack shifting, very uncharacteristically early upshifts and downshifts
and just generally poor performance of the transmission when you block it off.
When you install a stiffer spring, they reported characteristics that returned to normal or to what they expected.
So it's just something to keep in mind.
I very rarely block this off.
I'll just use a very stiff spring in place of the factory spring.
So in the Transgo Senior kit,
will give you two options uh they will give you a purple spring that's larger in diameter than a shorter i should say smaller diameter white spring okay um for real high stall it's recommended to use both springs for mid-range stall like you know again in that like 28 to 3 400 stall speed range um use just the purple spring
You could use just the white spring for anything between maybe 2100 or 2200 and 2800.
And then the factory spring for anything that's largely factory.
All right, that's the line bias valve, and there may be other things to say about it.
I'm not going to try and cover everything, but that's the limit of my knowledge in terms of what you can do and what you may want to do with line bias based on what you're overall intending to do with the transmission and vehicle.
So here is your 3-2 downshift or 3-2 control valve.
So there's a few different things you can do with this thing.
If you want real fast, real crisp, nice 3-2 downshifts, what you can do, and this is assuming you're not going to spend any money on the shift kit, which is perfectly fine, you don't have to.
is just delete all the springs okay and i'll explain what you do with this spring in a second um but just delete the factory spring and keep the valve in there with the roll pin okay that'll improve the speed in which um the 3-2 shift occurs if you pair this with high rate return springs in the forward drum that will give you a very nice uh 3-2 shift now
If you are running a very high soil situation and you need that shift to happen as fast and aggressively as possible, then what you can do is you can install an extra pump body pivot spring, pivot pin spring into the bore.
You want to install that first and then install your valve.
then go ahead and install your roll pin.
That will block the valve from moving at all.
It just simply won't move.
That will give you the firmest 3-2 shift.
Again, this is kind of like high stall, high performance, and you want to pair this mod with what you're doing with respect to the spacer plate, feed orifice sizes, as well as your overall converter stall speed, and of course, what you're doing in the forward drum.
So a lot of different things you could do with the 3-2 shift, but these are kind of like some examples of steps you can take to improve that part of the transmission's performance.
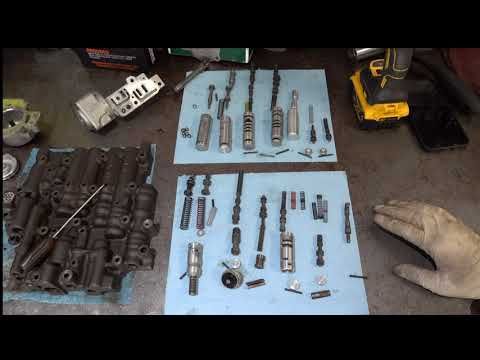
Okay, so we'll go over to the other side.
All right, so on what I like to call the shift valve side of the transmission, we have quite a few valves and lineups here.
Most of them are actually torque converter clutch control regulator valve setups for mechanical control of the converter clutch, and I'll touch on them in a second.
But we'll start here on the right side and kind of work our way left.
And I'll also point out that the 1-2 shift valve train is not on the bench.
I actually installed it into the valve body and then decided to do a video.
And I'll be honest, I don't feel like taking it out.
But I'll flash a picture of what that valve train looks like.
But in these early valve bodies, you have the 1-2 low range upshift and downshift valves, along with their associated springs, along with the 1-2 TV and the 1-2 shift valve.
and i only say this just because i've it's happened to me a couple of times but you want to kind of just keep in mind that if you're working with one of those early valve bodies uh the one two um low range upshift and downshift valves sometimes won't go back in there in that respective sleeve and you know and it's usually due in large part because the sleeve itself sat around so if you encounter that
And no matter what you try to do, they just won't go back in and you're going to have to either find another valve body or find another sleeve and valves that haven't been taken out.
And then whatever you do, just wrap them in duct tape so that they don't come out and only take that tape off when you're ready to actually install them into the valve body.
But anyway, so here we have our MTV upshift and downshift valves.
So modulated throttle valve upshift and downshift.
You're not going to do anything with the MTV downshift, but for the MTV upshift, I like to take the factory spring and just remove it.
Okay, you just leave it out.
The shift kits will come with, you know, different springs to be put in the place of the factory spring.
So if you're installing either a 700R4 Junior or a Senior, which is that green box, then just follow the instructions and use the springs that they, you know, tell you to use.
Over here, we have our 2.3 and our 3.4 valve trains.
So for the 2.3, if you're using the 700R4 Senior kit, they're going to have a spring in here for your throttle valve for the 2.3.
It's going to have a tapered end just like this.
Okay, the tapered end goes inboard.
All right, this is not super critical.
Don't worry if you're building something high performance and you don't have it.
Maybe you didn't buy the senior kit.
Maybe you bought the junior kit.
That's OK.
then there's also springs that they give you for, um, the other, um, uh, TV valves.
So the one tube will have a dedicated spring.
Um, you saw the two, three, and then I believe they also give you one for the three, four.
I haven't used this kit in forever.
I mean, I've had the box in a drawer for over 10 years and you know, I just pulled out to do this video.
Uh, so, you know, again, it's, it's not super critical.
Don't worry if you don't have it.
Um,
Let's talk about all the different torque converter clutch valve trains that you see on the bench.
So if you have a computer-controlled vehicle, whether it's an 82, 83, 84, 85, or 86, it's going to have the first-generation valve body.
You're going to see these aluminum slugs installed.
They're going to be the slugs and then the roll pin, and that's it.
That just basically makes that valve non-functional.
Now, if you are installing this particular transmission into like a classic, I don't know, 50s, 60s, 70s, or even 80s application that does not have any kind of computer control or any sort of electrical mechanical TCC control setup, then this is the valve body you want to use.
There are various kits made by Transgo, by Superior Tech, by I think TCI and maybe a couple others that will allow you to work and control your torque converter clutch 100% mechanically in the force bore on those first generation valve bodies.
And what happens is...
you will use one of whatever number of springs they give you to control the road speed in which that converter clutch is going to apply.
So what I typically do if I'm running something like this is I will use the stiffest spring that I could find.
And so that I have converter lockup
at as late as possible along the speed or RPM curve in fourth gear.
Reason being is that I don't want the thing coming off, going on, coming off, working hard at otherwise surface street type speeds and driving conditions.
So that's what I typically do.
Obviously, your situation and what you're trying to do will dictate what you do there if you're going to run a mechanical setup like this.
But the late model valve bodies, the ones that you would typically find on the auxiliary valve body equipped units, 88 and up, do not have the bore for this torque converter clutch mechanical setup.
So if you want that, but you're working with a later 700, the thing to do is to simply take that valve body off and put an early valve body on.
And that's it.
All right, for those...
These torque converter clutch control valves, you're going to have two different valves.
Notice that the inner spool here is different on what the Trans-Go refers to as the long spool valve versus the short spool, and you can tell by the ID grooves in addition to the appearance of the spool.
That's going to dictate what you do with the springs.
So they will tell you exactly what to do and how to do it with respect to whichever one you have.
Now, for the standard kind, this is the one that's, I guess, most commonly seen.
And I've seen very few of these valve bodies come from the factory with a lock-up kit installed like this.
But what they're going to have you do...
is grind this portion of the uh of the stem where it kind of um you know comes out a little bit like this they're going to have you grind it perfectly flush with the uh land here okay
If you don't do that, is it the end of the world?
No, but I think what that does is it prevents the spring from getting hung up or sticking or whatever the case may be.
I'm not exactly sure, that's just my guess.
But bottom line is that if you don't do it, it's usually not an issue, okay?
All right, so that is the valve trains in the valve body and some of the different things you can do.
I'm sure there's some other things.
If you know of something that I didn't cover here, please go ahead and leave it in the comments and I'll add that to the video description so that folks, when reading the description, will have that information handy.
So anyway, let me go ahead and reposition the camera and we'll talk about check balls in the valve bodies.
All right, so for check balls,
On a later model 700R4 that takes an auxiliary valve body, you're going to have a check ball here.
and a check ball here.
This is going to be your drive three check ball and this is going to be your third clutch accumulator check ball.
Now this is not to be confused with the third accumulator check ball capsule that's in the case and behind the servo.
Those are two different things.
Now over here you have what would be your low reverse check ball and for early 700 R4s, 82 to 86 and some early 87 model year units, they will have a check ball here.
Now, what determines whether or not you put a check ball in a bathtub or really any location?
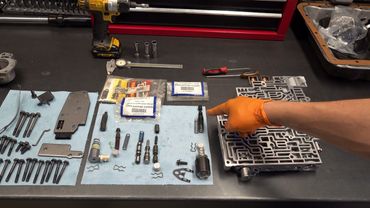
For that, we have to take a spacer plate and insert it over the valve body to answer that question.
All right, so what we have here is the Transgo 700P spacer plate.
And this plate was designed based on the early 1987 700R4 factory plate because it is provisioned to account for all of the different configurations.
So you have ports for your auxiliary valve body, but you also have ports for all of your other...
you know, all of your other check balls that went into the case that did not have auxiliary valve body.
So, for example, the check ball that would go here, you have your two circular holes.
This is for the case.
And then for your valve body, low reverse, okay, you have your dual hole set up here.
Now, compare and contrast that with a later model plate.
This is the plate that we're actually going to install on this transmission.
you'll notice that in this location there's a square hole.
You see a square hole over a bathtub, you never install a check ball there.
Two circular holes, two check ball seating locations, that's when you install a check ball.
again same principle on the case side on the case side when we get over to the case the same principle will apply when it comes to bathtubs and in the spacer plate seating locations if you have the two circular holes you will install a check ball in that location but just wanted to touch on check balls real quick now if you put
a check ball in this location on an auxiliary valve body late case, you're going to have all kinds of problems in reverse.
So you want to leave that check ball out.
Likewise, you'll have problems in reverse if you leave it out in an early case, so 82 to 86 or early 87.
Again, the spacer plate is going to dictate what goes into the valve body and the case when it comes to check balls.
Your auxiliary valve body.
You must have a check ball in this location.
If you don't, if you leave it out, you're going to have all kinds of problems with bind-ups when you go to take off and forward.
Some models will have a little kind of captured cage or what have you, retaining the check ball.
This one doesn't.
I think they started that, I want to say, either 90 or 91.
That's just going from memory.
It's real late 700 R4s that I see it.
Now come back to the main valve body for 1993 there was an additional check ball location right around in here and those 93 models, which I believe are only installed in corvettes and F bodies that was for reverse input Okay, that was a valve body and separator plate that was attributable to that year only so um.
And, you know, to my knowledge, they're not interchangeable with any other year 700s.
So if you are, you know, working on an F-body, you know, Camaro or Trans Am Firebird from 1993 or a Corvette, you will likely encounter that valve body in that plate.
And, you know, that is for, you know, that one year only.
Similar videos: Performance Tips and Tricks PT

700R4 Performance Tips and Tricks PT2 - Accumulators, Shift Feel Calibration and More
4L60E High Performance PT4 - Valve Body and Spacer Plate Mods
700R4 Build Strategy for Mild to Moderate Performance Applications
4L60E High Performance PT1 - Parts Selection and Build Considerations
700R4 Rebuild PT3: Measuring for Pump Clearances