700R4 Performance Tips and Tricks PT2 - Accumulators, Shift Feel Calibration and More
Download information and video details for 700R4 Performance Tips and Tricks PT2 - Accumulators, Shift Feel Calibration and More
Uploader:
Nick's TransmissionsPublished at:
10/5/2023Views:
13.6KDescription:
Video Transcription
Alright, let's go ahead and discuss the 1-2 accumulator.
So, 1-2 accumulator is interesting.
There's a lot of different things you can do to kind of calibrate your 1-2 shift based on what you're doing with the spacer plate as well as the accumulator regulator valve and the valve body in terms of the spring you're using.
recall the discussion earlier in the video where we talked about how the spring on the 1-2 accumulator valve controls accumulation high-pressure fluid that will pool underneath the piston and help soften the shift based on what kind of spring you use well here's how that works okay so we'll just use this piston here no seal obviously and then we have our 1-2 accumulator housing so
The 1-2 accumulator piston will go into the bore just like this.
Then you will have your spring.
What happens is that regulator valve will introduce accumulator fluid under high pressure underneath the piston into this cavity here.
And then when the 1-2 shift begins to happen, feed oil will then go into behind the piston and begin moving it toward the spacer plate.
Okay.
and the spring will compress and eventually it'll hit the point where the piston cannot travel any further.
The spring will ultimately bind.
That's, of course, by design.
When this piston stops traveling, then the band is fully applied and the 1-2 shift completes.
The longer it takes for this piston to hit the bottom of its travel, the longer and softer the 1-2 shift will be.
Okay, so when keeping that in mind, you have to also think about hole size as well as what you're using for a servo for the 1-2.
So here's kind of the general rule of thumb, because all these different variables can be adjusted, you know, in concert with each other, and that's what you want to do.
But in general, the stiffer the spring you put here...
the less accumulation you're going to have almost irregardless of what you put in the 1-2 accumulator regulator valve.
So if you want maximum firmness, which again, I'm not going to actually recommend anyone do this, but let's just say you want absolute maximum firmness and you have no regard for how it behaves part throttle shift, you will install the most aggressive spring in the 1-2 accumulator regulator valve.
And then...
you will install a second gear accumulator spring from like an A518, A16, A618, Chrysler 46, 47, 48, RE or RH.
And you will stick that in there like this, okay?
And then you will drill the plate, I don't know, 86 to 93 thousandths for the 1-2 feed.
And then you also run a billet servo, okay?
And when you bolt this down to the case, you know, it'll actually bolt with this big-ass spring in here.
So it'll compress all the way down and bolt.
And this thing, this piston, will travel hardly at all, okay?
Again, I don't recommend you do that, but, I mean, here we're talking about an extreme case scenario, just for illustration.
You know, your band is not going to like you very much after a while.
I mean, you can certainly combine that with excessive band clearance, like a quarter of an inch per se, and I have a separate video on band clearance, but the looser your band clearance, the harder that shift is going to hit.
So, I mean, you combine all those factors, you're going to have one or two shifts, and then the band's going to just snap in half.
So anyway, that's just to kind of give you some of the theoretical underpinnings of the 1-2 shift in a 700 R4.
Now, 4L60E functions in the exact opposite manner.
So in a 4L60E, as you know, at least for later models, 96 and up, they go in like this, right?
So here's an example.
You have the small hole, small pin diameter.
And a common complaint is a late, harsh 1-2 shift in a 4L60E where a P1870 is not stored.
And so when you go and test the valve body after you pull it off, you realize the torque converter clutch regulator valve is actually in good shape.
So you know it's not worn.
And let's just, for the sake of argument, pretend that there's no other factors that could contribute to the storing of that trouble code are at play.
In other words, the torque converter itself is in good shape.
The rear stator bushing is in good shape.
Those are the other two kind of drivers behind the P1870.
What probably happened is the outer primary spring, because in 4L60Es, they have two springs until late model units, the outer primary spring probably broke.
And that's producing your late harsh winter shift.
Now,
This is under factory stall, you know, stock type applications and conditions.
So if a broken outer spring is producing a late harsh 1-2 shift in a 4L60E, your next logical question, which you're probably asking right now is, well, what would happen if I had a high stall converter?
would it be prudent to maybe leave that spring out?
And the answer is yes.
Leave it out.
In later model 4L60Es, they did away with that outer spring, and they just had the inner spring.
And so that kind of firmed up the 1-2 shift a little bit, reduced the designed-in slit, and prolonged the life of the 2-4 band.
So those are things you could do in a 4L60E to give you a little bit firmer 1-2 in concert with...
you know everything else that's involved you know servo plate hole size and you know what you're doing with the one two accumulator regulator valve okay um so that's the deal with the second accumulator or you know one two accumulator um again
your spring from your 48RE or 46RE second gear accumulator, that's a mod you can do.
I'd reserve that for extreme high stall applications only.
The rest of the time, you really don't need to do that.
All right, Transgo springs, I almost never install them.
In the 1.2, they tend to break.
I had torn down countless 4L60Es and 700R4s where the springs were broken, and of course, the complaint was a late, harsh 1.2 shift.
Alright, let me briefly talk about the pump.
And then we'll go over the case and we'll talk about fourth accumulator and case check balls.
Okay, so for the pump body, I'm just going to sit it on top of here.
Very, very...
Wise thing to do is to purchase Transgo's unbreakable pump ring kit if you're doing anything even remotely high performance.
So it'll come with a new priming spring for the slide.
and ductile iron pump rings that you'll swap the stock rings out and put those in.
And then, of course, you'll always replace your pump rotor guide and your vanes.
You don't want to reuse that stuff, at least not unless you have to.
And then, as far as your rotor and slide themselves, if they're in good shape, you can go ahead and keep using them.
Of course, that's provided that you're within your clearance, so one to one and a half thou for your rotor to pump body deck surface and one to two thou for your slide to deck surface.
Best practice is just to machine the pump such that your clearance is one thousandth for both.
All right, the only other thing I'll mention, I can't really show it to you because this is all assembled.
But for the drain back, you want to drill out that whole 9.30 seconds or 5.16.
I always use 5.16.
It's not, strictly speaking, necessary for stock applications, but for anything high performance or real heavy duty, it's just generally best practice.
And again, obviously, it'll require a shift kit.
All right, so for your pump cover and your stator,
Just inspect the stator, obviously.
Make sure that you don't have ceiling ring grooves cut into the bore, otherwise you'll have all kinds of problems.
You can install Sonex performance bushing in here in the rear stator location.
It's good practice.
I'm probably going to pull this one out and install Sonex.
I just put this in there, but then realized I should probably install Sonex bushing.
And then your front bushing is just going to be the standard bushing that comes in the kit.
These are a little bit longer than what originally went in there, so a little bit more stability on that journal for the input shaft.
All right, let's talk about boost valves.
Okay, boost and reverse boost along with pressure regulator.
Okay, for the 700R4s, if you're not going to run a shift kit, you're just going to put the factory pressure regulator spring back in there.
Not the end of the world.
The shift kits will come with a spring that gives you, I think, another 10% line pressure rise linearly across the board.
So again, real high performance, that's what you obviously want to do.
But if it's for moderate performance or even stock, it's, again, not a huge deal.
You can reuse the factory spring.
For the pressure regulator valve,
You don't have to do this with the 4L60Es.
I mean, you can if you want, but it's not necessary.
But for the 700R4s, it's best practice to grind off this inboard land flush with the rest of the valve.
When you do that, you give yourself full-time line to lube at all throttle ranges.
The 700R4 had a, you know, a land here, and it's the same, you know, dimension, same diameter as these two lands, and, you know, that was kind of restrictive.
And with the 4L60Es, they changed the design to have two flats machined into that land so that you get that additional line to lube.
So they kind of improved upon the design.
They realized this was a weakness in the 700R4 as far as, you know, pressure regulator valve, you know, engineering.
Okay, so I have a bunch of different boost valves here.
And I got a new reverse boost valve.
So it's always recommended you install new boost and reverse boost valves.
They come in, you know, a small kit.
You can purchase them just loose like this or as part of like a kit like Sonix makes.
They are typically worn when you pull them out from a transmission coming in for overhaul.
The other thing is you want to install a bigger boost valve than what the factory gave you in most cases.
This is going to be factory, I think it's like 392 or 370, something like that.
It's a real small valve.
So for those doing high performance, I mean, something like this will handicap you big time because it'll leave you exposed to having insufficient overall line pressure and boost pressure when you're shifting at wide open throttle, especially if you have an engine making big power.
So half-inch boost valves are what should be installed on all 700R4 rebuilds for any kind of performance application at all if it has a V8 engine, even if the V8 engine is stock.
um so i recommend it for everything basically uh this is one example this is not o-ringed no big deal um i've installed this particular boost valve into god knows how many 700 or fours
And this will give you very, very nice boost pressure, you know, upon heavy acceleration, wide open throttle.
And it'll keep line pressure up for your wide open throttle shifts a lot better than the factory, you know, little 374 boost valve.
Okay, here's the Sonnax O-ring version.
Same basic design other than the O-rings.
So, you know, your choice what you want to use.
If the bore where the boost valve sits is worn on your pump cover, then you'll want to run the Sonics, and that'll seal off the bore.
All right, as far as everything else with the pump is concerned, again, machine them.
Most of them need it.
You can mix and match rotor and slide combos.
If you want to put a 13-vane pump rotor in your 700R4, that's fine.
If you want to take a 7-vane design, an early pump, and put a 10-vane rotor and slide kit in it, not only is that fine, that's encouraged.
So a lot of different options there as far as interchangeability.
And I have a separate video that kind of talks through that.
All right, let's go over to the case.
All right, now we're over at the case.
We just talked to the check ball locations.
So this is going to be, again, a late model case, 1989.
So we're going to have our two check balls here.
This is going to be our 3-2 exhaust and our 1-2 shift.
And then we're going to have our check ball here.
This is going to be our D3 part throttle.
And then this is the TV safety check ball.
You can put this back in or leave it out.
It's up to you.
How it works is if the TV cable snaps or something else goes wrong, this check ball will seat, and that will max out the line pressure, preventing the transmission from burning up.
So I always reinstall them just for that reason, but again, it's optional.
Fourth accumulator check ball, just for the fourth accumulator circuit.
I'll discuss a mod here in a little bit.
And then here is going to be the low-reverse check ball.
This is something they started with in 1987.
It's usually captured.
However, you can take the ball out and leave it out.
What that will do is hasten or quicken the apply of the low-reverse clutches.
So for performance, especially if it's an application where you're doing a lot of back-and-forth driving or if this is used in some sort of heavy-duty application like a snowplow truck, getting rid of this check ball would be a mod you'd want to do.
And then up here, this is going to be for our low detent.
And this low detent check ball is only put in on early model units 82 to 86.
So I'll bring the Trans-Go plate back over.
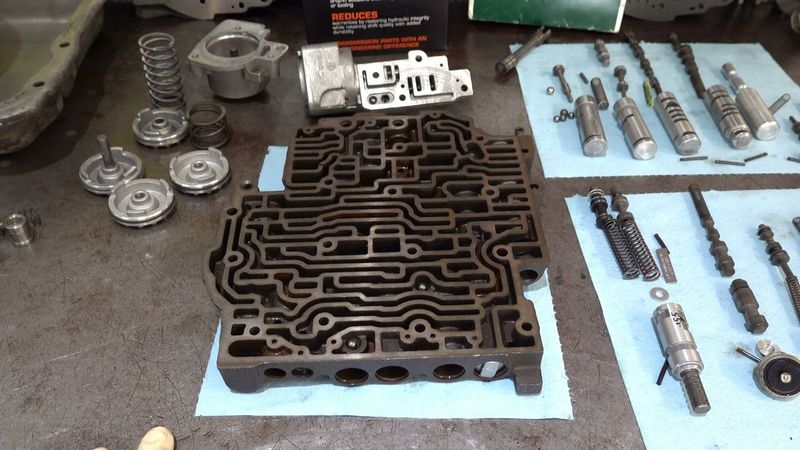
And as mentioned, this plate pretty much has holes and orifices that account for every single configuration that was ever put into a 700R4.
So again, we'll kind of just go over real quick.
TV exhaust, E3 par throttle, low detent.
And then you have your 3.2 exhaust, your 1.2 shift.
And then you're going to have your third accumulator check ball capsule.
Okay, so that's that capsule that sits in behind the servo.
Every once in a great while, you'll see one of these leak.
And it's usually because there's some crud, grit, or debris in there.
And once you clean it out, you test it again, it doesn't leak anymore.
I've never seen these leak.
I think maybe one time.
I shouldn't say never.
One time, I think I had one check ball capsule that was genuinely bad.
And I just replaced it.
All right.
So for the valve body, you have your three different check ball configurations on the plate.
So your D3 drive three check ball is going to be here.
This is going to be your third accumulator clutch check ball.
Again, that's different from the third accumulator check ball capsule.
That's going to be at this location.
And then for 93 model year units, you have your reverse input check ball.
And that's again for vets and F bodies or anything else that a 700R4 went into in 1993 for that model year.
And then, let's see, what else?
Val body low reverse.
So again, 82 to 86 only.
Non-auxiliary val body units.
You don't want to put a check ball in this location if your spacer plate does not have the twin check ball seating locations.
Same with the low detent.
Okay, for the case, you got the two circular holes side by side.
And then you compare that with a late model plate.
You notice you have your square hole here and your square hole here.
Do not put check balls in those locations respectively in the case or on the valve body if you're working with a late model unit with a plate like this.
All right, now, if you're familiar with the channel Automatic Transmissions out there on YouTube, that's Hiram Gutierrez.
He talks about some checkball mods in a video that he's done on 700R4s.
And he talks about deleting these two checkballs.
Well, this checkball, obviously.
I think he deletes this checkball and this checkball and this checkball.
Or maybe he leaves this one in.
And then he deletes the two Valbody checkballs, the...
third accumulator clutch, and the D3 check ball.
And what he says is that really firms up the shifts, or at least crispens up the shifts in a much improved manner.
And so if you're on a budget and you're not going to run a shift kit, you can do some of my mods in conjunction with some of his.
Now, I'm not going to
I'm not going to suggest you do that specifically here because I've personally never done it myself and I don't want to suggest anything to you that I've personally not done, tested, and validated that it actually works.
But if you've run across this video and you've seen it,
You know, it's something if you want to test, go ahead and do it.
It's not going to hurt the transmission.
I mean, you know, if you're in a bind up or if, you know, you go to shift and nothing happens and obviously then maybe that advice isn't valid.
Again, I don't know.
I'm only bringing it up because his channel is extremely popular and he's an incredible builder.
um, you know, extremely talented, especially with his teardown inspection videos.
So in case there's any questions around, you know, information you see in that video and you know, relative to the information I'm providing, uh, I just wanted to kind of touch on it so that, um, some of those questions could be answered upfront.
Okay.
Uh, let me go ahead and talk real quick about the, uh, fourth accumulator and some mods you could do here.
And then,
And then once we're done here, I'll go over gaskets real quick and then we'll wrap up.
So the fourth accumulator circuit in both the 700R4 and 4L60E is extremely effective in doing what it does.
So there's almost no limit to what you can do to try and crispen up that 3-4 shift.
One of the things that I like to do for pretty much almost any conceivable performance application, except for super high performance, is I like to use two accumulator pistons in this bore.
All right, now if you've watched some of my other videos, you've already seen this, but if you haven't, this is what it consists of.
You have your old fourth accumulator piston, so if this is the first time you're hearing of this and you're going to work on a 700, don't throw these large hole pistons out.
You want to replace them all, but you want to keep the old ones, okay?
Because what you're going to do with the old ones, you're going to take it like this, all right?
And then you have your new accumulator piston, and you're going to take the old piston, and you're just going to stick it in the bore just like this.
Okay, then you're going to take your new accumulator piston, leave the seal off for right now.
And what you want to do is you want to mesh the legs so that they don't interfere with the legs on the old one.
And just go ahead and drop it in right over top the old piston.
Okay, rotate it.
And what you want to do is you want to have it drop all the way down so it's fully seated.
And that's it.
Just want to make sure that the top of the piston is below flush here with this little cutout or conduit.
And that will be it.
That will firm up your 3-4 shift very nicely, all of the things equal, because we're eliminating about 90% of the accumulation that's going to occur in the 3-4 accumulator circuit.
So once you've verified everything is good, then just go ahead and stick your seal on and put the new piston back in with the seal, and you're good to go.
You can leave your check ball in place.
Now, for super high performance, you know, if you're doing something very, very high stall, and you're going to be, you know, doing a lot of wiring and throttle, looking closely into the board, you're going to have your fourth clutch accumulator orifice right there.
That's your feed.
What you're going to do is block that off completely so that no oil comes into this cavity or into this bore.
Now if you're going to do that, that basically eliminates all 3-4 accumulations so that everything that in terms of applied fluid goes right to the band.
So now if you're going to do this,
What you need to do is you need to keep this bore empty.
Do not put any pistons in here, any springs, nothing.
Just keep it empty because the reason you want to do that is so that oil that normally
would flow through this orifice and lubricate both the low reverse clutch pack as well as the back of the case, is allow the flow unimpeded to those areas.
If you put a piston in here, then nothing is going to flow.
So oil will still accumulate in this bore, but it will pass through and it will get to the areas within the case that it needs to get to, and you'll have uninterrupted lube flow to those vital areas in the rear of the case.
So if you're going to block off the fourth accumulator, you want to make sure that you leave this bore empty.
Okay, so last thing I'll touch on are valve body gaskets.
So you got your valve body, you got a spacer plate, and then you have your spacer plate to case.
All right?
so on the left we have our late model gaskets anything with a stripe like this it's almost invariably yellowish or yellowish green you want to use with your 700 to take an auxiliary valve body so you have all of your little orifices and feed ports or what have you for the auxiliary for the auxiliary valve body both in the case gasket as well as the valve body gasket
And then for the early units, 82 to 86, no auxiliary valve body.
You'll notice here there's nothing but bolt holes.
You have a hold-down plate that goes in here in place of that auxiliary valve body.
This is the gasket set to use.
So they're not marked.
There's no stripe.
And both the case and the valve body gaskets, there's no orifices for that auxiliary valve body.
Alright, so that should cover everything I wanted to cover when it comes to 700R4 tips, tricks, and mods, when it comes to the valve body, the accumulators, to some extent the pump, spacer plate, you know, all that good stuff.
One last thing that I'll touch on is the hole sizes and shift feed calibration.
So for what we're doing here, and I'll just kind of context set, this is going to be installed behind a Chevy 350 that's, from what I understand, very lightly modded, 300 horsepower, 325 at most.
And it's going to be used in some sort of dirt track or off-road racing application or something like that.
I'm still fuzzy on the details, but basically it's going to be raced.
And...
There's limits, from what I understand, that are imposed by the organization that's putting this on in terms of what mods can be done to the vehicle in terms of engine power and displacement and all that stuff.
And I think, for the most part, everything has to be either stock or very lightly modded.
The transmission, I don't think, has any limitations, but the engine does.
So anyway, what we're going to do is drill the plate per that application.
The stock stall is going to be used, so 1,600 to 1,800.
And so what we've done is drilled out the third exhaust and third feed to 125 thousandths.
The second is 76 thousandths.
So he's still going to drive this on the street.
So we don't want too harsh of a one-two shift at part throttle.
We're using the 093 Vette servo.
Low reverse, I'm probably going to drill this out to some extent.
I'm not sure which yet, but probably another 10% over what it is factory.
And I'll annotate what that is.
Or would I decide to drill it out?
This is your coast clutch feed.
I may drill this out as well, but again, I'm not 100% sure.
That's why neither of those are drilled out just yet.
And then here's your fourth at 125.
So...
and band release at 70 so this should give very firm crisp of shifts especially at wide open throttle or you know three quarters throttle and above but should be reasonably mild mannered in the street now if he tells me that the one two shift is still too harsh then we'll make adjustments um you know with the accumulator or worst case swap the plate out
I don't think I'll have a problem with the 125, but again, same deal.
If he does, then we'll swap the plate.
No big deal.
I definitely don't think I'll have a problem with fourth gear.
I mean, it's almost impossible to get that to shift too firmly.
Alright, that is the video.
Thanks so much for watching.
If you have any questions, comments, go ahead and leave them below.
If there's a tip or a trick that I didn't mention and you're aware of it and you've tried it and you know it works, please be so kind as to put it in the comments.
What I'll do is if I get enough tips and tricks, I'll go ahead and do a follow-up video for this and I will verbally cite you in that video as contributing to it as the individual who...
know who suggested the the particular mod um but feel free to suggest if i get a couple i'll annotate the uh comment section or not the comment section i'll annotate the description and recognize you there and yeah maybe i will pin your comment too i forgot we could do that in youtube so i'll pin your comment and i will um put a note in the description recognizing you as the um you know giver of the tip and this way everybody can benefit
Thanks so much for watching.
Enjoy the rest of your day or evening, and we'll catch you on the next video.
Similar videos: Performance Tips and Tricks PT
700R4 Performance Tips and Tricks PT1 - Valve Body
4L60E High Performance PT4 - Valve Body and Spacer Plate Mods
700R4 Build Strategy for Mild to Moderate Performance Applications
4L60E Build Strategy - 425 HP Street Strip (F-Body)
700R4 Rebuild PT3: Measuring for Pump Clearances
