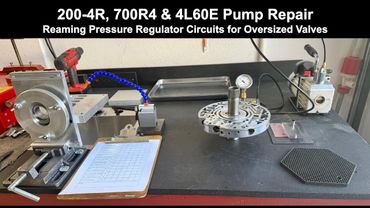
700R4 Valve Body Disassembly - (1988-1992)
Download information and video details for 700R4 Valve Body Disassembly - (1988-1992)
Uploader:
Nick's TransmissionsPublished at:
3/6/2023Views:
11.5KDescription:
Video Transcription
Welcome back.
Today we're going to be disassembling a 700R4 valve body.
This is out of a 1992 unit, so it's an 87 and up, which means it's designed to work with an auxiliary valve body.
So you can readily identify this particular vintage valve body by just simply looking over here where the torque converter clutch mechanical valve train was installed in the earlier versions of this valve body.
It was eliminated starting in late 87 so you won't have the little port here and of course this will be just cast over.
The only other thing I'll mention is this valve body is only designed for
one switch, that's the fourth clutch pressure switch, so earlier valve bodies had more switches.
So I'll do a video separately on all the different changes and iterations that GM made to these valve bodies through the years, but suffice to say that this was the second to last version, the late 87 through 92, and then they had one more change in 93 for those valve bodies.
And they went into the F-body platforms, Camaro, Trans Am, Firebird, et cetera, and the Corvettes.
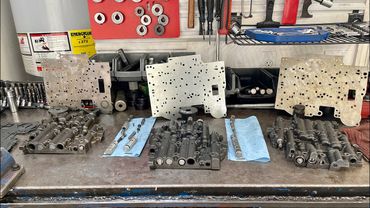
All right, so I'll do a quick run-through of the valve lineups.
So here's your main throttle valve.
So you got your throttle sleeve and plunger spring, and then the throttle valve itself is back here.
And then you have your 3-4 relay and 4-3 sequencing valve in this location here.
Whatever you do, do not stick your 3-4 relay valve in backwards.
If you do, you will not upshift to fourth gear.
This is your fourth clutch pressure switch.
Then you have your TV limit valve, accumulator valve, line bias valve, and 3-2 control valve.
And then of course your manual valve.
the back side you have your main four pattern shift valves so you have your one two throttle valve sleeve spring and valve and then your one two shift valve your two three throttle valve sleeve spring and valve and then your two three shift valve and then your three four throttle valve and sleeve and your three four shift valve and then you here you have your mtv upshift and you have mtv downshift
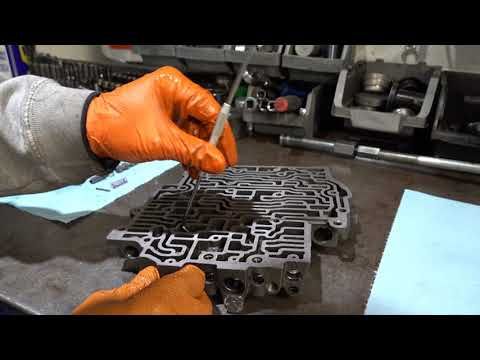
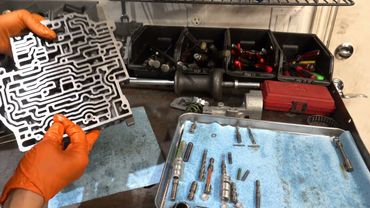
Okay, I'm gonna start on this side, take everything out, we'll line them all up, and then we'll do the same to the other side.
And then when I'm all done, I'll kind of reposition the camera so that you can see all the valve trains laid out.
So all these switches take a sensor socket.
This is made by OEM.
A standard 1-1-16 socket will also work and that applies to all pressure switches like this.
Okay, so for the throttle valve, they should have had them on the bench to begin with.
You want to have a good set of diagonal cutters.
So sometimes you can pry up on them and it'll come out like this.
But if it doesn't, if it's real stubborn, just take it, you know, whatever purchase you can get on it and then just wrap it up like that.
Okay, there's your throttle sleeve, your plunger and your spring.
Looks like a shift kit may have been installed.
So one of the more popular shift kits for these transmissions is the Transgo Junior shift kit and I install it on all my 700s irrespective of application primarily for the improved throttle valve that comes in that kit.
A real bad problem with the 700R4 is a sticking TV valve and that shows up as either inconsistent line pressures especially at
you know, at stall, but it can show up anywhere.
Additionally, high line pressure, if you have just like, you know, way too much line pressure at idle, you know, you got your gauge and you're, you know, screwed into the pressure port and the passenger, excuse me, driver's side of transmission, you're trying to set up your TV cable and your pressure gauge is just, you know, maxed out.
That's usually indicative of a stuck TV valve.
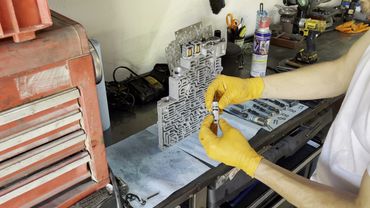
So sometimes this particular roll pin can be really stubborn, as you can see here.
So just take like tangle cutters and pry up and it'll eventually come out.
And your TV valve should just come out.
Okay, so here's the updated valve.
It comes with two stop springs or stop stick springs rather.
So you have a little spring that goes here into the into the snout.
And then you have an additional spring that goes on the outside of the snout.
Again, very effective.
Hang on, let me see if I can find a factory one.
So here's an example of a factory TV valve.
You'll notice here in the back, it's, you know, just one big land.
Whereas the Trans-Go valve has lands here that allow crud and debris and whatnot to pass through.
And then of course it has lands up here as well.
So again, more
areas where it can clear debris and grit and other contaminants that would otherwise cause the factory valve to seize up.
As you can see, there's no lands or anything like that in that location.
So, significant design improvement in my opinion.
And if you're building a 700R, it just makes sense to buy the kit for that valve.
We'll get the manual valve out of the way.
Okay, your next valve train is going to be your 3-4 relay and 4-3 sequencing valve.
And with many of these valves, you want to have a finger or a thumb, you know, over the opening so that the plug or the valve or spring or whatever doesn't fly across the room.
And there's a couple that are, you know, under a real high spring tension.
This one in particular, the TV limit valve.
So here's your 4-3 relay valve.
Notice how the big LANs are facing inboard.
That's how you want to go back with it.
If you don't, then there's a good possibility that you will not have, well actually not a good possibility, it's guaranteed that you will not have a 3-4 upshift.
messing with the cable, and trying to romp on it, and maybe checking out the servo, and seeing if one or more sealing rings got pinched or cut, but no, they're fine.
If that happens to you, and you kind of go through those progressions, and you don't find anything, and you're working on either a 700R4 or a 4L60E, check that 3-4 relay valve.
That could be the problem.
Alright, so just put a thumb here.
That'll stop the little plug for the TB limit valve.
Come on.
What I really need is a small magnet, but I don't have one.
Okay, there's your valve and spring, or I should say your plug-in spring, the valve itself.
Right here.
What I've noticed over the years is the springs are a different color.
I'm just talking generally speaking, the throttle valve spring, the 4-3 sequencing valve spring, TV limit spring.
I mean, I've seen all different colors.
I wouldn't read too much into that.
I'm not exactly sure.
what the significance is in different applications.
You know, got slightly different, you know, mechanical calibration in some of these valve trains.
So this is the accumulator valve.
It's a little in-plug.
And let's see if we can get that valve out.
There should be a spring in there.
The Transgo kit will come with different color springs and have you match your spring based on, in the case of the accumulator valve, I believe it's whatever servo you're using for your second gear.
So there's the 553, the 554, the 093, and then aftermarket billet style servos.
The 553
It was installed in most of the V8s, the 554, everything was like V6s.
The 093 is going to be your Corvette servos and they were installed obviously in Corvettes and in the 4L60E they installed them in F-Bodies and later models like the Escalades and the Denali's and things like that, GTO's they got them too.
Okay, so that's your accumulator valve.
Next up is the line bias valve.
And a lot of guys will tell you to block this valve off completely.
In other words, replace the spring with a rod.
I know that some of the shift kits have you do that.
They'll have like a rod that'll go in here and completely block the movement of that valve.
I'll be honest.
I don't know that I'd recommend that for a purely street driven application.
I think it's fine for
you know, street strip or obviously full race.
In fact, I do it myself for anything serious street strip or full race type applications.
But for just normal daily driving, grocery getting and whatnot, if you do block it off, you will have
you will have very harsh part throttle shifts, and that's not ideal.
For any street-driven application, you want to set up your mechanical shift calibration, whether it be a combination of valve body springs and different valves, governor setup, different shift point timing, etc.
based on um whatever application your you know your vehicle is going to be used primarily and for most street driven applications the idea is that you want to have mild mannered part throttle shifts but really crisp uh really uh
tight, for lack of a better term, full throttle shifts.
You really don't want a bang shift.
Even racing, you really don't want a bang shift at all.
You want that shift to be short and crisp.
And the higher the RPM, the shorter and crisper it should be.
Because otherwise, it's not going to be fun to drive and you do kind of run the risk of breaking parts inside the transmission.
Okay, here's your 3-2 control valve.
And it is also shy.
It does not want to come out.
So we're going to force it out.
Well, not literally.
I mean, it's just my clumsiness.
It wasn't seized or stuck in there or anything like that.
Okay, that's one side of the bow body.
Now we'll do the second side.
And then we'll start with the 1-2 control valve train, and then 2-3, 3-4, and then your MTV up and down.
I'm going to reposition the camera a little bit so you can see the valve trains.
So just, again, a bit of trivia, get into more details
in another video but the 1-2 valve train underwent significant changes starting in 87.
They redesigned the 1-2 throttle valve sleeve and spring to be much larger and eliminated the 1-2 low range upshift and downshift valves and they had their own sleeve and there was like another roll pin that went in to secure that sleeve and I mean just take my word for it if you haven't worked on one of those it's a pain to get back in sometimes.
Not all the time, but a lot of times you'll have to go at it for a few minutes before you finally get it in there properly.
Then there's the 1-2 shift valve.
Again, in the 82 to 86 valve bodies, they had a different looking shift valve in there to accommodate the differences in some of the other valving.
All right, that's the 1-2.
I'm gonna deal with the 2-3.
What's interesting to note is, so far anyway, I haven't seen any other shift kit components in this thing apart from that updated Trans-Go throttle valve.
Okay, so here's your 2-3 shift valve, or excuse me, your 2-3 throttle valve spring and sleeve.
And then the 2-3 shift valve will follow very shortly.
As soon as I can persuade it to come on out.
Overall, this transmission was pretty clean inside.
No major issues, no significant hard part damage.
Pump was a little scored up, but that's normal.
An 80700R4, 4L60E.
Pump is almost always going to be scored or messed up.
Put a little shop towel under there to prevent anything from falling through.
3-4 throttle valve.
Sleeve and spring.
And the 3-4 shift valve.
Sometimes it's not easy to get the camera angles where they need to be.
These valves normally don't fight you.
I mean, it's pretty rare that they're seized.
Usually what it is is
just adhesion, you know, they got trans fluid on them.
You know, they just don't want to come out.
You know, they're kind of stuck.
It's like suction, keeping them in the bore.
kinds of stuff to get it out of there.
So I'll use a paper clip sometimes, just bend it any which way to, you know, get into these tight spots.
Sneak its way in.
There we go.
There it is.
Did not want to come out.
Okay, this is your MTV upshift valve.
It's going to be under some spring tension.
there's a spring it's a factory spring okay so this spring is sometimes left out in performance builds i mean i do it too and the reason for that is the mtv upshift valve is basically designed to force an upshift at whatever rpm certain rpm so um a lot of times if you're you know doing something performance
that timing of that shift may not be optimal based on what you're trying to do.
So if you leave that spring out, then it won't shift.
You know, you won't have that forced upshift that you would have with the spring in.
So it's just a consideration for performance applications.
In a factory type, you know, daily driver that's not going to see any kind of RPM or not used,
In any sort of high-performance application, it's not necessary to omit it.
In a typical heavy-duty kind of towing and hauling application, you're usually not applicable per se.
I mean, you're never going to see the RPMs in a work truck that you would in, say, like a Camaro IROC or Vette or something.
Okay.
Alright, valve body is completely empty.
It's ready for the hot tank.
So let me reposition the camera.
I'll get the two valve trains together and I'll give you kind of a bird's eye view of them so that you have that for your reference.
The only differences between this valve train and the 82 to early 87 valve bodies is going to be in your 1-2
um control valve train here you're going to have a different looking um one two throttle valve and sleeve you're going to have two other valves and a second sleeve and you know as the year four mentioned one two low range upshift and downshift valves and then the one two shift valve is going to be different the um yeah this portion here
The stem, it's not going to be nearly as pronounced, and it's going to be a physically shorter valve.
But otherwise, it'll look similar.
And then in this area right here, you'll have the...
If the valve body came with it, you'll have a mechanical torque converter clutch lock-up valve train.
you'll have aluminum um slugs you know there's these two different size aluminum slugs you know one's a little bit smaller and narrower the other one's wider like roughly the size of these bores and that's what you'll have if you're working with an earlier valve body but other than that all the other valve trains are going to be exactly the same
So there's not much variability in the 700s as there is, say, to the TH-400, for example.
You had some, you know, different configurations, and that was application-specific, you know, make and application-specific.
All right, so there's all the lineups.
So if you want, go ahead and take a picture.
Let me fix the TV down real quick and I'll get out of the way.
So here are all the valve lineups.
Feel free to pause the screen or take a picture if you'd like.
You can find this information in the ATSG manual or factory service manual for any year 700 or four.
As I mentioned, the only differences between early and late are gonna be in this one-two valve train and the presence or absence of a mechanical torque converter clutch lockup valve train.
All right, so we'll get all this cleaned up, put it back together.
And we'll move on down the road with it.
Anyway, thanks so much for watching.
If you have any questions, go ahead and leave them below.
Any comments, any feedback.
Otherwise, again, thank you so much for watching.
Greatly appreciate it.
And we will catch you on the next one.
Similar videos: Valve Body Disassembly
700R4 Valve Body Differences, Changes and Updates from 1982 to 1993
3. GM 4L60E Rebuild - Valve Body Assembly
GM 700R4 Valve Body Assembly (1988-1992) and Transgo Jr Shift Kit
Always Inspect Your Remanufactured Pumps: 4L60E & 700R4
Замена сальники клапанов и цепи ГРМ. PEUGEOT 308 1.6 VTi 16v 120 (EP6