Blender Tutorial - Turn Any 2D Image to 3D Model - Quick & Easy
Download information and video details for Blender Tutorial - Turn Any 2D Image to 3D Model - Quick & Easy
Uploader:
Reality FakersPublished at:
4/19/2023Views:
754.6KDescription:
Video Transcription
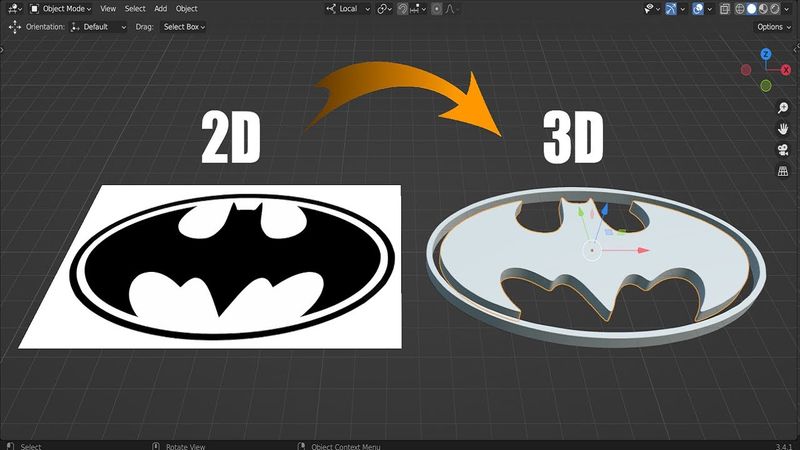
How can we convert any image type into a 3D mesh without modeling it in Blender?
All right, so first what I'd like to do is to add a plane.
So I'm going to select everything, X and delete, and let's shift A.
We need to add or to start with the plane.
You can zoom in here a little bit.
I'd like to press N and go to the item.
So these are the dimensions of our plane, two meters by two meters.
So our first step is going to be to match the same dimensions that we got in our reference image.
So this is our reference image.
I'm going to type right click and let's go to the properties and let me check the dimensions.
So we're having 1280 multiplied by 744.
So let's go ahead and do the same proportions that we got.
So here let's set it to 12.80 and here 7.44.
there we go so now it has the same dimensions of our plane awesome so the next step is going to be to subdivide our plane so on the edit mode i want you to press ctrl e and let's go to subdivide you will have this pop-up menu on the bottom so click on it and i want you to increase the number of cuts to the max which is 100.
So let's double click the tab so that we can reset the subdivisions and we can type again, control E and let's divide it one more time.
So the more subdivisions you have, the more clear you can have your final model.
So I'd like to increase the number of loops to, for example, two or even three, three is going to be fine.
All right.
So you can see we're having plenty of vertices here, which is awesome.
all right so for step number three we need to add the displays modifier so with this plane selected let's go to the modifier properties and we need to add this place modifier this one so click on it so basically for this modifier to work we need to add a texture to it so if you scroll a little bit down here you're gonna find this texture properties so I want you to click on it
And let's add a new texture.
So if you scroll again, you're going to find this new and open.
I'd like to open a new image texture.
And I want you to pick your reference image.
So double click on it.
And bam, as you can see, we got that reference image applied to our plane.
So this is how it works.
So basically, Blender is going to take the black surfaces and push them down like this.
And the white surfaces are going to be popping up just like this.
so we can reverse the extrusion up so let me just go back to the displace modifier and for the strength let's give it minus 0.25 to have it pop up in the reverse way something like this
Okay, so the next step is going to be to optimize this mesh.
So what I'd like to do first is to apply this displace modifier.
So let's go here and we can click on apply.
So next I want you to press 3 so that we can go to the right orthographic view.
On the edit mode, press Z, switch to the wireframe and you can click and drag.
Let me just zoom in a little bit.
You can click and select the bottom part.
x delete those faces all right so now all we have is just the top which is awesome also we're having some kind of uh we need to make it flat so what we can do is to press s z and press zero to flatten that surface all right so all the vertices right now are on the same level which is great so you can go ahead right now and just extrude this one up so you can press e z and go up like this
but as you can see this is not the perfect we converted our image successfully but if we zoom in you're going to find it not that good the quality is really bad so what we can do is to smooth this mesh out so to do that let me just show you the way so i'm going to press alt a to deselect everything so i'm going to go to the top select and select sharp edges so basically all we need is just these edges so i'm going to press 3 again and z switch again to the wireframe
b to back select and shift so that you can deselect at the bottom all we care about is just the top so shift d can you can try to move this one outside here press b separate selection right also we can change the center of origin to the center here so let's go to object set origin origin to the 3d cursor excellent so now we can select it from here
so let's go ahead and add the smooth modifier so that we can smooth our mesh so let me just zoom in here let's zoom for example here check this line so let's go to the modifiers and let's add the smooth modifier and we can increase the number of repetitions let's increase that to something like 30. so as you can see now we're having some pretty much smooth lines so all we have to do is just apply the smooth modifier
All right, so our next step is going to be to unsubdivide our plane, our mesh, so that we can have fewer vertices.
So it makes no sense to have this density of vertices here.
So let's select everything, and you can type Ctrl-E and choose this subdivide, unsubdivide.
So as you can see, we're having fewer details here.
We can also increase that number of iterations.
For example, three, or even four is going to be fine.
I think three is going to be fine.
Yeah, let's just go back.
Alright so with that being done so you can do some optimization to these edges just so that you can have the bevel working just fine you can select these points press M merge at the center and let's do the same thing to all those areas press M merge at the center so just keep doing the same step to all these corners.
All right, so it's working perfectly.
So what we can do right now is just fill these phases.
So let's press L to select this part.
We can press F to fill it.
Let me just go back to the solid.
And let's do the same thing here.
So I'm going to press Alt, Shift Alt to select both of those.
So if you press F, we're going to be filling everything.
So we don't want that.
So instead, what we need to do is to bridge edge loops these two lines.
So Ctrl E. And let's choose this bridge edge loops.
all right so there we go we got our mesh so all we have to do right now is to add the solidify modifier again so let's add it you can increase the thickness up so you might run into this weird problem so it has to do with the normals so let's select everything and type shift n and we can click on this inside so now our normals are oriented in the same directions which is awesome
all right so as a last move what we need to do let's right click shade auto smooth perfect and we need to add the bevel modifier so let's add it just so that we can smooth out a little bit these edges so right click shade auto smooth and basically that's it so we converted our image into a 3d mesh in blender so if you have any questions feel free to shoot them down below so thank you so much for watching and i hope to see you in future projects take care
Similar videos: Blender Tutorial

Turn Any 2D Image to 3D Model in Blender #blender #2dto3d #tutorial
Блендер уроки для новичков в скульптинге Blender 4.2 sculpt #3d #blender #blendertips
Как из svg сделать 3д модель в Blender. #blender #tutorial #svgto3d #shorts #3d
МОДЕЛЬ С ТЕКСТУРОЙ С НУЛЯ | Видео-туториал по Blender 3D и Substance Painter для начинающих.
Как создать идеальную сферу в Blender 3D