Building the RIG HIERARCHY | Toon Boom Harmony Rigging Tutorial | Part 6
Download information and video details for Building the RIG HIERARCHY | Toon Boom Harmony Rigging Tutorial | Part 6
Uploader:
DrawnSeanPublished at:
4/9/2022Views:
23.5KDescription:
Video Transcription
Hi guys, welcome back to part six of my video tutorial series showing you how to make your own cartoon from start to finish with Toon Boom Harmony.
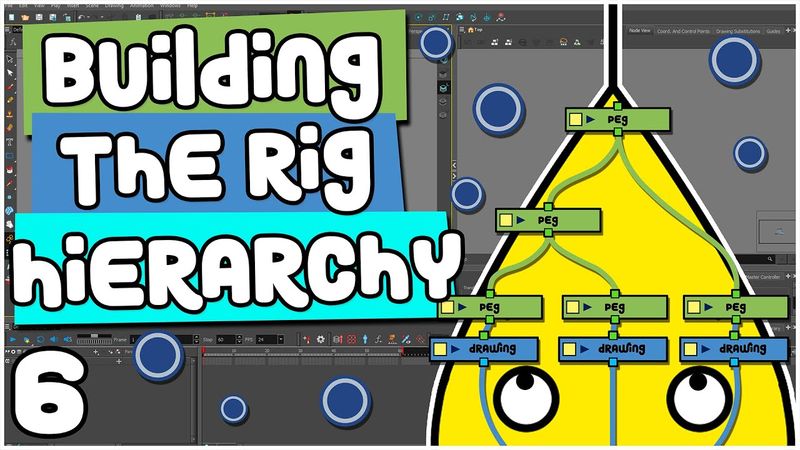
In the last video we made all of the art nodes for the various body parts of our character and in this video we are going to build the hierarchy in the node view.
So the first thing we want to do is we want to put all of these art nodes in order.
You can see here with the character that all of these different body parts are in a strange order, so you've got the foot behind the leg,
You've got the eyes behind the face, so let's sort that out before we begin.
So everything on the left side of the composite appears in front, and everything on the right side appears behind.
So what I'm going to do is I'm going to click this composite, I'm going to press Ctrl-C-V, I'm going to bring that up here, and click the yellow square, rename it Head Composite.
And then we're going to attach all of our head elements to this.
So we've got the mouth.
I'm just going to plug that in there.
The head.
So the head I want to be right at the back because all of the facial features are going to be on top of the head.
So we're going to move that mouth in front of.
We're going to take the eyebrow.
That can be in front of the mouth.
What else have we got here?
We've got the pupil so we can disconnect that.
We've got the eye.
We've got the antenna and the antenna ball.
So we can take all of those art notes, bring them over here.
I'm gonna have the antenna be behind the head.
and the antenna ball is gonna be in front.
Nope, actually, let's make it behind, because it is leaning backwards a little bit.
And then you've got your eyes, so we're gonna put the eyes behind the mouth.
Put that eyebrow just in front of the eye, and then we'll put the pupil between the eye and the mouth.
So there we've got all of our head elements, and we can plug that back into the main composite there.
Let's finish off this eye.
We're just going to fill this in.
Move that to the side.
Next we're going to make the arm composite.
So we're going to name that arms composite and that's where both of the arms are going to go into.
So we'll take our, we'll take these elements here and we'll just unplug those and we'll just move them over here.
We're going to plug those in.
So you've got shoulder one, arm lower, arm upper and the hand as well.
Where are you?
There's the hand.
So the hand is going to be on top and then the lower arm and then the upper arm and then the shoulder.
We'll have a torso composite as well, might change that later.
So yeah, this torso composite, and we're gonna name that torso composite.
And we are gonna plug the sun symbol.
I think we'll put the neck in there just for now.
And we'll put that neck behind the torso.
And then we can plug these back in so the head is in front of the torso.
So we're just going to put the torso next to where the head is.
And the arms are going to start behind the torso.
So we'll put that next to there.
We'll take these and we'll just arrange them in order.
We're also gonna make a legs composite as well, just like what we did with the arms.
And those are gonna be behind everything.
So we're gonna put those right at the back and then we'll put the foot in there.
The foot will be at the front, followed by the lower leg and the upper leg.
What you can do as well, you can do an upper body composite.
So everything that is the upper body will be the arms, the head, the torso.
So we'll plug those in there.
So you've got your upper body there.
And we're going to make a lower body one.
Just call that LB composite.
And then we can put the hip in there and the legs composite as well.
Actually, we're gonna call that leg 01 composite, because we are gonna be making another leg afterwards as well.
So we'll wanna plug that into this composite.
So now you can see everything is a little bit more organized.
You've got your head, your torso, your arm,
your hip and the leg.
So now that all of these are in order now we can add some pegs to our drawing nodes.
Now pegs are essentially containers which contain all of the animation information.
There's nothing visual, all the visual stuff is on the art nodes and then when you attach a peg to it that's what you'll be animating.
So the way you add a peg is if we select all of these here and all of these
I'm control clicking all of those so they're all highlighted and then I can press ctrl shift and p and that will add pegs to our drawings and you can see they've been created in timeline view as well.
So as I said before we turned animation tools off so we couldn't manipulate or animate our art nodes but these pegs are what will be used for animation.
So if I select the mouth there and then I move it somewhere, you can see a keyframe has been created in the timeline view on the mouth peg and not the drawing element.
So when you move it, a peg will automatically be created and that will store all the animation information.
Say you lose your position in the timeline,
to save you looking back and forth if you select an element let's select the mouth for example and then we come down to the timeline view and press O it will automatically snap to that node and the same with the node view as well if we select this arm we come into the node view and press O you can see that it gets snapped to that position so let's go back to the mouth and the peg so we're going to put that mouth back by pressing R
and we're just gonna delete that keyframe for now.
So if I accidentally move this arm like that, you can see it's created a keyframe and then it's gonna move back into place because I moved it on frame 20.
We're gonna delete that and we're just gonna make sure we stay on frame one.
What we can do as well, we can turn animate mode off
And that just means that no keyframes are going to be created when I move it.
So if I rotate this for example, there's no keyframes and it's going to stay like that throughout the entire scene.
I'm going to keep animate current frame on and just make sure I stay on frame one.
So the next thing we want to do is we want to create more pegs.
So we've got a peg for each drawing, but we want to create a hierarchy and that's going to help us when we animate.
You can see here I've got the hand.
When I want to animate, I'll want to move the forearm and the hand together, and then I want to go up the hierarchy again.
So I want to have the hand, the forearm, and the upper arm selected.
And then if I go up again, it'll be the same except with the shoulder.
If I go up again, it will be both arms.
If I go up again, it will be the upper body.
And if I go up again, it will be the entire character.
So we need to tell Toon Boom how that's going to happen by adding more pegs.
So the first thing we're going to do is we're going to start with the head.
We're going to start with the face.
So if you think about it when you're animating it will be very helpful to move the face separate from the head just for when you want the character to look in different directions.
so we're going to click around here and then we're going to press ctrl p and then we're going to call that face peg so we can attach all of these face elements here we're not gonna we're not gonna add the antenna just because it's gonna be useful to move the face without moving the antenna so we're just gonna attach all of these elements
to the face peg.
So we've got our mouth, eyebrow, pupil and eye.
So now if I select this mouth and I press B it goes to the peg and then I press B again and then it goes to the face peg.
And if I want to go down the hierarchy it would be shift B.
So B up, shift B down.
So we've got our face peg, let's press control P. This is going to be our
head master peg, and that will be the head and also the antenna.
What I might do for the antenna actually is create another peg for that.
We can call that antenna master, just so we can move both of those elements at the same time, and then the head master we can attach to that.
So if I select that ball, press B, antenna, entire head.
Let's do the same with the torso, so control P,
torso master and we are going to add all of these.
I'm actually going to detach the neck because we will want to move the neck and the head together.
So that's head master.
So I'm going to create another peg on top of the head and I'm going to call that head neck and then I'm going to attach that to the neck.
So for this arm, we are going to click the arm lower.
We're going to make another peg.
And for this one, we are going to attach the hand and the lower arm so that we can go hand, lower arm.
And then we will create another one for the upper arm.
And we'll plug that into there.
And we're also going to make one for the shoulder.
So we'll call that arm master, that one.
And we'll rename this one to arm shoulder 01.
You don't have to call it 01, you can call it A, B, front, back, some people call it.
As long as you can differentiate between the two, you're all good.
So now we can do our lower body.
So we're gonna do exactly what we did with the arm here.
So we're gonna call that leg master.
So now that goes up the hierarchy.
like so we've got the hip we will need a peg for legs both as well so we're just gonna call that legs both and then we'll be attaching the other leg to that later on so we've got our hip we're gonna put LB there for lower body and that will include the hip and both of the legs so we're gonna move that up here attach that into there and we've got our head neck and we've got our torso master
arm, shoulder.
So we're going to create an upper body peg for those.
We'll type in UB, and then that will be attached to the head, neck, the torso master.
So if I select that torso, or the hand, B, B, B, and it goes up like that.
There'll also be a peg for arms both as well.
So we've got the upper body there,
And we've got the lower body.
And now we are going to create a master bag.
So we'll call that master peg and then we can attach the upper body and the lower body to that and that is going to be everything.
So now we've got a basic hierarchy.
We'll have to add more pegs later on but for now that'll be fine.
And something else you can do as well to organize your node view further.
If we move this over to the side like that and we select all these pegs and then we come over to this little menu.
go insert, backdrop, that will make a backdrop for us, and you can change the color of it, a yellow, we can call it head, and then we've got our backdrop there so it's nice and clear where everything is.
We'll probably have to expand this as we add more nodes, so I'm just going to move that out a bit like that, I'll move that up, and then I'm going to move these down,
So this is our torso and we can do the same for this one as well.
expand it a little bit.
This is going to be our arm.
So I'll make that a dark green and I'll call that Armo 1.
And then the Armo 2 is going to be next to this.
So I'm going to move these over here just to make some more room.
I'll move that next to there and I will move this out because I'll need more space later on probably.
And then we can make one for the legs.
So I'm going to select that.
This time we'll make it blue and we'll call it leg 01.
Expand that a little bit.
So we've got room for the arm.
The arm 02 will be about here but we'll arrange stuff as we go.
We can keep the hip there.
And I'll put that up there.
So now everything is a little bit more organized.
So an important option that you will need to select as well is if we go on hand, we want to make sure that apply embedded pivot on parent peg is selected.
And that just means the position of the peg on the drawing layer, it will automatically be stored in the parent peg.
which is this one.
So make sure that is on for every node.
The second option I want to talk about as well is if we go into this peg we can see that it's set to 3D path.
We don't want that because we're only going to be animating it on a 2D plane and some of your animation can mess up if you keep it on 3D path.
So make sure that is on separate there.
Click close.
And just to make sure all of those settings are applied to every peg, we can press Ctrl A so that all of them are highlighted.
We can come up to this Set Properties on Many Layers button, and we can select Separate Mode, Use Embedded Pivot on Parent Peg.
Don't worry about these for now.
Animate Using Animation Tools is off.
That's the one we selected in the previous video.
And then composite mode, pass through.
I know I've been going in and out of the preferences menu over the last few videos, but the main thing you need to make sure of is separate position for pegs, default pass through for composite, focus on mouse enter, which we did at the beginning, and then support overlay and underlay arts, and element node animate using animation tools unselected.
Other useful options as well, we can do stop motion keyframes that will stop the keyframes from automatically being tweened or interpolated, which is more useful for the rigging process.
And then if we go into the timeline as well, click reduce indentation and that will just make this timeline view a little bit smaller and manageable.
So press OK.
So you can save those preferences as well.
Another thing you can do as well is if you go to Users, and then you go to AppData, just make sure the hidden files are shown.
So if you go to View, and just tick this box here, Hidden Items, and then you go to AppData, Roaming, Toon Boom Animation, Toon Boom Harmony Premium, and then if you do have a fresh install of Toon Boom at a later date, you can just replace these files with the ones that you've saved previously, and that will save all your workspace and preference settings.
So that's always something handy to have.
So the next thing we want to do is start working on the pivots.
So you can see if I go up to this hand and then I go and rotate it, what's going on here?
Hello?
That's not supposed to happen.
Well that's because if we press O in the node view, zoom in a little bit, and we go into our peg,
and we look at pivot information here, you can see that the pivot is zero.
And if I go into the drawing view for this hand and we turn on the grid, you can see the coordinates here and the pivot automatically defaults at zero in the x-y axes.
So we're just going to move that pivot where we want the hand rotating around.
And the way we do that is you might be tempted to grab the pivot and just move it like that,
However, that's just moving it temporarily just in case you want to animate it from a different point than where the default position of the pivot is.
And you'll notice there's a point there where the pivot used to be.
But you don't want to do that.
What you want to do instead is come up to here and click the rotate tool.
And it says there rotate layers can also permanently move a layer's pivot point.
So we'll select the hand and now we can move that pivot down
As necessary.
So what you could do, you could put it on the little dot that we made earlier.
And I just hid the hand then so I could see that dot.
So now when I rotate it, it rotates around the wrist like that.
So that's what we're going to do for every body part now.
Let's start with the head.
And we're going to go through all these pegs here.
And then we're going to do this peg, this peg, just so we don't miss any.
So for the mouth.
move it up to the middle.
For the eyebrow I actually put the pivot on the end there.
If you wanted certain pivots to be in exactly the same place as other pivots what you can do is you can open up the peg for the eye and you can see that it says zero zero because we haven't moved the peg yet.
We've moved the one for the pupil so if I open the pupil and move that to the side you can see the new coordinates for the pivot there so you can just copy and paste those values
into the other one.
And then you can see our peg is there.
I'm going to move it over just a little bit.
So the head, and the head is going to rotate around this point here.
Antenna, we'll place that at the bottom.
The antenna ball, we'll do it where it connects, so about there should be good.
And then the antenna master, you want that to be the same as the antenna.
so we'll open that and then we'll copy and paste those values into there and now it's moved to where the antenna was so let's move up the hierarchy and our face will be here so we'll just place it in the middle the head master as well that's going to be in the same position as the head so we'll open up both the head master and the head and again
Copy those values into there, mate.
So we'll just keep doing that throughout the whole rig now.
So torso master.
Let's do the sun symbol.
We haven't drawn the sun symbol yet, but we will.
It's gonna be around there.
The torso, we can have it rotate around there, say.
The neck will be rotating around this point.
Torso master, we want that to be the same as the torso.
come over to the arm we've done the hand already and we can do the arm lower now you'll notice i placed these dots here earlier and that was for this purpose of placing the pivots so you can just place that in the middle there like that same thing for the arm upper and the shoulder for the shoulder we're gonna have it rotating from this point here and then we'll go up the hierarchy again
So we want the arm lower master, which is the lower arm and hand, to be the same as our arm lower.
And then the same for this.
Arm shoulder is going to be the same as the shoulder.
So you can test this out now.
So if I rotate this hand,
Maybe I want to go up the hierarchy again.
You can move that up the hierarchy again.
We can move that arm up the hierarchy again.
We can do a little bit of shruggy shruggy action.
But the reason I placed those markers there earlier, if I rotate this arm you can see there's a nice perfect rotation there and you don't need to do any further adjustment to get it placed right.
So it just saves a little bit of time when you're animating later on.
For arms both,
we're just going to place though that in the center here and then moving on to the hip from the bottom and then the leg is exactly the same as the arms and then we can get that pivot now we can't see the top of the leg here because it's behind the hip something you can do is remember i spoke about this display node before you can make another one of those by control pasting or you can come down into the node view
display just like I mentioned before and drag it onto the node view or the quickest way you can press enter and press display.
Now if we bring this display node up to our leg, leg upper, so we can just put it in there and then we come over here and we can right click this
and we can click display that will bring up this menu here so then you can click this and click display one which is the one we've just made that will just display this particular node that you've attached it to and that will allow us to work on it without any of the other nodes
being visible something else you can do as well is if we go back to display all come down here to the timeline and we can click this button here enable solo mode and that will just hide everything except for that node there and then if you just want to toggle that on and off you can come up to here and click that there so we're going to get that pivot and we're just going to move it down to this point here so we can toggle solo mode back off bring back the rest of the elements
so now that we've done all of these levels let's start going up some more so we've got head neck and that is going to be in the same place as the neck and then we've got the upper body that's going to be in the same place as the torso master
And then we've got the lower body, which is going to be in the same place as the hip.
You've guessed it.
And then finally our master peg, and that is going to be placed
at the bottom between the feet.
So around about there.
So there we have it.
We have arranged all of the nodes in the correct order.
We have built and organized our hierarchy and we have arranged all the correct pivot positions.
So you can see we've got all these lines here.
So we need to start merging these together so that those lines disappear and they look all nice and neat.
And we'll be doing that in the next video.
Thank you so much for watching.
If you do have any questions, you can leave them down in the comment section below, or you can ask me live over on Twitch where I stream this stuff five days a week.
If you enjoyed the video and you found it helpful, please feel free to like and subscribe.
Your support really does go a long way.
And if you want to be notified of any future videos, you can click that notification bell.
Thanks again.
I'll see you in the next video.
Bye!
Similar videos: Building the RIG HIERARCHY
Character TURNAROUND | Toon Boom Harmony Rigging Tutorial | Part 14
Starting the CHARACTER RIG | Toon Boom Harmony Rigging Tutorial | Part 4
FINISHING the RIG | Toon Boom Harmony Rigging Tutorial | Part 13
DEFORMERS | Toon Boom Harmony Rigging Tutorial | Part 7
RIGGING Sonnie's ARM | Toon Boom Harmony Rigging Tutorial | Part 9