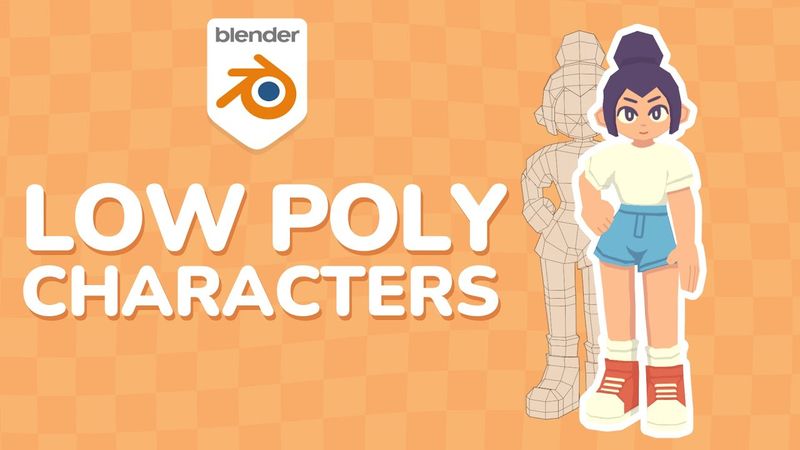
Creating Stylized Low Poly Characters in Blender
Download information and video details for Creating Stylized Low Poly Characters in Blender
Uploader:
lacruzoPublished at:
4/18/2024Views:
1.1MDescription:
Video Transcription
Hey everyone, if you've been following my work recently you've probably seen that I've been having a lot of fun making some low poly hand painted characters like the ones you see just now.
I've always wanted to do character work, but it's been one of the things that I've struggled with the most in 3D.
But I've slowly been figuring out a style and workflow that I'm really enjoying and I wanted to share a little bit of that in this video by making the character that you're seeing now.
I'll be sharing a little bit of my process for modeling, UV unwrapping and finally texturing the model.
I won't be going into rigging in this video as that's something I'm still very much learning myself and don't feel totally comfortable with explaining just yet.
But for now, let's head into Blender.
I had started by drawing out this character idea and dragging it into Blender as an empty for reference.
While it's not necessary, I do really recommend pulling together some references for whatever it is you want to model, or even drawing up something yourself, as it can really help visualize your idea and give you something to aim towards, especially if you're learning.
It doesn't have to be perfect of course, even just a little doodle can be a great starting point for your idea.
Now, starting with the head, there are so many different ways you could go about this, but here I'm keeping things quite simple as I'm very much going for the head style of characters from Wind Waker or going even further back to something like Mega Man Legends where a lot of the facial features are drawn out in the texture rather than being modelled out.
This keeps things pretty low poly and it's just generally a style that I'm really fond of.
I'm starting with a cube and adding a subdivision modifier to give us this nice spherical shape.
I then apply that modifier before deleting half of our sphere shape and adding a mirror modifier.
This just makes it super easy to edit our shape symmetrically and I'll be doing a similar thing with the rest of the character.
Quick note, if you're on a blender version older than 4.0 your modifier menu might look a little bit different but all the modifiers I use here still function the same.
I make sure to check clipping here as well as that will merge the points in the center and prevent us from pulling the shape apart.
I then start to push and pull this shape around to try and match the reference and get a bit more of a human-like head shape.
Using proportional editing by hitting O or clicking the button at the top there is really useful here.
It would have been good to have a side reference here also, but I'm just going on what looks good to me based on my experience.
I'm also toggling X-Ray on and off with Alt-Z just so I can see my reference through the model.
Here I'm pulling down some of the points at the front of the face before cutting out a simple nose shape with the knife tool.
You'll see I'm also going for more anime style proportions with the quite tall forehead and the lower half of the face pushing out a little bit.
Couple more adjustments and I'm pretty happy with how the head is looking.
Moving on to the torso, I like to start with a cylinder, this one having just 8 sides and once again cutting it in half before adding a mirror to it.
I then begin to flatten it out and after adding some look cuts, pulling in those points to help match our body shape.
To begin the arms, I take the top two faces here and inset them with I before right clicking and using the circle option within loop tools.
If you don't have loop tools, it comes free with blender and you just need to enable it in your preferences here.
Highly recommend having it.
I then pull this a little bit out to the side before deleting those middle faces.
Extruding this out, I start to create the sleeve of the t-shirt, ensuring there's some extra loop cuts where the arm meets the body, as the extra geometry allows for better deformation if you were to animate this later on.
and by extruding and scaling these top edges I start to form the top of the torso going up into the neck.
I'm also taking the time to move some of these vertices around to get a bit more of a natural body shape.
There is a bit of trial and error, and I feel like this kind of sums up the low poly style.
Because you have a lot less geometry to work with, you have to be a little bit more deliberate with how you shape things.
And that's something I quite enjoy about this style.
It's a bit of a fun problem solving process, at least to me.
For the arms, I'm simply scaling down and extruding out from our sleeve.
To start forming the hand, I'm extruding out and scaling that a bit on the Y axis before extruding a couple more sections and then beginning to flatten out that shape a little bit.
I then start to round this out a bit to give us a more natural looking handshape.
You'll see I'm keeping things super simple and not modeling out each individual finger.
Instead, we'll be creating that detail within the texture itself.
Finally, I'm extruding this face out and down to form our thumb before adding a couple loop cuts to give it a bit more curvature.
Once I finished adjusting things, I moved back to the arm and added a couple of loop cuts where the elbow would be.
Like I mentioned before, when it comes to posing or animating, it's good to have a bit of extra geometry where those limbs would bend.
To start the legs, I'm adding a new cylinder, this one with just 6 sides.
I then rotate it slightly so that the flat face is facing forward before adding a mirror modifier.
I delete the top and bottom faces before beginning to shape these out into our legs.
I'm extruding upwards and rotating a little bit to create a sort of V shape and this will begin to form the crotch area.
With clipping turned on in the mirror modifier, I'm extruding these top vertices and pushing them towards the center before filling in the shape.
To do this quickly, you can just select the two edges you want to fill and hit F on your keyboard.
You'll see me straightening out the top of the legs here and the super quick way to do that is just by selecting all the points you want to straighten out and scaling it by zero on the z-axis or x or y depending on the orientation.
After adding another look cut I'm pulling it out and down to begin to form the bottom of our shorts.
After extruding up to create the waist, I'm slowly going around and carving out our shape a little bit to make it feel less blocky.
I begin to extrude out the top of the socks here before quickly moving back to the leg and adding in those extra loop cuts where the knee would be.
I add a bit of curve to the leg before creating this triangular shape where the back of the leg bends.
You don't have to do it this way, I just personally like how this deforms.
And by pulling back that bottom edge I'm creating a bit more of a natural calf shape.
To begin our shoes, I'm first extruding out before pulling down to the heel.
I take these front three faces and extrude them outwards to begin to form the rest of the foot.
I'm deleting those stray faces at the bottom for now before joining up these two points at the sides and adding a few loop cuts to help shape this into more of a shoe.
Creating a horizontal loop cut, I strain it out and pull it down to act as the sole of our shoe.
I thought the shoes here were looking a little too big so I'm just scaling them back a bit before taking these top three faces and extruding them up to create the tongue of the shoe.
And finally I go back to fill in the base of the shoe.
I wanted to then join up the legs to the torso, so after extruding another little section here, I joined the objects together with Ctrl J before merging these vertices together.
A useful shortcut here is Shift R, which repeats your last action.
So after I merge those first two points with M,
I clicked on another two points and hit shift R and it repeated that action.
You'll see me then spending a bit more time just rounding out the body and giving it a little bit more shape so things don't feel too blocky.
I switch to smooth shading every now and then.
This just makes it easier to see if there's any problems or weird artifacts with the model.
And then just quickly taking the time to rename these objects and keep everything a bit more organized.
Before moving on I went back to the arm and repeated what I did with the leg joint, before also doing a similar thing where the fingers would bend.
Now a great way to get started with hair if you've already got a head shape like this is by selecting a bunch of the faces, duplicating them and then separating that into its own object with P. You can then take these new faces and inflate them out with Alt S and scaling it this way just helps keep it aligned with the head shape.
I start to carve out the back a little before coming around to the other side and extruding out what will become the side bangs of the hair.
Then I just fill in some of the gaps here and add a few cuts until I get the shape that I'm after.
To add some thickness to the hair, I'm adding a solidify modifier and then just adjusting things some more so that the hair sits nice and flush with the head.
For the hair bun, I'm simply taking a cube and subdividing it into a more rounder shape and then just rotating it into place.
Last thing to add are the ears, which are simply just another cylinder that I have flattened out, rotated round and made a slight adjustment to the shape.
And with that, our model is almost complete.
I just wanted to make a few final edits.
This one isn't completely necessary, but I took some of the faces of the head underneath the hair and deleted them since we can't see them.
And that just helps lower the poly count a little bit.
I made sure to apply the solidify modifier on our hair.
I had a weird issue where it made some faces in the middle, so I just had to delete them and make sure those center points were still merged.
Before I applied the solidify modifier I had onlyrim checked so that it didn't fill the faces on the inside, once again just to keep the polycount lower, but I did still have to manually fill in some of these faces that you could see from the side.
So we're ready to start UV unwrapping, and I'm going to be unwrapping the whole character onto one texture.
You can separate things out into their own individual textures, that works as well, but I just wanted to keep things super simple for this.
I'm sticking with a 1K texture, which is going to be high enough for us to get our details in.
But since I'm putting everything onto the 1 texture, there is going to be a little bit of crunchiness, though that's something I quite like.
A really useful thing here is if you open up the sidebar with N, under image you can change it to be a UV grid or a colour grid.
I personally like the colour grid.
but this will help us visualize our UVs on the model and make it really easy to see if there's anything we need to fix or adjust.
Just make sure to change this back before you start texture painting, otherwise this grid will be embedded within the texture.
You'll see I've created a new material and applied our image texture to it.
I've set it to emission as I'm going for an unlit style and I'm going to be drawing in some of the shadow details within the texture itself.
A quick way there to apply the material to all the objects is to select all the objects you want, make sure the one with the material is selected last, then hit control L and link materials.
Now I don't want this to be a whole tutorial on UV unwrapping as I'm by no means an expert myself, but a good rule of thumb is to mark your seams in places that aren't super obvious or where there are quite sharp corners.
I'll also tend to separate out each individual part of the character, like separating the shoes from the socks and the legs for example.
That Shift R shortcut comes in handy here again as if you've just marked a seam on an edge loop you can select another and repeat that.
If there are certain areas where I know there's going to be a distinct change in colour, like the shadow on the underside of the arm, I may cut them out onto their own UVs to make things easier later on.
You'll see I'm now selecting everything and unwrapping just to see how things are looking.
And that's where having this UV color grid comes in really handy.
As you can see, this also takes a little bit of trial and error, but since we're going to be doing some quite simple texturing, as long as there isn't any really obvious stretching going on anywhere, I wouldn't stress too much about it.
If you're happy with how your seams are looking, you can select everything and unwrap it onto the texture.
I recommend bumping up the margin a little bit just to give a bit of extra space between the islands and this will help stop any overlapping textures.
Now at this point you'd be ready to start texture painting but I like to take things one step further and again this isn't necessary but I like to organize my UVs a little bit just so I can easily see at a glance where each part of the character is.
So I'll tend to separate the clothes and the skin and the hair into their own little groups.
One other thing I did here is I took the face and unwrapped it using project from view.
This will give me a flat front UV of our face and would make it a little easier to draw on the facial details later on.
And after taking the time to do that, here's how my UVs ended up looking.
Again, you don't need to do this.
It's just if you like to keep things organized.
And with all that done, it's time to start texture painting.
I made sure to switch the image back from the UV grid so that we had a blank canvas to work on.
I started in texture paint mode by creating a new palette and sampling colors from my reference image.
You do this with Shift X now.
It used to just be S in previous versions, so it's been a little weird to get used to.
But just grabbing all these colors first and having them on hand makes things a bit quicker when we start painting.
I begin to block out the main colors first using the fill tool.
And I make a lot of use of the paint mask option, which allows you to only paint on the faces you have selected in edit mode.
And you can toggle that on and off using the square button at the top there in texture paint mode.
Before painting, I also really recommend to up that bleed value in the options.
This adds a little extra padding to where you're filling in your colors so you're less likely to see seams.
You'll also see in edit mode, if you hit L while in face selection mode, you can select individual UV islands that you've cut out on the model.
This just helps speed up the process a bit.
Make sure to regularly save your image texture, as I believe Blender doesn't do this for you.
You can do this quickly by hovering over the texture and hitting Alt S. With the main colours blocked out, I began to fill out some of the obvious darker areas that I had already marked out in the UVs.
And we're ready to start brush painting.
One thing I like to enable first is the wireframe in the viewport overlays.
I lower the opacity a bit but this just makes it easy to see exactly where I'm painting on the model since I'm doing this in an unlit style.
I also like to change the brush falloff to this more rounded shape as the default one is just a bit too soft.
And I also turn off pen pressure next to strength as I just want to be painting flat colours.
I also tend to change back to solid view with flat lighting as I find painting to be a little more responsive here than in material preview.
From here now I'm really just trying to match my reference as best as I can and having that extra viewport in the bottom left there with the full view of the model comes in really handy as I can easily see how my textures are looking from a distance.
Another little useful thing here is turning off occlude and backface culling, which lets you paint through the model and helps with something like this where I know the line on the t-shirt is going to be the same on the other side.
Just make sure to toggle it back on when you're done.
I make use of the stabilize option under the stroke menu.
Helps a lot when drawing some of these line details.
When you're getting into these sort of in-between areas, it can be helpful to turn off the visibility of the mirror, which you can do by hitting that little screen icon in the modifier.
When it comes to this unlit style, you just have to be mindful of where the shadows would most likely be on the model and how you can paint them in to really sell that look.
Because we don't have a lot of geometry to work with, we really have to create those details within the texture itself, which is a really fun process but can take a little time to get things looking right.
And this tends to be a bit of a back and forth between painting things in and taking a step back to see how it looks with the full model.
Here I thought the socks were sticking out a little too much and looked a bit weird with the texture, so I just scaled them in and rendered it out a bit.
It's okay to make minor adjustments at this stage as long as you're not pulling things around too much.
When it comes to the face, this is usually something I'd do in an outside program like Photoshop as it offers a bit more control, but I wanted to try and keep things within Blender for this.
And using x-ray here in front view helped me try and match those facial details to my reference.
With the last bit of shadow on the underside of the hair, our character is complete.
If you made it to the end, thanks so much for sticking around.
I really hope you enjoyed seeing some of the process and hopefully picked up a few tips along the way.
I also wanted to announce that I've opened up a membership over on my Ko-fi, where I'll be sharing some extra behind the scenes of my projects.
You'll also gain access to some project files, including the character from this video and the vending machine I shared a few months back.
But of course, if subscriptions aren't your thing, these files are also available through the shop.
Thank you again for all your support, and I'll see you around.
Similar videos: Creating Stylized Low Poly Characters in Blender
Tutorial: Blender MODELLING For Absolute Beginners | Low Poly Girl
I Created THIS in 10 Minutes in Blender using Poly Haven Library

ASMR - How I Make Actual Good Coffee (Soft Spoken♡)
Room Blender Tutorial With Commentary

The Secret to Hand-Painted | Pixel Peeps Weston Reid