Everything wrong with this Bead Roller
Download information and video details for Everything wrong with this Bead Roller
Uploader:
my mechanics insightsPublished at:
3/21/2025Views:
76.5KDescription:
This video was recorded and uploaded at April 16th 2023. In this video I'm showing you all the details on this bead roller. Going over each individual part and analyzing if they are original or not and why. Also inspecting all the fitments and checking its functionality. This bead roller was sent to me by a subscriber from Switzerland. I knew I needed a bead roller for the car restoration, that's why I started restoring it. Unfortunately I couldn't finish it in time and that's why I put this project on hold. Now it was the time to finally finish it. My plan was to get it completely perfectly working again, but at the same time keep as many original pieces as possible. The goal was also to make the new pieces match the over 100 years old bead roller. Unfortunately I couldn't find any pictures of this exact bead roller how it originally looked. I just searched for antique bead rollers and looked at designs of handles and screws these had. There was a lot to design: the crank, the adjuster handle, the thumbscrews, the dead stop, the pivot guiding screws. Overall I'm very happy with my design choices. Be sure to check the full restoration video on my main channel and let me know your thoughts on it in the comments. Here's the link: Huge thank you to all of my Patreon supporters and especially to: Aaron White Adel AlSaffar Alfonso Baz Andrew Egerton August Kupfer Ben Burns Sigoss Family Bold Cheddar Brenna Redpath Chris Ulivarri Edward Conway John Shebanow Joseph Kamps Josh Ledford Joshua Scher Kar Kerem Yollu Kyle O'Keefe Lambda GPU Workstations Lorraine Hughes Marcus H. Mark Tesmer Michael Fleisher Mo B Nick Houston NoLoneSurvivor Peter Cyprian Peter Pearson ReddDirt Ricky Adolphe Ryan Pickett Scott Tomlin Stefano Di Biase Stuart Tyler Carruth Vickie Bligh Vince Valenti Yale Baker Albert Siemers Alex Manning Andre andrew Anton Pchelkin Arni Bjorgvinsson Ben Simmonds Benny Big Ole' Bran Bobby herrera Bonnie Williamson Brian Hoerl Briscolone05 Bruce Boschek Caleb Betczynski Chad Bryant Charles D Chris Faehl Chris Visscher Chris Walter Christian Fjelldal Christopher Lobay Communidad Damien Fuller-Sutherland Daniel Varga Dave Hardware David Chang-Yen David Lehnus David P Hruska David Thompson Derson Jacomini Dustin Davis Eddie Erik Nordby Flo Sauter Gareth Rimmer Hakan Uzunoglu Heidi Jeffs Ivan Marks Jack Curry JacopoBello James Hare Jesus Fernandez Cortes Justin Miller Kiro Ivanovski Kyle Edgar Laurent Bolli Leevi Kontkanen Marc Cerisier Mary Casella Matthew Johnson MDC Mihai Máté Tamás Molnár Norbert Spaar Oleksandr Oliver Quandt Panagiotis Mavrommatis Pat Nakajima Rania Zainalabedin Raoul Kriesi repülő búgás Roan Fryer Rob Sherfick Robert Landrum Ross Clark Sam Sarah B. Scott Brooks Scott Marshall Sparrow Spencer Kormos Stanley Dimant Stefan Heymanns Svenja Kuckla Taylor Stimpson Thanny Tim Holt Timofey Lychik Trevor Kam Tucker Ifft wdwfan78 William Sorry for my bad english, it's not my language. I try my best to improve my technical english. Thank you for watching :-) „I make a new one“ T-Shirts: My Main Channel: My Patreon Page:
Video Transcription
Everything wrong with this bead roller.
I just disassembled this bead roller, cleaned all the parts with the parts washer and started to inspect everything to make a detailed plan for each part of this restoration.
First things first, this bead roller was produced in Rupperswil in Switzerland around 1917 by a company called Ferrum.
They usually make can-seamer machines and are still in business today.
I contacted them but unfortunately they don't have any information anymore from this bead roller.
The other aluminum tag was added later by the previous owner of this machine.
So it is not an original piece and I won't put it back on it.
Unfortunately I wasn't able to find out what this company was making.
I couldn't find any information online.
After cleaning I put the bead roller back together to inspect its function and all the fitments of the moving parts.
I can definitely say that it is still in working order although the machine has definitely seen some better days.
Almost all the guided sections of the shafts and moving parts have a lot of play due to years of use.
The machine has been repaired and modified a few times and a lot of original parts have been replaced.
Let's just go over every single point I figured out.
As just mentioned the aluminum tag was added later so I won't put this back on it.
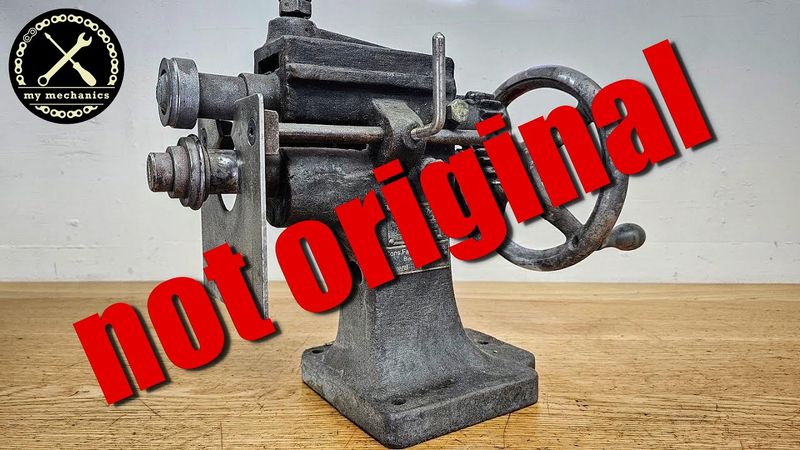
The handwheel is definitely not an original piece of the speed roller.
It kind of fits the design of it, but it was definitely added later at some point.
You can just see that because the shaft is longer than the bore of the handwheel.
It's also made from cast aluminium.
All the other parts are cast iron.
And also almost all the bead rollers have cranks, not hand wheels.
So I'm definitely going to replace this one with a crank.
You can just tell by looking at it that this dead stop is definitely not original.
The plate is made from stainless steel attached with socket allen countersunk screws.
These two rods might be original as they look pretty old, but also these two small steel plates look like they have been added later.
While doing some research I found most bead rollers have the front plate as thick as these small plates, also having it directly mounted to the two guiding rods.
This design with the small plates and the relatively thin stainless steel faceplate makes the whole deadstop a bit fragile and sometimes difficult to adjust.
So I'm definitely going to change that with a more rigid solution as well as a more looking like a hundred years old design to fit this antique bead roller.
Then there's also these two clamping screws or how you want to call them for a dead stop.
These seem to be self-made with a piece of bent threaded shaft.
They're also made from stainless steel and you can tell by the look of them that they are definitely not original.
so I'm also going to replace them with a more appropriate 100 years old looking design.
Maybe something like a T-shaped screw, a knurl screw or something like a wing screw.
I don't know just yet.
This depth adjuster crank also does not look original.
It's just a bent rod welded onto a hex screw head.
I'll also make something new here.
Maybe a little crank would be nice or a T-shaped screw.
This was also far from the not original parts that I am going to change to recreate a more antique look.
Now let's take a look at the functional parts and all the worn out fitments.
But first of all I am going to show you the function of this bead roller.
You can roll over a 90 degree edge for example or just make some beads into sheet metal.
It is definitely a must have machine for a car body workshop.
You will always have a set of dies installed in front of the two shafts.
They are always a pair and you choose them whatever kind of job you want to make.
With these two dies I can make a round bead into the metal.
To function correctly the dies need to be aligned with each other.
Means the round profile of the upper die needs to match the profile of the lower one.
To achieve that you can adjust the position of the lower die with the lever.
By moving it the shaft is moving back and forth.
Once you got your dies aligned you can lock the lever position by tightening the screw in the back.
Now you need to adjust the distance between the dies with this crank up here.
You just set it to the correct distance regarding the thickness of your sheet you want to work on.
Now everything is ready to start rolling a bead.
Just guide the sheet metal into the dies and start turning the handwheel.
I can move the sheet around freely with one hand and make curves and such.
Or I can just set the deadstop to a certain distance to run a straight and consistent beat.
Also the throat opening here defines how big your sheet can maximally be.
Or how much distance you can roll a bead to the edge of the sheet.
So this machine still works as you can see, but all the fitments have a lot of play, the dies are not running through and overall it feels very sloppy.
So it really needs a restoration.
Let's go over everything I need to fix here to have a perfectly working machine in the end.
So first of all there are a bunch of small washers installed on the lower shaft.
These eliminate axial play from the shaft.
This play is coming from the section of the shaft which is definitely too long for the adjustment lever.
I could turn his shoulder back on the shaft but because the gear is attached with the tapered pin I would still need washers to adjust the distance.
As well, I think this is not the original 100 years old shaft.
Also just by the look of the key slot in the end.
Usually machinists back then used slitting saws instead of tiny end mills to make such keyways.
You can also see some clamping marks from a freejar jug right here.
The shaft also has a bunch of play in the bushing in the front here.
So I'm going to make a new shaft from scratch.
Taking a closer look to the adjuster lever.
It has a lot of play inside the body.
I can't really make a sleeve onto this section.
Also welding up material is not really an option because the area is too big and I'd risk the part to warp.
And because this part looks like an original one I'm going to restore it.
I'm going to turn this outer diameter clean and round on the lathe.
To achieve a nice fit I'm going to widen up the hole in the body and install a sleeve.
I also need to replace this brass sleeve here since it's not even round anymore.
It also seems that it has been pushed back because right now the shaft is touching the body on the chamfer.
It's rubbing against that and you can already see how chewed up the shaft looks on the chamfer.
This screw is guiding the adjuster lever in this spiral slot to move back and forth.
When you fully tighten the screw it will actually touch the shaft and lock it.
And this is not what it should do.
You can actually see the marks of the screws on the shaft right here.
To avoid that the screw needs to be loose all the time or you'd need a lock nut.
But since the screw doesn't look original anyway, I'm going to make a more elegant solution where you can fully tighten the screw against the body and still be able to move all the parts.
A similar problem is also on the opposite side of the body.
This screw locks the position of the adjuster lever.
It just pushes onto the adjuster lever directly, steel on steel.
You can also see quite some marks of that.
So I'm also going to remake that with a more elegant solution.
I'm thinking about a brass pin between the screw and the lever and also a nicer design for the screw head.
The upper shaft also had these three washers between the gear and this piece.
I can't see any function of them except for reducing the actual movement.
And looking at it closely, they seem to be on the wrong side of the shaft.
Because right now the gears match when the lever is in one end of its position.
On the other end the gears just engage on their edge.
Theoretically it should be even.
Means the gears should match in the middle position of the lever.
This would be the case if the axial play of the shaft is eliminated on the left side.
The shaft also has quite a lot of play in this piece.
As this piece is too thin here already I can't install a bushing therefore the only solution will be to make a new shaft as well.
This piece which holds the upper shaft pivots around these two holes in the sides.
They look a bit chewed up because the tip of the screws don't really fit in there.
But not a big deal, I'm just going to clean these holes up and restore the rest of this part, as it looks to be in working condition otherwise.
Just talking about these two screws, there's the same issue here, like on the lower one from the adjuster lever.
When tightened completely it actually clamps the part, which it shouldn't.
So I'm also going to replace them with new ones.
fully tightened don't lock anything and also making some nice appropriate matching screw heads for them.
The gears themselves are looking a bit rough but they should be restorable.
I'll try to close the tapered holes so I can later drill and ream new ones to get a nice connection with the new shafts.
So right now you got a pretty good overview from this project.
It kind of brings the Ship of Theseus problem to light.
There will be barely anything left from the original when I'm done, because there's already barely anything left from the original.
But since I want to keep this bead roller as a tool in my workshop, like the Beverly Shear or the Arbor Press for example, I want it to be in perfectly functional and working condition, yet still with an antique look.
Thanks for watching.
Wait wait wait, don't turn off the video just yet, I got some more information.
So I just started working on the body and found something very interesting.
I widened up this hole with my DIY boring head and removed this press fitted brass sleeve, then I took a closer look at all the threads and had to realize that most of them are imperial size threads.
BSW, British Standard Width Wolf to be precise.
I just assumed all of them are metric because it's a Swiss product.
It's indeed actually quite common for such old products to have imperial size frets.
That's not the first time I've seen that.
All the frets in the body are different sizes of BSW frets.
But I also found some metric frets on this bead roller.
The two screws holding the deadstop plate.
But on these it was already obvious that they are not original.
I was more surprised to find a metric thread on the screws that hold the dies.
I mean it was clear that this zinc plated screw is not 100 years old.
But I really thought this big slotted screw was original.
Turns out it is not.
So I am also going to replace both of them with new ones.
Since both screws have M8 threads.
Means also the shafts have M8 inside frets.
But I kind of knew before that both shafts are not original and 100 years old.
Thanks for watching.
Similar videos: Everything wrong with this Bead Roller

Recreate WWTBAM Classic UK 2001-04 Intro (Widescreen Ver.)

UNDYED BOX OF BSN: full undyed vs surprise undyed 💕

SFM| The Deceiver | Follow Me (Remix) - TheRapptor (FNaF song)

ASMR Scratching & Plucking with Clawed Gloves over a Wig with lots of Crinkly Tape Underneath

BLOOM fanmade ENCHANTIX ✨WINX CLUB✨Transformation Fan Animation