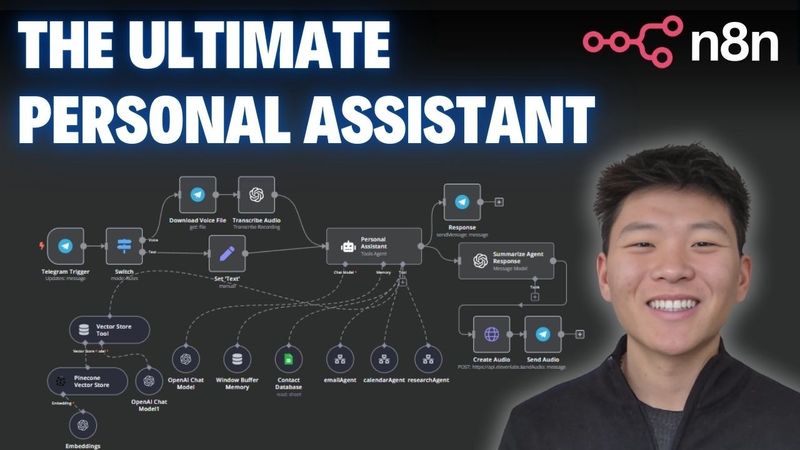
How to Build a Personal Assistant AI Agent in n8n (Step-by-Step, No Code)
Download information and video details for How to Build a Personal Assistant AI Agent in n8n (Step-by-Step, No Code)
Uploader:
Nate Herk | AI AutomationPublished at:
11/29/2024Views:
134KDescription:
Video Transcription
Hey, personal assistant, can you please create a calendar event for tomorrow with Michael Scott at noon for a meeting?
And then can you email him to confirm if that time works?
And then finally, can you grab all of my calendar events for the rest of today?
Thanks.
Okay, so we just sent that off to Telegram.
It's transcribing that audio.
It's now hitting the personal assistant and the assistant's going to take the contact information.
It's going to create that calendar event with Michael Scott.
Now it's going to hit the email agent so that it can send out that email to confirm if that time works.
And then finally, it should come back to us with a text message as well as a voice file or an audio file that's going to be telling us about
what we asked for so here's the information the calendar event was created the email was sent we've got our information about the remaining events for today and now as you can see that audio file is being created so let's listen to that real quick
A calendar event has been created for a meeting with Michael Scott scheduled for tomorrow, November 29th, 2024, from 12pm to 1pm.
An email confirming the meeting time was sent to him.
Today's remaining calendar events include a meeting with Michael Scott from 12pm to 1pm, dinner from 5pm to 6pm, and dinner with Michael Scott from 7pm to 8pm.
If further assistance is needed, please let me know.
Awesome, so that's how this works.
That's the agent that we just saw right here.
We're gonna be jumping into the build, so let's get into the video.
All right, so now we are going to get into the actual step-by-step tutorial for the demo you just saw of the personal assistant.
So we opened up a new workflow.
As you can see, we've got personal assistant step-by-step, and we are just going to start building out this agent.
So first thing we wanna do, obviously, we're going to grab the actual agent.
So we're gonna grab an AI agent here.
And we're going to leave this as a tools agent.
We'll get into the prompting of this guy sort of as we start to add more tools.
But that's all we got to do to start with.
So as you saw in the demo, we were talking to this agent through Telegram.
So we're just going to go ahead and get rid of this trigger real quick.
And we're going to add a Telegram trigger.
So we've got different triggers.
We've got different actions.
But we are going to do a trigger of on message received.
So that way, any time that we text our Telegram channel, it will basically start this workflow for a personal assistant.
Just a quick reminder, as always, the workflow for this whole assistant and the other agents that we're building out today will be in my Freeschool community.
The link for that will be down in the description.
And if you're looking to get a little more hands-on, you're looking to go further with AI automations with N8N, then feel free to check out my paid community.
That link for that will also be down in the description.
And then finally, if you're looking for some sort of assistant, if you're looking for automations, if you want me to build out some of this stuff for you or for your business, then go to my website down linked in the description and book in a call and let's chat.
anyways back to the build what we want to do now is add the chat model we have to add the brain for this assistant so that it can you know think about what we're asking it it can think about what agent it needs to go to what tool it needs to go to and then it will ultimately give us a response so in this case i'm going to be using 4-0 just because
It's going to have a ton of different tools connected to it, and we want these responses and the sending of data across workflows to be as accurate as possible.
So I'm going to go with 4.0 here.
Now we're going to add memory.
That way, when we're talking to this assistant, it has context of previous messages.
So we'll click on this plus.
We're going to add window buffer memory because it's super easy.
It's going to store this memory in N8n, and it's super easy to set up.
But one thing that you have to do here is we have to set up the session ID because if you leave it like this,
it's not going to work because it's looking for basically this would work if you're chatting with it through a a chat trigger so if we go to a chat trigger right here and we connect this if we chat with his agent through the trigger we just say this now it will go to the window buffer memory because we have it configured to take from the previous node automatically and in this case it's coming through as you know json.txt or something so or chat id anyways
If we're to do this with the Telegram trigger, so if I click, let's just get rid of this.
We hit test workflow and then I pull up my Telegram real quick and we just say, hello.
It's going to go through, but it's not going to actually store in the window buffer memory.
So what we need to do is we need to see how the chat's coming through from our Telegram.
We can see that it's coming through right here.
Let's go to schema actually.
And we can see it's coming through as the chat ID.
So all we need to do in here,
is instead of setting this from take previous note automatically, we're gonna define it below, it's gonna be an expression, and we're going to be pulling that chat ID from the telegram trigger.
So we'll click on telegram trigger.
What we need to do is go to .item, .json, .message, .chat, and then we go to ID.
So now we have that ID in there, as you can see, that is what's being stored as the key for our session ID.
We'll hit save, test this workflow again,
We'll come into here in Telegram and say hello.
And no prompts specified.
Okay, we have to do this also.
We also have to define where we're getting this from.
So the text that's coming into our agent is no longer the chat input that's coming from a chat trigger.
What we're wanting is the text that's coming in from Telegram.
So chat.text down here, we'll drag this in here.
And now we're getting the actual message.
We can hit test step now.
and we can see that it's being stored in the window buffer memory so the past videos i've had some people ask questions about that that's all you have to do you have to define the agent where it's getting the message and you have to define for the window buffer memory what channel it's being stored in so that's how that works
Another thing I'll touch on real quick is with the actual Telegram trigger.
If you're having trouble connecting your credentials, once you're creating a credential in here, you basically just need to get your access token, and then you can see you have this URL.
So in Telegram, all you're gonna do is you're gonna set up, you're gonna talk to, let me pull up my Telegram real quick.
If I just expand this,
a little bit more.
If I go back here, you'll have your Botfather.
And so you'll go into your Botfather and that's how you can get your access token.
You'll have to plug in some credentials.
It's not super difficult at all.
If you are having trouble, you can click on open docs right here.
It'll walk you through exactly how to set up your, you know, your API, get your bot access token.
You'll talk to Botfather, you'll enter this command and it's super simple.
So then once you get that set up, you'll just pretty much plug it in and then you'll be good to go for the rest of the time that you want to talk to Telegram in NNN.
All right, we have the brain for the agent, we have the memory for the agent, and now we're going to start adding on the tools.
This is where the magic really happens.
So the first thing we want to do is we want to get a contact database into our agent so that it has access to different email addresses, different phone numbers in case we want to send a text, an email, calendar invite, that sort of stuff.
So in this case, we're just gonna be using a Google Sheet.
You could do a contact database in Airtable.
You could do it into Pinecone.
If you had a big repository of contact information, you could put that into Pinecone, a vector database.
In this case, we're just gonna be using Google Sheets to keep things simple.
And as you can see, we have information here and this is what we're gonna be giving our agent so that it can reach out to the correct people.
So we're gonna click on this plus for tool.
We're gonna grab a Google Sheets tool.
You'll have to connect your account here.
It's very simple.
You can also click on docs and you can figure out how to go to Google Cloud, set up your credentials, your OAuth consent screen, all that kind of stuff.
And I've also walked through that in other videos, like the NNN masterclass, other videos on my channel like that.
But anyways, what we're doing here is we want to connect the right documents.
So we're going to grab, this one's called contact database, the sheet, there's only one sheet.
So now that it knows it's pulling the information from here, we can leave all of this as is, we're getting rows, all that kind of stuff.
So we're just going to rename this our contact database.
Okay, so we've got that information into here.
That's super simple to set up.
And now we just want to make sure that all this information is working.
So let us really quickly test the workflow.
We'll basically just come back into our personal assistant and we will say, can you get me Nate Hurk's email?
And so this is actually not going to send anything back to us in Telegram because we haven't set that up yet, as you can see, but it went through the logic and then the agent would actually be responding.
Nate Hurk's email is natehurk88 at gmail.com.
As you can see, it sent over this query to the Google sheet and in here it pulled Nate Hurk and it found its email and then sent that back to us.
Real quick, what I'll do is we'll just set up the Telegram message.
That way for the rest of the time we're testing, it's actually gonna come back in Telegram.
So we're gonna add something after the agent because typically it's going to get a query.
It's going to figure out what it needs to do.
It's going to hit the specific tools and then it's going to output something over here.
As you can see, one item was output and we want this output to go to Telegram.
So we're gonna grab Telegram.
This time we're gonna do an action.
So down here, we will see message actions and we will see send a text message.
So at this point we have our Telegram account already connected.
So we're good to go here.
Now we just need to configure what this node is gonna do.
So we're gonna be sending a message.
The resource is gonna be a message.
As you can see, there's files, there's other stuff we can send.
We're sending a message.
And now we need to set up our chat ID and what the message is going to be.
Because we have our trigger connected, it's really simple.
We'll click on Telegram trigger over here in schema and we're gonna be looking through this information and we're looking for chat ID.
So the exact same thing that we gave our window buffer memory, we're going to give that to Telegram so it knows what channel it wants to send this message back to.
So we can grab right here, chat ID, we'll drag it right in there and it's as simple as that.
We are now set up.
and then we just need to configure what text is actually going to be coming through through the telegram so text right here all we have to do is we just want what whatever the agent's saying that's what we want so we're going to grab the output from the ai agent
drag that into there.
And now we can see we have our channel set up and we have our tech set up.
So if I hit test step, pull up Telegram, now we got that information.
Nate Hurk's email is natehurk88 at gmail.com.
And then we also got this.
This message was sent automatically with NNN.
What we can do is go to add field, append NNN attribution, and then just flick that off.
We'll test that again, open up Telegram.
And now we got that message in Telegram, but we didn't get that attribution.
So it's really clean.
That's exactly how we want it.
And we've pretty much got this guy set up.
we'll just name this um response and now we can see we have our telegram trigger and then we have our agent and it will be actually responding to us in telegram so we've got this kind of foundation set up now let's continue to add more tools okay what we're going to add now is an email agent so what we're going to do is we're going to go open up a new tab we'll go back to the home screen of n8n then we're going to add a completely new workflow so once this loads up we'll click add workflow
and this one is going to be an email agent.
So now we have an email agent that we're going to be plugging into our personal assistant.
So the first thing we obviously need to do is add the trigger, which is going to be when called by another workflow.
So this workflow is going to be called by our personal assistant whenever we ask, can you send an email?
Can you get my emails?
That sort of stuff.
So this is the agent that's going to have all the actions within our Gmail.
So we're going to add an AI agent once again,
We are going to just call this guy the email agent.
It's going to be a tools agent.
We'll get rid of this chat trigger because that's not how we're going to be interacting with this agent.
And once again, we're going to set up our chat model.
For this one, we'll use for many because it's only going to have a few tools.
We don't need to give this guy any memory really.
And now we just have to add tools to this agent that is going to be a tool for the personal assistant.
So what we want to do is grab Gmail.
And this is really cool because within Gmail, we have a ton of different actions we can take.
And we're gonna keep this agent very simple, just like we did in the personal assistant 2.0 video, but still use cool use cases of what it can do.
So this first one, let's just do sending an email.
call this guy send email.
We've got our Gmail account connected.
We want to be sending a message and now we need to configure the to, the subject, the email type and the actual message that's coming through.
So what we're gonna do is we're gonna use this cool expression called from AI.
If you want to go more in depth a little bit of how that's gonna work,
you can feel free to watch my video.
I'll tag it right up here where I dive into this actual function, but it's just a really cool way to have AI interpret an incoming query and actually send out messages on our behalf, filling in these fields automatically.
So the first one we're gonna do is the actual to field.
So in here, we're going to grab from AI, and we are going to put in the key of what this from AI is looking for.
And this is just gonna be,
We'll just say email address, and then I want to define, actually, we need to throw the quotes in there.
So we've got email address, and then I actually want to define what that means just in case.
So the email address we are sending to.
Okay.
So we've got that set up.
We need to do a very similar thing with our subject.
So we're going to come in here, also do from AI.
then this time we're just going to say subject and we can leave it as simple as that we want to change the email type to text and then in the message we are going to do once again from ai and we are going to say email body and so this really should work we will test this out of course first thing i want to do is we want to go to append attribution we want to turn that off and then in this case we can add a sender name so um
Let's say we're always gonna be sending from me, because this is my personal assistant.
So I'll put Nate in here.
And this won't actually always sign off the email.
This is basically just saying when it comes through in Gmail, who is it gonna be sent from?
So we'll see that in action.
We'll save this.
And then real quick, let's come in here and we'll just test out what this stuff's gonna look like.
So if we come in here and we put in the query, because when the personal assistant is going to be,
sending information to the email agent that we're building right now, it's going to send off a query.
So we're just kind of putting in sample information of what a query could look like.
So let's say that we asked, can you send an email to Nate Hurk?
And then also it would be giving that email because the personal assistant is grabbing the contact data and then it's forming a query to send over to the email agent.
In this case, it's already gone and got my email.
So it would send that over as well.
and we'll just say asking what's up.
So that's the query that we're gonna be testing.
This data will be pinned, so now we can come through and test this information.
And we will pretty much just be testing the send email function, so we can see how information is coming back.
We'll hit run, no prompt specified.
Okay, so once again, we can't just be taking it from previous node, we have to define below.
And what we're grabbing is json.query, as you can see, now it's coming through.
And now we'll test up.
We'll see that it's gonna hit the send email tool.
Okay, so we're airing.
Let's see what's going on here.
Provided authorization.
Okay, so I just need to refresh my credential.
Let me just log in and do that real quick.
So good learning opportunity right here.
If you have your OAuth credential set as just a test app and you put in your information, I think those credentials expire every few days.
So you just have to log in and do it again.
But if you publish your app, then you should be good to go.
So anyways, this information filled out automatically, right?
So we got the query that was, can you send Nate Hurk an email, all this kind of stuff.
And so now this automatically filled that in.
So it grabs the two, which is natehurk88.
It grabbed a subject, it made a subject, what's up.
And then it made an actual message, which as we can see, the message was, hey, Nate,
Just wanted to check in, see what's up with you.
Hope all is well, best your name.
So the reason it signed off as your name is because we just haven't prompted it.
The sender name, as you can see, we filled out down here is going to be sort of static sender name in our Gmail.
So let's open up the email, um, refresh this and we should see the email that we just sent off.
So we got what's up.
Um, so you can see right here, this is, this is the Nate.
That's what we put in the sender name, but if we want it to actually sign off, we have to prompt the agent.
So, um,
Really quickly, what I'm going to show you is a cool GPT that you can use.
If we come into here and we just say, an agent who takes action in Gmail, it should sign off all emails from Nate, never using placeholders.
Okay, so we set that off really easy.
It's a super simple prompt.
Shout out to Tyler who showed me this GPT.
Super awesome.
Great work, Tyler.
But anyways, it's gonna make it a super cool SIM system prompt for you, and it's gonna be in Markdown.
So the agent's gonna understand like, you know, the headers, all this kind of stuff.
So we've got that really quick.
We'll copy that, go into our email agent, and we will add a system message.
And then we can come in here, paste that in.
And so now it's gonna be signing off as Nate.
So let's save that.
Let's try this one more time.
It's gonna send us another email.
I'm gonna pull up the email in here, refresh this.
And so now at the bottom, you see it's signing off, best regards, Nate.
So that's sort of how that's gonna work.
Let's go back into the email agent and let's add another Gmail tool.
This time we are just going to be
So you can see there's, you can expand off this agent, give it tons of different actions.
You can add labels, you can delete messages, you can mark stuff as unread.
You have, you could basically add a tool for all these functions.
In this case, let's just get many emails.
Okay, so we have to set up the limit.
We have to set up, we wanna be asking like who they're coming from.
So we'll say sender.
And as you can see, there's different ways you could filter, you know, you could filter by date, you could filter by the status, all this kind of stuff.
So you could,
configure this to say if you wanted to get all emails from the past five days.
You could come in here and you could set up the received after and the received before, and you could have the from AI figure out what it needs to do as far as what filters to put in here.
But for now, we're gonna keep it simple.
We're just gonna do a limit and we're going to do a sender.
So in the limit, we're gonna again use from AI.
Okay, let's get rid of all this.
We're gonna be using from AI.
and we're basically just going to be saying limit.
And I think we should be good to go with that.
We'll test it out.
And we don't want this to be simplified because this is gonna return a simplified version of response instead of the raw data.
So in our use case, in this example video, it should be fine, but basically it's going to cut off emails.
So if you have long emails coming back and you don't want them to be simplified, you wanna get all the content of the email to come through, then you're gonna wanna turn off simplify.
And then sender, once again, we'll make this an expression.
We will do from AI.
And then we're basically just gonna be saying the sender, we need to put the quotes.
Sender email ended off with quotes and we should be good to go here.
And then we'll just call this one, get messages.
Okay, so we've got this tool connected also.
And now let's come in here and change the query.
actually first what I want to do is I need to send some emails to this inbox so that we can actually get them back so give me a sec to do that we now have two emails in the inbox they're coming from a different email as you can see in here they're coming from up at digital at gmail.com which we have associated with Michael Scott so anyways that's why they're signed off Michael but they're coming through as Nate because my actual email is Nate anyways we have this email stuff coming back and now we're going to put a query in here that says can you
grab my past emails from Michael Scott.
And it would also at this point be getting that email.
So up at digital.gmail.com.
And this is just something that I like to do when I'm testing out different workflows.
You put obviously the example query that would be coming through and then you can go ahead and test them.
So let's run this.
It's now understanding that it needs to get messages rather than send email.
And it should be giving us basically a summary of those couple of emails that we just got back.
So we'll come in here and we'll see your current emails from Michael Scott.
So it pulled all this information back and there's actually a ton.
So because in here, it's not just these two, we didn't set them as a filter to only pull back unread messages, only pull back messages from the past couple of days.
And also, if you remember in the query,
We just said past emails.
We didn't say like past two.
So if I say, can you grab my past two emails from Michael Scott?
Now we'll run this again and it should be grabbing that limit because we put in, you know, the limit of how many emails that we were asking for right here.
So now it says limit two from a bit digital.
And now it's just basically making a summary of those emails.
So right here we only have two emails, email one was project mountain and email two was wanna grab lunch.
So if you can see right here, we have project mountain and want to grab lunch.
So now we see the limits working, we see that it's getting it from the correct email and then once you understand this concept, you could come in and start to add in more filters like if you only wanna get certain dates, if you want them to only be unread messages, all that kind of stuff.
But this is just to give you an idea of the foundations of how these tools work within agents and how this agent is a tool for the overarching agent of the personal assistant.
So now all we need to do here is we want this agent to respond back to the personal assistant.
So if we grab a set field and we just call this field response, and all we have to do is drag in this expression, which is the information coming back from the email.
So we can see we have two emails.
It's summarizing them.
And then this is what the agent's going to get.
So real quick, we'll just call this response.
We'll hit save.
And so this workflow is called email agent demo.
Now coming back into the personal assistant, we're going to add a tool and we're going to do call NNN workflow tool because we're calling a different workflow.
This guy's going to be called email agent.
Just copy this into here as well.
call this tool to take action in email.
Sorry about the cursor right there.
And so now we just need to configure which it is.
So you can choose from lists, you can choose by ID, but list is really easy.
We can just come in here and grab our, actually we might need to refresh this page because yeah, we're gonna have to refresh this page.
So save this.
Refresh the page because it wasn't refreshed since we made that new workflow called email agent demo.
So now we can come in here, grab email agent demo right there, as you can see.
And this is where we set up the response earlier.
So the field that it's looking for, once the personal assistant sends off a query to this AI agent right here, it's going to be looking for a field called response.
So that's why back in this workflow, we set up the set field, we call it response, and then we gave it the answer, which is the response.
So now it's looking for that, and then it will actually hit it and be good to go.
So if we test this guy from here, we'll hit test workflow, we'll come into Telegram and we'll say, can, this emoji thing is annoying.
Okay, can you get my past two emails from Michael Scott?
So just like the query we put in, as you can see, it has to, oh, this actually might be an issue because it didn't grab the contact data.
So let's see what it said.
It looks like there are no past emails from Michael Scott in your inbox.
If there's anything else you need, let me know.
So what happened is it didn't understand that it had to first get the contact information from Michael Scott because then in the email agent, it was just looking for, you know, it didn't actually know who to go to.
So let's go into executions of this email agent.
And this is the one that we just hit off.
And we can see in here, it doesn't have a sender email.
It just made up this sender email, michael.scott.example.com.
So that's why we need to prompt this guy to understand that it needs to look for contact database first.
So let me do the same thing.
I'll go into that GPT, make a prompt, and then I'll be back in a sec.
Okay, made a super quick prompts using that GPT.
We outlined the role, we outlined its tasks, we gave the tool overview and usage guidelines, which is super important, outlining what each tool does, when to use it.
And we basically had to tell it to use the contact database before going to try to send an email or make a calendar invite, stuff like that.
then at the bottom under reminders you know we gave it examples too so showing how things should be done which is super important the process of it but then at the bottom we want to add another reminder that says here's the current date and time so we basically just came in here and grabbed the function um dollar sign now and it would originally look like this which you know the computer unders can understand it but it looks ugly so if you type in format then you can grab this and you can change the way that the date comes back so that's how that works we're gonna hit test workflow
That's now listening for us.
We're gonna ask, can you get my past two emails from Michael Scott?
We'll send that off, and now it should be hitting the contact database before it actually goes to send that information to the email agent.
Now it's getting those emails, it's gonna respond to the personal assistant, and then it should hit us back with a message, which is summarizing those two past emails.
So as you can see, we now have email one, email two, which is exactly what we just saw.
And real quick, we'll just test another one, we'll say,
We'll have it just send an email real quick.
Can you send an email to Nate Hurk asking him how the Project Mountain is going?
So same thing, it will hit contact database.
It's gonna grab Nate Hurk's email, and then it will pass off that query to the email agent, which should send an email.
And then the personal assistant should let us know that it did that.
So the email has been successfully sent inquiring about Project Mountain.
And let's go to the email real quick.
Refresh that.
So now we got inquiry about Project Mountain.
Hope this defines you well.
I wanted to check in, see how Project Mountain is progressing, all that kind of stuff.
So one thing I think is super important is before you start to add more tools, you want to play with the prompting.
You want to play with what's currently going on.
It's going to save you a headache down the road.
So now that we know that these functions are working, we can now come in and add a calendar agent.
That's the next one we're going to build.
So we're going to hop over to a new workflow.
we know that this email agent is pretty much working well.
And like I said, you would start to add more tools onto here.
But now we're gonna add a calendar agent.
So new workflow.
This one is gonna be the calendar agent.
And first step as always, we're gonna be calling it by another workflow.
So we've got this trigger.
We're gonna add an AI agent.
And this one's gonna be the calendar agent.
So I'll move a little faster on this one because it's gonna be the same principles pretty much as that past one.
We've got our agent.
We will once again, we saw that 40 mini worked fine for that email agent.
So we'll go with 40 mini again.
We don't need our memory.
Now we can just come in here and start to add the tools.
So our accounts are connected.
The first one we're going to do is going to be creating an event.
We are going to connect our calendar and now we just basically need to configure start time and time.
And then an additional property that we want to add is, you know, we can add attendees.
We can also add summary, which I think the summary is the actual title that shows up as the, what's it called?
As the title in calendar.
So this is what we're gonna do here.
And yeah, let's just start filling in that from AI stuff.
So first what I wanna do is add a sample query so we can play around with this data.
Let's say that we ask the calendar agent to set up a calendar event
for 5 p.m. for dinner.
So we've got this.
And so if it comes through like this, it basically means that we're just doing a personal calendar thing that we just wanna block off some time.
And also you can notice here that we haven't specified an end time.
So all we're giving it is a start time.
And so this should be interesting because in this node, which is creating an event, we have to give it a start time and an end time.
So from here, we're going to do, once again, we're gonna be using from AI, which is awesome.
Oops, I don't know what just happened there.
We're gonna be having from AI, and then we're just gonna say, in quotes, start time.
I'm pretty much just gonna copy that, and we're gonna add that in here, and then we're just going to say end time.
So this is something where in the prompting of the actual agent in here, this is where we want to say like, if an end time isn't specified, just assume it's going to be 30 minutes after the start time or an hour after the start time.
So we'll play with that.
And for summary, once again, we're going to grab a from AI and we're just going to say event title.
Okay.
So we've got this and
We're pretty much just gonna test it out.
I'm not gonna prompt anything yet.
We'll just see what happens.
So we've got this.
We will hit, once again, we didn't specify.
So define below, you wanna grab the query and now we'll hit save and now we'll run this again.
So now it understands what we're asking.
It's gonna create an event.
And also I just realized, okay, this will be interesting to see.
Let me pull up the calendar.
I don't know where it created it because we didn't give it any sort of,
Yeah, so as you can see here, it came through as 2023, October 10th.
So that's interesting, but we can see that it made the end time an hour after.
So let me come in here and prompt this agent.
We wanna give it the current date and time so that it also knows when to make these events.
Okay, so we want to keep this prompt shorter straight to the point because it's a calendar agent and right now we're only going to give it three tools.
So we're going to give it create event, create event with an attendee and then also to get events.
So we kept everything super simple and we gave it the current date and time and we're just going to leave it as this for now.
So once again, we'll try this.
We will see that it's going to hit the calendar event.
You can come in here and see now that it's getting it accurately.
This is the correct date.
This is the correct start time.
And then it called the event dinner.
So if we go into the calendar,
There it is.
So 5 p.m. We have dinner that was just created Thanksgiving dinner as you can see today's Thanksgiving, but anyways Now that that's prompted in we can add another tool.
So if I can just copy and paste this event right here We are going to call this tool create event With an attendee and so the reason that we're doing this in a separate workflow is because we have this option here for attendees
And so if we were to do this as just one thing, and it was not to invite an attendee, it would leave this as null, and then it would probably, it would fail on the calendar creation side of things.
And so there are some options to get through this.
You can use specific operators, like there are some cool operators.
which I'm planning on making a video about like some advanced tips and this kind of stuff but like you can use two question marks you can use two pipes and that sort of stuff will help you sort of almost dynamically tell if something's null you'll go with this but to keep things simple in this personal assistant build we're just going to add two different tools and it's super simple so we're going to come here and we're just going to basically say
And I think that that should understand it.
If we are seeing that it's not working, we will come in here and prompt after the key, we'll give it a description, but this should be working great.
So set a calendar event for, let's now do 7 p.m. for dinner.
And we're gonna say with Michael Scott, and it would also have included his email.
And now we'll test this out.
We've got that prompted in already.
We'll hit it.
It should go to this one because it realizes that there's an attendee now.
So that came through.
Pop over to the calendar.
7 p.m. dinner with Michael Scott.
So that's working as it should.
And now that we have these two tools, we will add another calendar one.
And this one is going to be getting events.
So right now we had it as create.
We were going to do get many.
We're going to select the calendar once again and
We'll return all, but now we want to do after and before.
So when we're asking, can you get events from the past three days?
Or when you're asking, can you get events from today, tomorrow?
We have to outline the parameters of, you know, it's gonna go search calendar, but which events are you gonna be looking for?
So that's what we need to set up here.
Okay, so we're gonna call this one, get events.
And now this is gonna be interesting.
Let's say we were asking for, can you get my events from today?
The filters we're looking for are events after yesterday and before tomorrow.
So what we need to do in here is for after, we're gonna have the AI figure out, we're gonna call this one day before, and then we're gonna outline that this is one day before the date the user requested.
And so we've got that copy this down and see the after, or sorry, the before.
And so now this is going to be one day, one day after, and then we're just going to say one day after the date, the user requested.
So if we think about this logically, we're asking for, can you get my events from today?
And then it's going to be looking for any events that are after yesterday and any events that are before tomorrow.
So we'll try this out.
see what it does in this query we're just now going to be saying get my events from today so we'll save that and we'll run this see what it does it's going to be getting events and hopefully it filled in these correct parameters so we can see
did yesterday and tomorrow.
So that's working correctly.
And we can now see that we have our events from today.
Perfect.
November 28th, we've got dinner at five and then we have dinner with Michael Scott at seven, which if you remember, those are the events we just created.
So now that that's working, um, you know, we see that we see the way that this is going through and we see that it's pulling back the correct events and, um, yeah, that's pretty much going to be it for the calendar agent, except of course we need to add a response so that it's getting back to our
agent.
So we're going to add the field here.
We're going to call this one response, and then we're just going to be dragging in this output once again, call this response.
And then all we need to do is come in here.
We're going to refresh this because it won't have that workflow yet in this knowledge, refresh the main agent.
We're going to add another tool called from another workflow.
This one is going to be called calendar agent.
Copy that, we'll rename the tool calendar agent as well.
Call this tool to take action in calendar.
And I've had people ask me, what is the difference between the description you put here and then the description of the tool and the prompt in the system prompts up here.
And really it's not a huge difference.
The tools are outlining what's going on when you would call this, but it's just best practice to also outline that in a tool section within the agent system prompt.
So we've got calendar agent demos, the one we just made, it's returning response.
Um, and yeah, let's just test it out.
We will hit test workflow and then we'll say, make an event for tomorrow.
Um, with Michael Scott at, okay.
We'll do from 6 PM to 8 PM and we'll just call it for a meeting.
Okay.
So now it's gonna do that.
It should grab the email.
So that's working well.
It's gonna now hit the calendar agent, and then it should respond to us with saying that that event was created.
It may even provide a link to the event, which would be pretty cool.
Obviously we can prompt that stuff in, but okay.
So the meeting with Michael Scott is being scheduled.
Project discussion, November 29th, 6 to 8 p.m. Michael Scott with his email.
And now let's hop into calendar and we can see right here, it got created.
It got created twice because it did one for us and then one for the email invite with Michael Scott, but that's great.
So that is working.
And then real quick, we'll just test.
Can you get my events for tomorrow?
my events from tomorrow.
So real quick, just doing another test to make sure all our tools within our calendar agent works.
We tested out queries, but we want to see it working in action, the full picture.
So make sure everything's working before we move on to the next tool.
And now we can see we have two events scheduled for tomorrow.
Like I said, the project discussion events got duplicated.
So we would just have to go in there and fix that.
But everything's working as far as it's able to create an event.
It knows when to do an event by just us and when to do one
an attendee it also knows to grab their email so that way if we wanted to do something like yeah actually let's do that real quick so we're going to test this again we're going to say create an event for today at noon with michael scott and send him an email to confirm so we got that it should be hitting both tools we'll see it grab the email
now it should be as you can see it's hitting both tools which is awesome it's going to send them an email it's going to create an event and then we'll check on both of those things so the event should have been created let's just we'll just wait because I think it's really cool to just watch this stuff happen so we've got the event today it's a meeting with Michael Scott you can view and manage the event here so it gave us a link and then additionally the email confirming has been sent to Michael Scott so in the calendar we've got the meeting right here
And then let me pull up that email.
Okay, so then I switched over to the other email that's associated with Michael Scott.
And it said, hi, Michael, just wanted to confirm that our meeting's scheduled for today at noon.
Looking forward to the discussion.
So that's a cool way we just show that it can use multiple tools instead of just having to use one.
And then you can really start to combine tool after tool and be able to text it like, hey, I have these five tasks I need you to do.
Can you please do them all?
And it will go do them all.
Email agent, calendar agent, let's look at the next tool that we're gonna add.
All right, next agent we're doing is a research agent.
This one is just gonna be able to answer questions.
It can search the internet, it can search through articles, it has Wikipedia as well.
And just another cool use case, it will be, this one, setting this one up is a lot easier.
The email and the calendar ones are obviously the ones that, you know, when people are thinking of a personal assistant, that's like what comes most important to them.
So let me just put in assistant prompts real quick.
But obviously in this video, we didn't really go super in depth with those two, what are they called?
Those two agents.
But the idea is just to open your eyes to how you can give all your agents different tools, how you can make them more robust and really just making it that if you build out one email agent and you have all these different functions, you can plug in this email agent to multiple different workflows and it's just gonna be really scalable, really modular.
And you can just basically,
reuse this same build and just improve on this workflow and it will just be able to plug in anywhere.
So that's sort of what I wanted to show you guys with those two agents.
But now we have a research agent.
We're going to set up this model real quick.
4.0 Mini is good.
And then we're going to give it different tools.
So the first one is going to be Wikipedia.
This is going to be the first thing that we wanted to go through.
So as you can see, sorry, I didn't read this prompt.
Basically what I said in here is
your research assistant, you have Wikipedia, Hacker News API and SERP API.
And you first want to search Wikipedia.
If you can't find your answer, then you're going to search articles with Hacker News.
And then if that doesn't work, you'll use SERP API.
And we set it up like this so that you basically can get all the answers you need in here.
But we don't always want it to be first going to SERP API because
that one has credits and it's an API call and you don't want to burn through all those.
So what we're doing is pretty much giving it almost like a tier system to do.
So in SurveyBI, if you make an account, you'll have a certain amount of free credits per month.
You'll just connect your API key there.
But yeah, so this is pretty much the framework.
And then what we want to do in here is give it an expression.
So that's what we wanted to do.
So anyways,
we have to limit the articles that it's going to come back so same thing this is such a cool a cool tool that we have is the from ai and this is just going to say limit so that way we can limit the amount of articles we want back you could ask for five you could ask for ten um whatever that is okay so the reason that the right field wasn't coming up the way i wanted it to is because now we're looking for all getting many um and now we just need to basically set this stuff up again so
I don't know why it always does that, but we're going to just do the same thing.
We're typing in our limit here, which is going to just obviously do its thing.
And then we want to add the keyword, which this is going to be another expression.
It's going to be another from AI.
We're basically just grabbing...
This is how it's gonna specify what type of articles to look for.
So we should be able to just go through like that.
So we've got Wikipedia, Hacker News, Serif API.
And then we're just going to give it the response.
Once again, it should be an expression.
And I believe it's gonna be json.output.
Okay, so now we'll just test out this thing.
um yeah okay so let's actually just test this out with telegram so we'll make this guy pretty much active we will come back into here refresh this page so we can add our tool which is going to be that research agent that we just built and then we'll just test it out and we'll see if it goes through um you know hacker news or what it's coming through so this is going to be the
research agent put this in here call this tool to search the internet to answer the user's question we're going to choose the research agent and we're good to go so sorry i really like to
sure it's like set up almost i like to make them sort of symmetrical but it's not perfect anyways um yeah we'll test this guy out so first if we just say something like what is the biggest mountain in the world maybe tallest would have been a better word but anyways okay so we got air already in the research agent um i wonder okay i've done this every time i think
We need to define below, obviously, and it's gonna be json.query.
So hopefully you guys like, you probably noticed when I was setting this up, you're like, oh, it's gonna fail because I've done that every time.
But anyways, we can pretty much, I think we can just run that query again.
No, it's waiting, okay.
Okay, interesting.
So I think what it did is that it was able to answer that just using its OpenAI model right here, which is pretty cool.
I don't know why that wasn't going.
Okay, it's listening for us, but it was able to answer that last time with the OpenAI chat model because it just has information, but now it's hitting the research agent.
And then we'll hop into the execution of the research agent.
So we've got that information about Mount Everest.
I'm gonna assume that this one just used Wikipedia.
Okay, so it actually used all of them, which is interesting.
So it got information here.
probably pulled back some articles so that's not really what we wanted to be doing because it grabbed five articles with highest mountain and obviously it could have just answered that question with using wikipedia so because it passed through the query biggest mountain in the world so let's let's fix this up real quick to make sure that it's only using what we want to use okay so in the reminder we just said you should only be calling one tool never call all three tools if you can get an answer with just one and then we just gave it a reminder of what the tools are
So we'll just test it in here so we can see it happen live.
Let's ask it about like something where, something trendy.
So what are the current trends with cryptocurrency?
So we've got that query.
We'll test this guy out and see.
So now it's using SERP API and it's gonna respond back to us just using that one.
It's perfect.
It's gonna give us the current trends in the cryptocurrency, bull market, emergence, AI and crypto, all that kind of stuff.
That's perfect.
Now let's ask something about, can you get me three articles about the election?
So we'll go with that.
Fire that off.
This one, I assume we'll go to Hacker News.
It's just gonna use one tool.
Perfect.
Just the way we want it to.
and then respond back with those articles.
So it's also gonna give us the actual link to each article, which is cool.
So let's real quick, just go back into the personal assistant.
We will test the workflow and we'll say, get me the articles about finance.
So we've got that research agent.
It's gonna give us those articles and then we'll just click on one of those links and see that we can actually go look at them, which is gonna be cool.
There we go, so we've got personal finance for engineers.
So if you open this link, you've got this blog, course material, awesome.
And then of course you could click on those other links, which are right here.
That's pretty much how the research agent is going to work.
So I don't want this tutorial to go super long, but at this point you should understand how you can build agents as separate workflows, give them access to, or give the personal assistant access to these different agents.
If you were to build on more, it's super simple.
Once you've seen these, it's just a matter of prompting them so that it knows when to use them.
You could add on vector stores, stuff like that too.
But now I want to show you guys something really cool, which wasn't in the original build, which is how you can make the agent understand an audio file and also output back an audio file.
So you can talk to it and listen to it rather than having to text all the time.
So what we're gonna do, we're gonna drag this out over here.
And so as you see, when we're texting with the agent, we're getting back the actual text, which is json.chat.text, whatever.
And then we're feeding it into this guy as message.text.
So what we wanna do now is add a switch node.
So in here, we have basically two paths that it's gonna go down.
We're gonna have one for voice,
We want to rename it down here, voice.
And that's how we want to do.
So we're going to have two paths, right?
Like I said, one for voice and one for text.
So what we want to do is if text exists, so right here is a text message.
If this exists, then it's going to go down this path right here called text.
And if it doesn't exist,
or not if it doesn't exist, but if a voice file exists, which actually we could make it as simple as just this, but if a voice file exists, it's gonna go down this path.
So how do we get this voice file?
We are going to have this listen for an event.
We're gonna come in here and just say, hello, testing.
So now we've gotten back in here a voice file.
And then what we can do in here is we see that we're getting this voice file rather than a text file.
So what we wanna do is grab that voice file, which will be file ID right here.
And we're gonna say, well, now if this one exists, you're gonna go down this route.
So we have two routes in order to talk to our agent.
And so the first thing that we wanna do is
we need to make sure that this input right here is gonna be consistent.
So it needs to always be called the same thing.
That way, if it's a voice file or a text file, we're gonna get it no matter what.
So we're just gonna come in here and we're gonna call this one, I hate that it does that.
We're gonna call this one json.text.
And now we just need to map out and make sure that each file coming through is going to be, or each output is going to be json.text.
So how we can do that with text is we're gonna add a
edit field set we're going to map this one and just call it text and we'll drag in that input real quick so I'm just naming this for organization so we're gonna have this one setting as text and coming through and I'll show that in a sec but now if it's a voice file the first thing that we need to do is actually download that file so we're gonna go to telegram
We're going to, let's see, chat actions, file actions, get a file right there.
So we're getting a file.
The operations get resources file, and then we need the file ID.
So if we can test this guy, we'll see it's a voice file.
It's gonna come up here.
And now the file ID is just pretty much down here, which is what earlier we said, does the file ID exist?
So download voice file.
Now we've got the file put in here.
We wanna download it.
We test the step and now you can see it's gonna come back over here.
And this is what we're looking for.
So now what we need to do with this file is we wanna grab an open AI node and we're gonna grab one that is going to transcribe a recording.
So we're transcribing this one.
Transcribe.
audio we're transcribing recording it's coming in from here and then we just i think we actually should be good with that so if we hit test it's grabbing the input data field data and we just said hello testing we got that file coming back and as you can see it's coming back as json.txt so we'll route this into here and now we can see in the personal assistant it's getting our message that said hello testing and now we just need to make sure that it's going to get this message as well
So now if we have this guy listening for us, we will just say, hello.
It got that file.
It understands that it's a text file now because we routed it right here.
And then we'll run this guy.
And in here it took, it didn't do it yet.
So we have to set it up.
It's gonna take this input, which is our text.
which is currently being called json.message.text.
We'll test it.
Now it's coming out as json.text.
And now our assistant is going to be getting that message regardless whether it's a voice file or a text file.
So that's super cool.
And now we just need to output over here when we're getting an answer from the assistant that it's going to respond to us with a text message, but also with a voice file.
All right, so we've already got the text message coming through.
We know that this works, so let's drag it up here.
And now we need to go down another path, which is going to obviously give us the information as a text file.
So first what we wanna do is I'm gonna use a summarization chain because we don't exactly want, we don't want the exact text coming back.
What we want is a summary of it so that we can see the details, but then visually, or sorry,
audibly, we're just getting a summarization.
So actually, I don't know why I was going to rename that.
That's fine.
So we've got this.
It will be summarizing the actual text that we would be getting back.
And then now with the summary, we want to feed this into a post request.
We're going to be sending it to 11 labs, which is going to be helping us make the actual audio file.
So HTTP request.
we're going to be doing a post like i said and then we need the url we need to set up some headers and stuff like that so in 11 labs if you haven't made an account go ahead and make one real quick i also want to mention that when i was testing this kind of stuff i was on the free plan and i was getting some errors with like it was saying my credentials were incorrect so if you are experiencing those errors then you may want to try the starter plan which is only five bucks and you get 40 000 credits which lasts a decent amount of time as long as you're not getting files like two minute long but anyways
if you're getting that error that may be why but once we're in here we're looking at text to speech because we're going to be feeding it in text obviously and then it's going to be coming back with our audio file so up here we click on curl and you could copy this in and you could import your curl into nnn but what we're going to do is just grab this url and so we're going to grab
Actually, yeah, we can just grab this whole thing and we're going to paste that in here.
But what follows the text-to-speech slash, as you can see right here, is the voice ID.
So if you go into voices in Eleven Labs, you can listen to these different voices and you can figure out which one you want.
I'm going to be using Ryan Kirk.
And then you're going to click on view.
You're going to click on ID.
and you've copied the id so now all we have to do is after the text of speech forward slash we just copy in that id so now eleven labs knows um which voice we want to use so we've got that set up and now all we need to do is set up our our headers so with our and our json body but headers the first one that we have to do if you go back to the api documentation is our api key so it's going to be
x i dash api dash key we'll grab that um paste that in there and then we need the actual api key of course so we'll go back into um 11 labs we will just basically create a new key this one will be called test we've got our value we copy that in and then we're going to paste that right here just make sure there's no trailing white space anywhere
And then we're gonna add another header.
As you can see, this header is content-type.
So we'll grab that.
I can end it in, that's our header name.
And then the actual value is gonna be application slash JSON.
We paste that into there.
And so headers should be set up.
Now we just need to set up the actual body, what we're sending over to 11 Labs.
So first what I wanna do is I'm just gonna test this assistant because we want some actual data to be coming through.
So I'm just gonna say, testing.
So now it should be going through, it's probably gonna respond with something like, we don't actually, the assistant said, if you're testing, please let me know if there's any specific.
But now we have data coming through our summarization chain, which is the speaker offers assistance and invites input.
Now we have that information coming back.
We'll go into our send body.
We're gonna be using JSON expression and we'll open this up.
I'm gonna paste that in here.
And what we want is to make this JSON dot, let's see.
json.response.text.
And so now we have this and I will paste this code in here as far as the replace and the stringify.
I'll paste this in the FreeSchool community as well.
Link for that will be in the description.
Go to YouTube resources and you can grab this little code snippet as well as the workflows that were shown in this video.
But now we're just getting a nice clean string that will be sent over to Eleven Labs so we can turn this right here into audio.
um let's actually just test this real quick and that went through okay it's it's being all weird because of the what's it called because of the multiple switch routes but anyways from here we have an audio file and then once again it's just as simple as adding telegram and we're going to be sending an audio file is the resource send audio file chat id
Once again, we're doing the same chat ID from earlier, which is going to be, we get that from the telegram trigger.
We want item.json.message.chat.id.
There we go.
And this should be the correct one.
We can always just check that in here that we're getting the chat ID.
You can also just copy and paste that into there.
And send audio.
And then we just need the actual audio.
It's going to be a binary file.
And so it should just be coming through as data.
We should be good to go with that.
So let's do a test.
Let me just make this stuff a little more concise so that we can see this stuff happening.
I don't like the way it does that.
That's fine.
That's fine.
Okay.
Anyways.
Testing workflow, we'll send over an audio file.
Can you send an email to Nate Hurk?
Just checking in on his day.
So now we're getting that file.
You can see it's being downloaded, it's being transcribed.
The actual system is now taking place.
It should be hitting the email agent.
Okay, it actually didn't.
So it had an issue with my contact data.
So we'll fix that in a sec.
But now we just need to make sure file name is needed to send audio.
Okay, right, so we have to add a file name, and that's just going to be data.mpeg.
Hit test again.
Okay, and now we have to do that again.
So anyways, this is the beauty of the almost sort of live builds.
But anyways, let's see what the issue was.
I found Nate Hurk in the database with the email address natehurk at gmail.com.
Ah, okay, it's because it...
It transcribes my name as Nate Herc with a U.
So let's just try something else.
Let's say, can you send an email to Michael Scott checking in on his day?
So that's actually kind of ridiculous with the transcribing because it couldn't find Nate Herc anyways.
So it's finding Michael Scott.
Now it's going to hit the email agent.
We should see it get summarized.
So there's the text and then the audio file coming back should be a little different.
So we've got this.
the email to Michael Scott has been sent inquiring about his day.
Okay, awesome.
So that's pretty much how it works.
The way that you can talk to it, you can see a detailed breakdown, but then you also get something else back.
So if I said, let's test this workflow.
Can you summarize my calendar events for today?
So same thing, it's gonna get that information, hit the right agent.
It's gonna send us a text that'll be a little more detailed, but then the summary will be, well, a summary.
That's kind of the whole point of the summary.
Anyways, so this is the information we got back.
Now it's creating that audio file for us, and it shouldn't be as detailed as we get here.
So let's listen to this.
We won't listen to the whole thing.
Today's calendar events for November 28th, 2024 include one, asterisk, asterisk, meeting with Michael Scott, asterisk, asterisk.
Okay, so that was awful.
It was reading off asterisks, asterisk.
We don't want that.
I was trying to play around with the summarization chain, but what we're gonna do is just, we're gonna grab an OpenAI message model.
And basically when we're telling it to summarize, we're gonna say like to,
make it as plain text.
We don't want any of the, you know, asterisks coming through.
So real quick, am I able to?
Yeah.
Anyways, we're just going to come in here.
We can grab 40mini and your goal is just to summarize this incoming information, which will be
output right here and yeah so we got that and then we're just going to say output only plain text there should be no like markdown formatting or or any symbols okay so that should be simple enough we'll test that out
It is going to be weird about that because, you know, the whole looping.
But this should be JSON.message.content now, I believe.
So we'll give it another run.
Please summarize my calendar events for today.
Okay.
What is this?
I don't know what try.
I was about to say third time's a charm, but we'll see.
should now be just summarizing information it should be a plain string that way when the audio file is being created it's going to be much cleaner let's see what we got okay this looks a lot cleaner and then we'll see what the actual file sounds like hopefully this one's better your calendar events for today November 28th 2024 include one meeting with Michael Scott from 12 p.m. to 1 p.m. MDT status confirmed response needed from up at digital at gmail.com
Okay, so that one comes through cleaner.
We would probably want to play with the prompting so it gives you an even more high-level summary.
We don't want to maybe hear that it's confirmed or if it needs a response, or maybe we do.
But anyways, that's just, you know, you'd play with the prompting within that OpenAI node right there.
But yeah, I mean, that's the foundations really.
We could, you know, obviously come in here and we could add something like a vector store.
Let's just call this data.
Trees.
information about company projects.
So we can do that.
Obviously we'd set up the other information we need for the vector store.
But yeah, obviously the idea is that we're just pretty much building on top of the agent type workflow.
you can continue to come in here and add more and more tools, which is obviously the super cool part.
And yeah, just the whole theory of like being able to build out workflows in NNN and being able to call them in multiple different workflows.
They're very scalable.
It's very flexible.
And yeah, the whole idea is that you have all these different workflows you can sort of plug and play, which is super cool.
So yeah, I hope that this workflow or I hope that this step-by-step tutorial was insightful.
There's a lot of things that we could do to improve upon this.
One thing I'll just show really quick is a cool way that you could have your agents be able to talk to each other a little bit more.
So obviously we're calling email agent, we're calling calendar agent, stuff like that.
Let's say we were calling the calendar agent and it aired, right?
So this is an actual workflow that I was using for the personal assistant build.
And this is not the one we just built.
But anyways, you come into here and you want to go to settings and then you want to make it continue using an error output.
So if we do that, we have two different options.
So if the workflow errors for some reason, rather than it just stopping or rather than the agent responding to us on Telegram and saying we couldn't do that, it's going to go down this path and it's going to respond to that personal assistant with the response of unable to perform task, please try again.
So this agent would hit this, it would get a response.
And then rather than responding to us, it would be like, okay, well that didn't work.
What do we need to do differently?
And you would maybe prompt that a little more specifically.
But let's say for some reason it didn't grab the email, then it would try again, it would run through that whole query.
And then this time it may go grab the email and then understand, okay, well, that's sort of where I messed up there.
Anyways, I hope this video was insightful.
Like I said, the workflows that were used in this video, as well as the code snippets will be in the school community.
You'll just go to YouTube resources, find this video, everything will be attached there.
you know i mentioned there's a lot of ways to improve on this build to make it really more production ready and if you want to dive deeper into that please check out the paid community if you have any questions about that reach out to me the link for that will also be down in the description but thank you guys really appreciate your time today and we'll see in the next one
Similar videos: How to Build a Personal Assistant AI Agent in n

Animating a Logo Reveal with Blender | Tutorial

Edit With Confidence: A Step-by-Step Guide to Adobe Premiere Pro
Build and Deploy a SaaS AI Agent Platform | Next.js 15, React, Better Auth, Polar | Full Course 2025

ህይወቴን ያቀለለው ፕላትፎርም! | How to use Notion? | Full Setup!

Mastering Character Rigging in After Effects with Duik Bassel: Step-by-Step Tutorial!