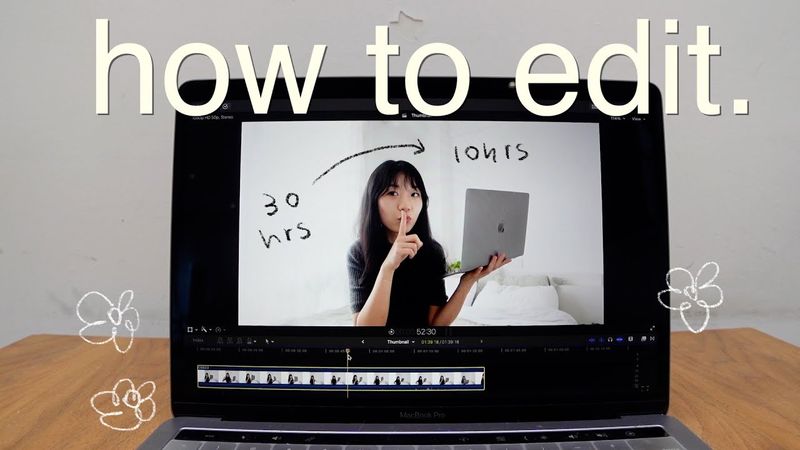
how to edit *aEsTHetic* vlogs (FULL workflow + tips to save time) beginner friendly
Download information and video details for how to edit *aEsTHetic* vlogs (FULL workflow + tips to save time) beginner friendly
Uploader:
tapiocapressPublished at:
3/21/2024Views:
541KDescription:
The video opens with the creator explaining that they’re sharing their entire editing process, from gear to workflow, to help viewers who feel stuck or overwhelmed. They show their camera setup—Sony ZV‑1, iPhone 14 Pro, various tripods—and explain how they capture footage and audio, including using a Rode Wireless Go 2 and phone microphones. After outlining their gear, they dive into the editing workflow in Final Cut Pro: importing footage, making a rough cut with AI‑assisted trimming, audio mixing with compressor and noise reduction, selecting music from Epidemic Sound, adding minimal titles and effects, and doing light color correction on an adjustment layer. They finish by exporting in 1080p, creating thumbnails in Procreate, uploading to YouTube with chapters and end screens, and then archiving files to keep the workspace tidy. Throughout, they stress that the story matters most, encouraging viewers to prioritize what gives them the biggest impact while saving time on less essential tasks.
Video Transcription
Today, I'm telling you all my secrets about how to edit.
Because you, you are creative, but you don't know where to start.
Or you've picked up bits and pieces from YouTube, but don't know if you're doing the right thing.
Or maybe your workflow is not working for you.
And you simply don't have 30 hours a week to edit a video because you also have a full time job.
Well, luckily, I don't have one anymore, so I get to spend two whole weeks making this video, spilling everything I've learned from four years of documenting my life on YouTube.
We're gonna talk about equipment, my complete editing workflow from rough cut to adding music to color correction, aesthetic, fonts, effects, and transitions, and share tips that would have saved me hundreds and thousands of hours if I had seen this video, all for free, because it's hard enough putting yourself out there, and editing shouldn't stand in between you and getting your story out into the world.
I'm rooting for you.
Okay, let's start with the equipment.
I currently use the Sony ZV-1 with the HD wide and micro conversion lens from Neewer.
Most of my vlogger friends use this camera.
It's very compact, has a flip out screen for filming yourself and I just shoot in intelligent auto mode to make all my footage consistent.
I also film on my iPhone 14 Pro.
Sometimes I specifically go for the zoom on my phone instead of using my camera zoom because it has this vintage grainy aesthetic vibe.
Oh hi!
I use my big tripod for filming sit down and talk videos this is the filming setup for this video this mini one I started using recently because a lot of vloggers are using it and it's like a good distance for holding the camera and filming yourself and if I can only bring one tripod with me when I'm traveling or I'm shooting outside it would be this bendy tripod because it's super versatile there's a built-in clamp for holding your phone
The height is adjustable and the legs can grip onto things.
But maybe don't grip it on the railings of the bridge over a river.
Honestly, my most used tripods are Bose.
This is my setup for filming myself cooking.
Remote controls and my phone.
A lot of you guys asked how I record audio.
I currently use the Rode Wireless Go 2.
Not so that you can hear me even when I'm standing far away from the camera, which is what this is intended for.
But because there's a school right next to my apartment and this is what you would hear if I didn't have a mic.
I can't wait to move out!
I am really really sorry but you're still gonna hear some background noise later on in the video because when I was filming this, I decided to do this because I've seen some other YouTubers do it and as a result, the mic picked up noises from the background and I can't re-film it anymore because I've already moved out of the apartment.
Please don't click away because I promise there's a lot of good stuff in the video.
You may have seen this in my videos and wondered, Evelyn, what the heck are you doing?
I put a wing sleeve over my phone to record audio when I have to set up the camera from across the street so that you guys can hear me before I upgrade it to the Rode.
Other than that, you have to sync the audio later on.
I honestly think it works pretty well.
I also have this Rode video micromic, but I live in China and when I take this out on the camera, people will stare at me and ask, are you a journalist?
So now I only use it to record voiceovers at home.
My point here actually is if you're a beginner, you don't actually have to buy any gear.
Not only because phone cameras are getting insanely good these days, but because what matters is your story and what you have to say.
Yes, it's great to have amazing video and audio quality, but people watch your videos because of you.
So the most important thing is putting yourself out there by editing a video together.
And here's how.
I use Final Cut Pro to edit my videos because Best Dressed uses it and I haven't seen better videos and heard from a storytelling perspective, period.
But you could totally use free ones like iMovie or CapCut to start off.
Kelly Stamps uses iMovie.
I told you guys many times I've learned how to use Final Cut from Ali Abdel's class on Skillshare, who is very kindly sponsoring today's video.
Again, we're going to talk about them later.
So for this video, we're going to skip the technical stuff and focus on a workflow and tips and tricks I've learned over the years to save time.
So I have a notebook for YouTube where I plan videos, take notes, and before starting to edit every single video, I will write down a checklist of each step in my editing workflow.
This is super important to me because I love editing, but I'm always like scared to start because it seems like such a mammoth task.
So by writing down the checklist, I can break down this intimidating task into smaller, more manageable ones.
Also, it's just so satisfying to check off a box.
Importing footage might seem like a silly stuff to talk about on its own, but I specifically make a big deal out of it because getting started is the hardest part.
Oh my god, I sound Irish.
Damn it, dude.
I import the footage from my camera to my laptop and airdrop footage from my phone so I don't have to edit with clunky things attached to my laptop.
Also, Final Cut runs much faster when you have everything on the laptop.
At least it's a lot faster for me.
Now that everything is nice and imported, I'm just excited to edit, so let's get to it.
Rough cut is where you arrange raw footage in order, pick out the most aesthetic shots, cut out the less exciting parts, like the gaps in your talking, so that your ordinary life becomes an engaging story for your audience.
It's the most important part for me because I love telling you guys my story and I know that's what you're here for.
Rough cut for a sit down and talk video like this one is really easy.
I just upload all my footage to an editing software called Gling and the AI will cut out all the pauses and repeats for me.
All I have to do is to review the text in the text editor and make some minor edits.
This is so much faster than manually going through and cutting every single clip.
wish i could have found it earlier and if you want to try it out you can use my link in the descriptions to get one editing credit for free for vlogs i just manually cut everything because i like having control anyways a few tips to make your story more engaging cut on action start the audio from the next clip before the video cuts in for a smooth transition
This is called a J-Cut.
You can also change up your camera angles and keep each clip very short, like under two seconds.
But I think I'm lucky enough to have been working in technology for the past five years.
And more fortunately, I come from a very frugal family.
I spent a ton of time doing this to keep my vlogs interesting to you, but as a result, I can't be consistent.
So you have to decide here what matters more to you.
I also record voiceovers in this step with this mic attached to my phone.
I just airdropped a voice memo to my laptop and drag it into the Final Cut timeline.
for less scripted videos like vlogs and especially travel vlogs rough cut takes much longer because i have to think more about how to tell the story during rough cut where for sit down and talk video that's done during scripting i think knowing the different types of video you make and which step takes longer for each type of video helps manage your time a lot better because
gets really frustrating for me when like one video takes 10 hours to edit and then i expect a video for next week to take the same amount of time to edit and then i don't get it done for me a sit down and talk video usually takes me about 10 hours to edit if i don't go crazy on the b-rolls and effects which i probably will for this video travel vlogs can take 20 to up to 30 hours just to give you an idea how do i make my audio sound consistent even though they're recorded from different devices
After rough cut, I mix my audio.
I just grab a compressor effect and drop it on the audio clip and added the noiser because the hum removal on Final Cut is actually really shite.
I just use the default settings for both because I don't actually know anything about audio.
But you don't have to know all the technical stuff to be good at editing.
If you stumble on something that works, just write it down and keep doing it.
I adjust the volume and loudness so that the audio levels are between negative 12 and negative six.
I don't know why, it's just what sounds good.
And then I copy the clip and paste the audio effects onto every other clip where I talk.
And for the clips where I don't talk, I just turned down the volume so that there's still a bit of noise going on in the background, but the music comes through front and center.
this part usually takes about 30 minutes and i think it's really worth it because you guys notice the difference sorry for talking so fast in this video there's so much i want to share in this video but i don't want to take like 30 minutes of your time anyways now you're ready to add music a lot of you guys asked me where i find my music my current favorite platform is epidemic sound to add music i actually first write down the mood
or vibe I want to go for for a particular segment of the vlog, like chill guitar solo or quirky jazz.
This saves a ton of time because it helps me look with a purpose and not get lost in the sea of options, which can get really overwhelming when you're looking for music.
Then I go on Epidemic Sound, find the genre, select the mood, and just listen through a few songs to find the right one.
My current favorite genres are romantic jazz,
Solo piano.
And cinematic beautiful for wider shots.
These are what give my video the chill vibes that you guys really like.
Sometimes even if the visuals are un-aesthetic, bringing pretty music to the forefront still makes it feel aesthetic.
when I first started I would use exclusively lo-fi music from thematic which I still use occasionally now and I honestly think it's the best option if you're just getting started but I noticed a lot of my favorite aesthetic vloggers switched to epidemic sound and their music really elevated their videos since they switched so I invested in epidemic sound I think the genres and filters on epidemic sound are really good and it saved me a lot of time from browsing music
So if you're a little more advanced or if you have a little bit budget and want to prioritize saving time, I recommend checking out Epidemic Sound.
You can also use my link in the descriptions to get your first month free.
After adding music, congratulations, 80% of your video is done.
I used to spend a ton of time on titles and effects and color correct every single clip, but as my channel grew bigger, I actually don't do that anymore because I realized it doesn't matter as much to you.
don't get me wrong these things are important because color correction gives your video a consistent aesthetic and titles and effects help your viewers decide where to focus on the screen but i know you guys are here for my story so why am i spending the bulk of my editing time not on that which was done in rough cut and music so now i only add titles where it makes a difference as a design element for my intros
excuse my voice and welcome to Seoul as subtitles when there's a lot of noise in my background
or to segment a long video like this one so it doesn't get too boring for you.
My current favorite fonts are Ditto, Taito, and Helvetica.
My funky fonts are from a website called Defont.
And my favorite effects are handheld for titles.
I just turn up the shakiness and turn down the distance to make it look like this.
I use this transition a lot.
I just drag shape mask onto the clip, make it a perfect circle, set radius to zero, keyframe the beginning of the clip, move forward a few frames, make the radius 1100, and bam, the most famous transition for aesthetic vlog.
For cute animations, I use Procreate on my iPad.
I export the still from Final Cut, open it in Procreate, add a layer, draw a few doodles,
Add another layer and just draw the same thing on top.
Export as Animated PNG.
And then I just drag it onto the Final Cut Timeline and change the Bled Mode to Screen.
I don't know why, it just looks the best.
My favorite Procreate brushes are 6B, Dry Brush, and Studio Pen.
Before adding titles and effects, I drag the adjustment layer over all my rough cut footage and this is for color correction.
When I first started YouTube, I took a DSLR photography class on Skillshare.
I learned all about f-stop ISO shutter speed and decided I was too good for auto mode.
Because of that, hundreds if not thousands of hours color correcting every single clip just to make them look consistent.
There are two roles of color correction.
Make the footage look consistent and make them aesthetically pleasing.
Shooting on auto mode takes care of the first step for you.
I don't do any funky color correction or use any filters anymore because I watch Michelle Choi and Moya.
They don't seem to color correct, but their vlogs look really good.
And also, you guys are here for my real, authentic, unfiltered life.
Why would I put a literal filter on that?
So all I do now is on the adjustment layer, I turn down the highlight a little bit, turn up the mid-tones and the shadows just a little bit to give the video a softer look.
At least two to three hours saved for each video.
But there are a lot of vloggers out there known for really amazing color correction.
Linh Truong and Dustin Vuong made super helpful videos.
Check them out if color correction is what you're into.
When I was color correcting though, one thing that bothered me the most was I don't know what looks good.
For that, I took a color theory class on Skillshare and learned all about what hue, saturation, brightness, what colors look good together, and it helped me understand color correction much better and overall develop a better aesthetic.
You must be like, hi Kavalin, how much is Skillshare paying you?
Not much.
But I genuinely love taking classes on Skillshare and I'm not covering the specifics of how to use Final Cut in this video because that already exists on Skillshare and I learned how to use Final Cut from it.
In this class, Ali Abdaal walks you through exactly how he edits a video from beginning to end on Final Cut.
If you can only take one class to learn Final Cut, this should be the one.
If you haven't heard of Skillshare yet, it's the largest online learning community for creatives where you can choose from thousands of classes led by industry professionals like MKBHD, Ali Abdel, Nathaniel Drew to learn how to do YouTube right.
Also how to use Procreate, filmmaking, art, design, all the creative things.
I highly, highly recommend the Grow Your First YouTube Channel Learning Path where they pick a few different classes that build on each other to help you get up and running on YouTube.
Here are the classes you should also take to learn everything you need to make good aesthetic
Intro to Procreate, Color Theory, Beginner's Guide to Vlogging by Kerry, the whole package.
If you want to get that, they've actually given me a link and the first 500 people to use my link in the description will get a one month free trial of Skillshare.
Get started today.
By this point, you would have completed editing and this is when I would watch the video in full screen from beginning to end to check for typos, misalignments.
I don't always catch them.
i just came back from yoga class and then you're ready to export i export my video in apple devices 1080p because sometimes the file size just comes out enormous for the default option and i don't film in super high quality anyways so 1080p works just fine for me but i guess let me know in the comments if you want me to upgrade to 4k
And while the video exports less work on a thumbnail, I typically grab one screenshot from the vlog, put text over it in Final Cut, export it to Procreate, and then add cutouts from different screenshots, which are typically books, coffee, and some food.
Sometimes I add little doodles.
I haven't figured out how to make a killer thumbnail because you guys actually pointed out that this one undersells my video, but April in Ultra did.
And you should really watch this video.
Okay, now the video is exported.
Oh.
Okay, now the video is exported, the thumbnail is done.
And just when you thought you're done with all the hard work, there's more because you have to upload a video and it takes me at least an hour each time.
I try to write descriptions that very accurately represents what's in the video for the algorithm.
I also make chapters in the descriptions also for the keywords.
By the way, it has to start from zero so that it'll show up on the timeline.
I find all the links I mentioned in the video.
One trick to save time here is you can actually configure your upload default in YouTube Studio so that the parts like social and your intro that are always there will just auto-populate every single time you upload.
I also always add an end screen so that you guys can subscribe and watch more videos from me.
Okay, now the video is uploaded.
Are we done yet?
no no no we're gonna move the video and audio files and the final cut library to our hard drive and also delete footage on the phone and clear out the sd card to remove mental friction or starting to film and edit the next video oh this hard drive is from western digital is bought with the money you guys donated on ko-fi thank you so much okay some quick tips for saving time number one remove cat from chair
Also, don't rewatch the part you just edited.
You're rewatching not to check if the edits look good, but because it's hard to continue editing.
So now I just take a break when I notice myself rewatching a bunch, so I can be more productive when I come back.
Also, the time it takes to toggle between folders and your editing software
really adds up.
I got an extra monitor so that I can drag and drop files from folders directly onto the Final Cut timeline, which makes my editing process much, much smoother.
80-20, this is a term way overused by management consultants.
80% of the outcome in business and in editing comes out of 20% of the input, which means 80% of our time spent on editing are on things that don't really matter that much.
And that is your biggest opportunity to save time.
What part of your editing process matters the most to you?
For me, it's the story.
So I know to cut down time on titles, effects, and color correction.
For you, it might be the aesthetic visuals.
So you spent less time finding the perfect music.
Only you have the answer to that question.
And if you don't have it right now,
That's okay.
You'll figure it out with time.
I feel like investing your effort where it matters is such a utilitarian way to look at things because it implies the opposite is undesirable.
That spending hours just to figure out an effect is not okay.
And I want to tell you it is.
You're allowed to do things simply because you love doing it.
If you need a bit more time to edit a video that you're proud of, that's okay.
And if you're investing 80% of your effort in what you love to do, that matters.
And that's all I have to say about editing.
I'll see you next time.
I actually should be packing up my apartment right now because I'm moving across the country like tomorrow.
I haven't started packing yet.
Priorities.
Similar videos: how to edit
How to edit Viral Reels in Premiere Pro | Live Reel Editing
Premiere Pro LOG Color Grading INSTANTLY Without LUTs - Color Management Tutorial
These 10 Premiere Pro Effects Will Level Up Your Edits
Viral Horizontal Reel Editing 2026 | Premiere Pro Tutorial

what I've learned creating better vlogs & how I edit for youtube