I made the PC I couldn’t buy
Download information and video details for I made the PC I couldn’t buy
Uploader:
Christian SeligPublished at:
6/27/2025Views:
1.2MVideo Transcription
I have a confession.
I am a long time Mac user.
Seriously, I even worked at Apple for a summer as a programmer.
But as much as I love my Mac, more and more lately I've been really jealous of all the awesome game releases on PC.
Like, have you seen the new Hades?
I mean, Apollo is in it.
Problem is, it's been a long time since I owned a PC.
We're talking like 2008 when Windows Vista was the big thing.
Bionicles were all the rage, and I mowed lawns all summer to save up for an HP Presario F764CA.
Remember when laptops were named like that?
I'm sure they're better na- oh.
Anyway, point is, I'm decently out of my element here.
But I think I have a plan, and I think I have a fun twist on the build.
PCs come in lots of different shapes and sizes, so I really need to nail down what my goals are.
I have five.
First, budget.
This is the big one.
I'm new to this hobby, and have you seen the price of groceries?
This is not one of those videos where you're sitting there scratching your head at how everyone has an RTX 4090 or 5090.
I'm used to consoles for gaming.
Like, if I wasn't building this, I'd probably be looking at a PS5 Pro or something, which sounds like a good price goal.
So let's put $700 on the board.
I quickly learned that this was not an easy price point to hit.
My second goal is compact.
I want a small, good-looking case.
There are some really cool, really big PC cases out there, but I wanna either put this by my desk or by my TV, so I'm looking for something with a smaller footprint that looks really nice.
There's probably some people screaming, though, because as you get really small, prices start to absolutely skyrocket, so we're gonna have to be crafty here.
Third, I want it to be upgradable.
As faster used parts get cheaper over time, I wanna be able to upgrade my PC.
So that unfortunately means no Steam Decks, no cool laptops, none of those minis, minis, minis?
Minis for him?
Tiny PCs.
All three types are cost-effective and small, but there's really not much you can upgrade.
Next up, modern.
I don't want it to feel old.
I want USB-C, modern Wi-Fi standards, and quality Bluetooth.
Lastly, I want gaming performance.
Computers get used for all sorts of things, from compiling code to running simulations.
But for me, I just want to game on this thing.
So that's really what I'm prioritizing.
And I want it to be pretty awesome at that.
There's no point building this if games end up looking bad on it.
So with those five stairs guiding our way, it's time to choose our parts.
Let me tell you, picking these was not easy.
There are so many options.
But here are my reasons, and let me know if I did okay.
My understanding is that it's kind of like Ocarina of Time, where we have to go on a quest to collect these six different medallions.
except our medallions are a motherboard, a CPU, a graphics card, a power supply, RAM, and lastly, storage.
Our motherboard is super, super important, as it's what everything else plugs into.
This means it helps to dictate the rest of the build, and I went with maybe an odd choice in 2025.
For the uninitiated, you first have to choose a motherboard's size, ATX, microATX, or ITX.
ATX is the physically largest with the most features, but it requires a big case as a result, where ITX is much more compact, but it also has much less features, like less RAM slots, less expansion slots, but its size makes it the go-to for compact PC builds.
Problem is, that size comes at a big price premium.
So enter MicroATX, right in between the other two sizes.
Not super big, not super small, but well-priced with a bunch of awesome features, making it a really easy choice for me.
Next, you have to choose a family of motherboard.
A motherboard can only support Intel or AMD CPUs, not both.
So you have to make a blood oath to either Team Red or Team Blue.
Even then, you have to factor in the socket type, which is how the motherboard and CPU connect, and Intel and AMD update these every few years.
So a motherboard with an older socket might be a great deal,
but it might not support the newest CPUs that use a newer socket.
So this is what we're looking at, Intel or AMD, and for Intel, we choose between the beautifully named sockets LGA1700 and 1851, which, fun fact, was named for the year Moby Dick was published.
In AMD's corner, we have AM4 and AM5.
Long story short, both were great, but AMD motherboards seem to have a slight edge on the price right now.
especially where Intel's 1851 socket literally just came out late last year.
That means we're down to choosing between AM4 and AM5.
Maybe surprisingly, I went with AM4, but hear me out.
Being a generation older, the motherboards and CPUs are cheap, and it supports CPUs up to the Ryzen 7 5800X3D, which still absolutely rips in 2025.
Specifically, I went with the Amesai Pro B550M VC Wi-Fi.
An amazing deal at $100, which we'll subtract from our total.
It has Wi-Fi 6E, Bluetooth 5.2, four RAM slots, multiple expansion slots, and per benchmarks, the VRMs can handle super beefy CPUs.
Buying a new AM4 board in 2025 is maybe a bit weird though, but we're on a budget and the value is really hard to beat.
My only complaint is the back IO.
Come on, no USB-C, but don't worry, we'll address that later.
Next up are CPU and GPU.
If our motherboard is like the body's central nervous system and it connects everything together, the CPU is the brain of the computer to do all the general thinking.
And the GPU, or graphics card, is almost like a secondary brain.
Not as good at general tasks, but absolutely unbeatable when it comes to handling graphics.
But before choosing here, I had to go on a little side quest and answer some questions.
Namely, what kind of gaming am I looking to do here?
If you're looking to only play 2D pixel art style indie games like Stardew Valley, Bellatro, you're in luck.
Just about any CPU and GPU combo from the last few years will power this beautifully.
I'm also stoked to play the new Hollow Knight sequel.
It's been so many years since I played the first one that, you know, it has to be out by now.
I also want to play some more demanding games, like Cyberpunk and Elden Ring.
So after looking around, I find you have to place yourself on the spectrum of gaming, where you decide between resolution and frame rate.
On the far end, you have the frame rate people, putting a lesser emphasis on visuals, and instead prioritizing making their games feel super smooth, often hundreds of frames per second.
On the opposite end, you have resolution people, who don't mind playing a slightly choppier, less smooth experience, if the visuals are absolutely gorgeous, which can be really great for story-driven games.
Most people are probably in the middle, wanting a nice mix of smooth gameplay and pretty visuals.
For me, I'm definitely a resolution person, because I'm coming from consoles where you often have to choose between frame rate and visuals.
Like a heathen, I always choose visuals, and I'm happy as a clam sitting there staring at gorgeous 30 FPS plants in Horizon.
But I know for a lot of people used to smoother gameplay, something that low would drive them absolutely crazy.
Your place on the spectrum is important because it helps to decide what kind of CPU and GPU combo you want when you're on a budget.
Why?
Well, if you're prioritizing hundreds of frames per second, your CPU has to do a ton of work every second to setting up all those frames before handing them off to the GPU to be drawn.
So you need to prioritize a hardworking CPU as much as your GPU in that situation.
On the flip side, at a higher resolution but lower frame rate, your CPU has a lot less frames to organize, but each frame will be very detailed at 4K instead of 1080p, which is a lot more pixels for your GPU to have to draw.
New card.
What do you think?
Something wrong?
So in that case, where resolution is more your goal, like me, I want to prioritize my GPU.
And because my CPU won't be working as hard, I can go a little bit more budget there.
For that CPU, our motherboard choice means we're on Team AMD.
And with its AM4 socket, the newest CPU we can choose from is the Ryzen 5000 family of CPUs.
I managed to find a used Ryzen 5 5600 on Facebook Marketplace for $70 that should do the job beautifully.
It thankfully had zero bent pins, and even includes a seemingly unused CPU cooler.
But because it's used, I had to spend $7 on some replacement thermal paste.
Remember when I said, trust me, let's back up this CPU choice with some numbers, and why I'm not worried about an older AM4 motherboard.
Here's Linus showing the best of the best, the Ryzen 7 9800X3D that requires an AM5 motherboard, and comparing it to the best of the best of my older AM4 board, the Ryzen 5 5800X3D.
Showing at 4K, the performance difference is incredibly minor.
Maybe a couple extra frames at best.
And taking that 5800X3D, again, the best of the best for AM4, and comparing it to my weaker 5600, with 4K gaming, there's still not much of a change.
So my 5600 should be awesome.
Okay, on to the all-important GPU, where you choose between NVIDIA, AMD, and Intel.
All three have their strengths, but GPUs can get eye-wateringly expensive.
and you can't water cool with tears.
So my strategy was just to find a good used GPU for around $200.
I ended up finding a nicely mid-range card, the Nvidia 3060 Ti on Marketplace for $170.
I picked it up and being a certifiable idiot, on the drive home it occurred to me, I haven't even tested this thing to see if it worked.
Nor did it even say anywhere on the box what kind of GPU it was.
So I took to the internet for help, and it did seem like it's a 3060 Ti, but I guess the final test will be when we actually plug it in.
System RAM is much easier.
For just gaming, 16 gigabytes seems to be perfectly fine in 2025.
and I found a new 16 gigabyte Corsair kit for $34, clocked at 3,600 megahertz.
My motherboard has four slots in total, so I could grab another two in the future if I'm wanting 32 gigs of RAM.
For an SSD, this is where I started to get nervous.
Being an Apple user, I knew the SSD is the most expensive part of the system, where going to a one terabyte drive could cost literally hundreds of dollars, obliterating our budget.
Wait, what?
I'm sure it's not a perfect apples to apples, but it turns out in PC land, you can get a well-reviewed budget SSD like Western Digital's Blue Line for $55 a terabyte.
So I picked up one of those bad boys on Amazon and holy crap, I had no idea how tiny these were.
last medallion time the power supply aka psu this one legitimately was hired for a bunch of reasons the two pieces of advice i kept getting were one don't cheap out on your power supply it powers your whole system and can last ages if you get a good one secondly ideally don't buy a used one
Why is buying a used GPU fine, but not a PSU?
That's a great question.
I don't know.
I'm just following advice.
Okay, but what defines quality?
A few things.
A trusted brand is a really good start.
Oh, and power supply fans are totally weebs.
If it's not from Japan, it's no good apparently.
But overall, the noise and efficiency are the two really important things.
Efficiency, you say.
Long story short, there's two kinds of electricity, AC and DC.
In ancient times, we found it was cheaper to transmit AC over long distances, so DC lost and AC became the standard.
We later found that's not really the case, but now we're kind of stuck with our infrastructure.
Our power lines are AC, our house is AC, but hilariously, most of our electronics use DC.
So we need to translate that AC electricity that comes from our wall to DC electricity that our computer can actually use.
This is what your power supply does, and its efficiency is how good of a job it does at converting that AC to DC.
If it's 75% efficient, that means that of the AC electricity that comes in, 75% gets converted to DC and 25% gets wasted as heat.
So obviously, the higher the number, the better here.
Cybernetics, a new company that despite lacking an R, everyone seems to pronounce as Cybernetics.
Wait.
Anyway, Cybernetics is a handy organization that measures efficiency and noise levels for power supplies and publishes these handy graphs, which we can use to check out our options.
But that's not all.
Like motherboards and people, PSUs come in different shapes and sizes.
ATX being the largest, SFX being the smallest, and SFXL being in the middle.
Ideally, I would get a tiny SFX or SFXL one, but like small motherboards, the smaller they are, the more they explode in price.
So budget-wise, we're gonna have to make the ATX size work.
But puzzlingly, while SFX is a size standard in all three dimensions, ATX, on the other hand, is a size standard in only two dimensions, width and height.
But the depth can be however long you want.
Seriously, this is an ATX power supply, and so is this, and so is this.
What a bizarre standard.
For reasons you'll see more of later, we are gonna aim for a max depth of 150 millimeters, mostly so we can fit all of our things comfortably in our build.
and I landed on, drum roll, the MSI A850G.
It supports all the newest stuff, is exactly 150 millimeters in height, and was on sale for 100 bucks new.
The max 850 watts of power is probably a bit beefier than I really needed, but it was only slightly more expensive, and it gives me a lot more headroom to use more power hungry parts in the future.
And as for efficiency and noise, on Cybernetics, it does really well.
I was slightly worried that I overspec'd it, because most people say that power supplies reach their peak efficiency at 50% load or so, but for Cybernetics, this one reaches its peak efficiency at right around 35%, which is probably right around where I'm gonna end up.
And it's over 90% efficient there.
Nice.
And as for sound levels, it's virtually silent until right around 450 watts of draw, and even after that, it's really not that bad.
And yeah, no clue why they use red to indicate silent, but you can see the legend there at the bottom.
Wow, okay.
With that, we have collected our six PC part medallions, and we're ready to face the final boss before we actually assemble the whole thing.
The case.
This was far and away the hardest part of the whole build to decide on.
I'm looking for something well-made, compact, looks good, has modern features, supports microATX motherboards, an ATX-sized power supply, and is cheap?
Yeah, trust me, that was not easy.
In fact, I'm pretty sure this case is a pretty well-kept secret, since when I hinted and asked people to guess, literally no one guessed correctly.
The Lian Li A3 was a common guess and looks like a great case, but I wanted something even a bit smaller.
So what did I go with?
The Sama IM01.
It's only $60, it's made of metal, has a nice minimal look, and despite supporting micro ATX motherboards and ATX power supplies for volume, which is how these small cases are normally measured, it comes in at a pretty tiny 22 liters or 1500 tablespoons in total size, which means it almost qualifies as a full-on small form factor or SFFPC, which would mean it's under 20 liters.
Heck, it even comes with a cute little fan.
But do you know what sold me in the end?
It's absolutely incredible description on Newegg.
The tiny me has big idea.
Big ideas are exactly what I wanna hear because GPUs are getting big.
Fun fact, at a max length of 335 millimeters, this case can support longer GPUs than the juggernaut Mac Pro at 312 millimeters.
That leaves me plenty of room for upgrading.
But it's not perfect and we're gonna have to modify it a fair bit while still on a budget.
First and foremost, while I love how simple and minimal the case is, with the front it almost borders on bland for my personal tastes.
and the airflow really isn't the greatest.
There's a ton of gorgeous case fronts out there, so I wanted something a bit more visually appealing for my case.
And thankfully, this one pops right off.
Secondly, the front I.O.
makes me sad.
My next statement will probably result in one of these situations, but I really think it's time for USB-A to die.
It has served us super well since 1996.
That's older than Goodwill hunting.
Heck, the release of USB-A is closer to when humans first stepped on the moon than it is to today.
Whenever I see it, I'm transported back to my school's library and the ancient computers that I'd play Roots Learn on, and it's not even like USB-C is some new, untested thing.
It's like a decade old, which someone should really tell Logitech.
and I can get much faster speeds.
And more importantly, it's reversible, so I can plug things in right the first time.
So for me personally, for my storage to even like my kitchen scale, I really only have USB-C things and cables kicking around nowadays.
So this front I.O.
really needs a change.
For a more interesting front, I had to look no further than the back of my monitor.
This has been one of my favorite design flourishes of the last decade.
It looks like an elegant cheese grater, and the nested spheres are so fun to look at, and it allows for really great airflow.
I knew I wanted something like this for the front of my case.
Turns out, this design is pretty mathematically complex, so shout out to Jay Peterson for an awesome blog post on all the math required to reconstruct this case.
I opened up my CAD software and punched the formulas in, and quickly had something basic.
After that, I got out some calipers and took a bunch of measurements of all the existing parts of the case so I could design something that would snap right on.
After about a full day, I ended up with something I was really happy with and went to 3D print it as a test.
And, uh-oh, it's too big for my 3D printer.
To make it fit, we'll bust out the Pythagorean theorem where A squared plus B squared, yeah, we just lean it back a bit and it fits.
Test print time.
And what do you know?
It printed easily, snapped right on, and outside of the color, I'm loving the look and the increased ventilation.
The original case had these little separate pins that the front panel would snap into, and I even modeled those as part of the design.
But it turns out, just making slightly undersized holes worked incredibly well and strong.
Work smarter, not harder, right?
You can see I also made a quick draft of the front IO of the case, a simple setup with a power button and two USB-C ports.
I could have kept the headphone port, but I mostly just use wireless headphones nowadays.
I also printed a second version with even more holes, but I think I prefer the current version.
And I always hear about people's cats walking on their power button, and mine definitely will, so I wanted to design around that.
Being a Mac user, my initial thought was to put it on the bottom of the case.
But in the end, I put it on the top, but recessed it slightly so that no cat paw can actually get into it.
But human fingers still easily can.
Okay, but how do we change our front I.O.
from USB-A to C?
I found a pack of these cheap front I.O.
replacement cables that have USB-C and connect to your motherboard's USB-C output.
The only issue is that our motherboard only has one USB-C output.
So I also bought a cheap adapter that converts the USB-A header to USB-C while still keeping that nice five gigabit speed.
Now we can't really have vertical USB-C ports anymore because the cables won't fit.
But we can rotate them horizontally.
I mocked up a design so these could slide in with a plate that would go over them to secure them into place with these M3 screws.
And a quick test showed it worked like a charm.
for the power button, I wanted to avoid spending more and looked into harvesting the power button from the original front IO.
Sure enough, it was super easy to desolder and it's just a basic button.
I also wanted the nice white power status LED beside it, so I also desoldered that and gave it a quick test with a coin battery.
Wait, it's blue?
I really don't like blue status LEDs.
They just feel so distracting.
But thankfully it comes right out of its casing and we can just replace it with a 5 cent white LED from Amazon.
Nice.
Getting a 3D printed button to actually click is something I have no idea how to do.
In fact, I still don't know if I did it correctly.
But what I did do was print a little cavity for a circular button with a square base to set in.
The square base is so the button won't spin around when you click it.
From there, I made a little shell for the power button to sit in that would push up against the square base.
And another cap to clamp it down, and a channel for the eventual wires to run out of.
After a bit of trial and error, I finally got something with a nice, satisfying click.
I then just needed to add a little cavity for the LED to sit in, so I gave it a tiny little hole for the light to shine through so that it wouldn't be too overwhelming.
Spoiler alert, yeah, it still would be.
One remaining issue.
The ventilation for this panel is almost too good.
Dust bunnies are going to ravage this, so I designed a little filter mesh, like what already exists on the sides of the case.
I could have just bought this on Amazon, but why not 3D print this too?
I kept with the theme of the front of the case and went with a bunch of offset circles.
And holy crap, nothing has made my computer angrier than Fusion 360 trying to put thousands of little holes in a rectangle for some reason.
I split it in half so it would fit on the printer bed easier, and I added some ridges so it could slide into the front panel.
A quick test print is really promising and really fun to play with.
The last thing I wanted to design was some replacement feet.
The existing feet are fine, but I wanted something less shiny that also lifted up the case a bit more for better airflow.
I think a tapered design like this would be a really nice improvement.
With all that designed, all that's left to do now is our final high quality print.
Oh, and if you made it this far into the video, maybe you kind of enjoyed it.
Only if I genuinely earned it, maybe consider subscribing so I can make some more videos.
Wow, that came out pretty great.
Layer lines are minimal, but we'll definitely need to touch it up some.
The mesh fits in snug and the panel snaps onto the front of the case in a very satisfying way.
And I'm loving how the feet came out.
We're just missing the parts to hold the front IO in.
One sec.
Yes, perfect.
Oh, and if you want any of these parts for yourself, I'll just put a free download link in the description that you can grab.
Now our only catch is the colors and finish between our prints and the case aren't really a great match.
Fortunately, I already wanted to paint the case itself more of a graphite color rather than its stock black.
I think a cool dark gray just gives cases a really premium look.
So I ran off to the hardware store to pick up some primer and paint and landed on some sandable primer, which should also help to fill in any imperfections in the 3D print.
And I also got some metallic spray paint and clear coat.
I then smoothed out the surface with a combination of wood filler, sandpaper, and the sandable primer, repeating until everything looked really nice and smooth.
I scuffed up the main PC case too so that the primer would adhere better.
Then I just rubbed everything down with some IPA as a final clean.
Time to paint!
And it turns out an old box for an IKEA desk makes for a perfect portable paint booth.
I am no painting professional at all, but from what I understand, we want to slowly build up thin coats until we have a really nice finish.
I added a quick satin clear coat to really dial in the finish.
And with that, the case is looking pretty dang awesome, if I do say so myself.
Actually, wait a sec.
So I'm at Home Depot, as one does, and I randomly noticed these broomsticks that seemed to be made of solid walnut for like six bucks.
And I got thinking that, hey, I might be able to make even cooler PC feet out of these.
So I diced them, 3D printed a jig, drilled some holes, sanded and finished them,
And now I can't decide if I like these or the gray feet better.
I'm genuinely curious what you think, so leave a comment.
I think I'll go with the walnut for now.
Okay, all that's left now is assembling the whole thing.
After watching a great build guide from The Verge, I'm feeling pretty confident.
I keep hearing that it's just like Lego for adults.
But if I do something dumb, please, please, please tell me.
I know we start by placing the motherboard on its box and build what we can outside the case first.
One thing is that static electricity is apparently scary for PC parts, but Linus said we can mitigate it by just plugging in our power supply, then touching it every so often.
So we'll try to remember that.
Uh, Goatmeal?
What is Goatmeal?
That is correct.
We will be back with the clip right after this.
Stay tuned.
With that burst of confidence, let's start with the CPU.
We'll begin by raising the small lever by the socket.
AM4 CPUs have the pins on the bottom of the actual CPU, so I have to be careful here.
We want to align the little triangle on the CPU with the little triangle on the socket.
Then, just line those up as best you can, and you kind of just no-scope it.
It might take a few tries.
Just kidding.
We want to very carefully lower it into place.
then we just lower the arm to lock it in.
Cooling was an area I haven't talked much about, but the Ryzen 5 5600 comes with a stock cooler, and I'm hoping alongside the GPU fans and the included case fans that we'll have enough airflow to meet all our demands, but I guess we'll just have to see when we test some games.
To install the stock CPU cooler, we first wanna remove the retention brackets on the front.
Then we'll apply our thermal paste.
I heard you can just put a pea-sized blob down, but I don't trust peas.
And this cool Optimum guy said you can just paint it on evenly, so I'm gonna do that.
The cooler can only go on this way or this way, so I'll choose this way so that the cable can go toward where it plugs in.
Now we just gently line up the cooler with the four screw holes and tighten it down in a diagonal pattern.
I'm also going to take out these four screws and realign the top logo because it was really bothering me.
Ah, much better.
Then we just connect that cable to the CPU fan header on the motherboard.
For the SSD, our motherboard supports two and we'll use the main one in the middle.
Yeah.
Next up to bat is our RAM.
The motherboard's silk screen thankfully helpfully shows which DIMM slots to put the RAM into if you only have two, so I'll follow that.
I open up the tabs and they're just supposed to click nicely into place.
I think that's everything for the motherboard since we do the GPU and the PSU once it's actually in the case.
So onto the case, where we'll first take off some panels for easier assembly.
We'll also pop in the IO shield for the motherboard before we forget here.
Now we can screw the motherboard down, noting that the case has seven standoffs and our motherboard has eight holes, so hopefully seven is secure enough.
But just to be sure, I won't take this mountain biking until someone comments.
Now let's do the front panel I.O.
by first stealing the cables from the front I.O.
's power button and LED, checking which is positive and which is negative, then soldering it onto our own power button and LED.
Then we can secure all the front I.O.
down to our panel with some M3 screws.
And then plug the other ends into our motherboard.
Quick cookie break.
Next up is our beloved GPU.
Its thickness takes up two slots, so ooh, magnets.
So we'll unscrew two slot covers, unlock the PCIe latch, insert it into the motherboard with another satisfying click, and finally secure it to the case.
For our power supply, we'll unplug it, then grab our power cables.
There's a ton.
But for us, we'll only need the 24-pin motherboard cable, the 8-pin CPU cable, and our GPU has two connectors, so we'll need the 12-volt high power to two 8-pin connector.
We'll plug those into our power supply first for easier routing, then I just had to modify the bracket a bit so that the plug would fit.
From there, it's just a matter of plugging it in and screwing it into place.
Now we can route those cables to the motherboard header, the CPU header, and finally the two cables going into the graphics card.
We'll cable manage a bit with some cable ties, and hey, not bad.
You can see, this is why we had that 150 millimeter height requirement for our power supply.
Shout out to a person for doing the digging, but any longer than that and the cables coming out would limit us from being able to use any longer graphics cards.
And my dream of one day putting in a big 4090 would be just that, a dream.
Wow, believe it or not, that is everything installed.
Now is the big test to see if we actually did everything correctly.
The LED's on.
Oh my God, it worked.
Let's go.
I figured I'd have to fix something on the first go, but it turned on first try.
Actually, there was one fix I had to make.
That status LED is still hilariously bright.
Why is your PC so bright?
so I took a tiny bit of parchment paper and put it into the LED hole, and it actually worked like a charm.
With that solved, it's Windows installation time.
I grab my laptop, and Microsoft makes it weirdly hard to create a USB Windows installer if you're not already a Windows user.
Like, for some reason there's no Mac or Linux installation assistant, so I'll just select the ISO file, and while that downloads, I'll hop over to GitHub and download this handy tool called WinDiskWriter.
Basically, for some reason, my motherboard will only accept a USB drive formatted to FAT32, which only allows files up to 4 gigabytes.
The Windows ISO file, on the other hand, is way bigger than that.
And since a billion, oh, I'm sorry, trillion dollar company couldn't build a non-Windows installer to break up that file into smaller chunks, this tool by a random non-trillionaire will do it beautifully.
We just plug in our USB drive, copy anything important off of it, because it's going to be wiped.
Then in WinDiskWriter, choose the Windows 11 ISO file we downloaded, select our flash drive, set it to FAT32, and just hit start.
This might take a minute, but once it's done, we'll just eject our drive.
Behold, Windows 11, ready to install.
Shall we?
Turning the PC back on, we now get the Windows installer.
And from what I understand, Windows is perfectly usable nowadays without a product key, so I'll just skip that for now.
Windows 11 Home will work nicely.
We'll then choose our one terabyte SSD for the install, and it'll get to work installing Windows.
But just before it finishes, it'll be like, psych, and ask us to connect to the internet and sign in.
But we can bring up the command prompt with Shift F10 and type ubi bypass nro, which will allow us to install Windows without needing any internet connection or Microsoft account.
Nice.
After that, it's as easy as clicking through a few easy setup screens and we're greeted by the Windows desktop.
Okay, let's download some apps.
And my internet doesn't work, which means it's time to install some drivers.
I'll grab my MacBook since, you know, no internet on this computer yet.
And because MSI makes my motherboard, we'll grab a bunch of the drivers from their website, including the chipset drivers, as well as ethernet, wifi, Bluetooth, and audio drivers, so Windows can properly use all those components.
I'll throw those on a flash drive, and then I'll plug that into the new PC, and then it was just a matter of finding and double-clicking a bunch of files called setup.exe and waiting around for drivers to install.
There's even some cute install wizards that look like they're from Windows XP.
And woohoo!
I have internet access, which means I can do everything going forward right from my new PC.
First use of that will be to go to the NVIDIA website to grab the drivers for our graphics card.
These were pretty easy and even had some great jokes like the 5090 being available.
After that, I just had to update Windows and after it rebooted a few times, I was feeling pretty good.
That is, until I realized there was one last thing to update.
And it's genuinely the one thing that scares me the most for some reason.
The motherboard's BIOS.
It always looks so intimidating.
And maybe I can update the BIOS.
And maybe you're a little fat bear cub with no wings and no ability to update the BIOS.
but it's important, so let's do it.
Oh, and for the unaware, the BIOS runs when your computer starts up to get all your hardware configured before handing it off to Windows.
Kinda like how a parent might get a kid ready before sending them off to school.
We can check our motherboard manual for which USB port we update the BIOS with, and yup, it's a USB-A port.
So I grabbed an old flash drive, which apparently has to be less than 32 gigabytes.
Then we go back to the MSI website to grab the download.
There's a text file with instructions, but we just want the file with the actual juice, and then drag that onto the flash drive.
Ensure the flash drive is in the flash BIOS port, and then just shut down your computer.
Now, maybe this was fearmongering, but apparently if your power drops out while the BIOS is updating, your computer can be toast.
So I'm gonna go full nerd and plug this into a little, again, not sponsored battery to be on the safe side, since my power can be kinda screwy.
Okay, so now after turning it back on, you have to keep mashing the delete key, and then we'll be brought into the BIOS, where the UI appears to have last been updated when the first Lord of the Rings movies came out.
Oh man, did you know the actor broke his toes in this scene?
Crazy.
We'll select M flash at the bottom, which will bring us into flash mode, where we can select our flash drive, and then our juice file, where it'll update.
Hey, that wasn't so bad.
but we're not out of the woods yet.
We'll go back into the BIOS, and while we're there, we'll tweak some recommended settings by entering advanced mode, like enabling XMP, which lets our RAM run at maximum speed, enabling resizable bar, which boosts our GPU's performance, and enabling virtualization and secure boot.
I also noticed, weirdly, the keyboard couldn't wake the PC up from sleep, so the last thing was just tweaking that setting.
Okay, yeah, that wasn't so bad.
Take that, mother bear.
Now let's download some apps.
We got Chrome earlier.
Ooh, let's download hardware info for its most common use case, seeing if we got scammed on Facebook Marketplace.
Oh hey, it is a 3060 Ti.
We didn't get scammed after all.
Woo!
Next, I remembered from 2006, don't I need an antivirus or something?
But apparently, Windows has a good built-in one now.
Nice.
Now I just have to stay away from LimeWire.
That just leaves Steam to install.
Time to see how our little buddy performs.
I'll download Cyberpunk 2077, Black Myth Wukong, and Stardew Valley, the classic trio of modern benchmarking.
Starting with Cyberpunk, let's try 4K and lean on DLSS, which is Nvidia's fancy AI upscaling technology.
Now, to a seasoned gamer, you might be like, meh, you're leaning on a lot of DLSS upscaling, and that's not even 60 FPS.
And to that I say, yeah, you're totally right.
But let me tell you, as more of a casual console gamer, I am genuinely over the moon at how gorgeous this is.
Things aren't perfect, Cyberpunk's making the CPU quite toasty at around 85 degrees, and the fans are going pretty hard right now.
With BlackMath Wukong, we'll select similar 4K graphical settings as we did with Cyberpunk.
And honestly, still really good.
Right around that same 45 FPS range, I would say.
And dang, what a beautiful game this is.
Temperature-wise, it was actually a little cooler, with temperatures hovering in the mid-70s.
Wow, I sound like a weatherman.
Last but not least is Stardew Valley.
Often considered the modern-day Crysis in terms of benchmarking.
It's running at a blistering 500 FPS, so I can finally beat Abigail at the Egg Festival.
Because it did better than I expected at 4K, let's try a 6K monitor that's more for productivity.
They are siblings after all.
4K is a total of over 8 million pixels, but that looks meager compared to the enormous 20 million pixels that 6K is pushing.
So I do not expect this to go well at all.
And Cyberpunk worked okay, actually a little better than I thought, but I think 6K might be asking a bit too much of it.
I mean, it's stunning, especially with the HDR, but hovering around 25 FPS and 90 degrees on the CPU meant not exactly playable.
Black Myth Wukong at 6K was just about the same as Cyberpunk with under half the frame rate versus 4K.
Again, a very pretty slideshow though.
Stardew Valley still absolutely crushes it with 500 FPS though, and the map is comical at the default 6K zoom level.
You can basically see the next town over.
Enough about monitors though.
Man, plug this thing into a big TV and connect a controller and I'm not really missing my console for couch play.
I just need a bigger desk now.
Okay, yeah, yeah, it plays great, good for you, but how are the thermals?
The noise?
We have a pretty piddly fan setup after all.
Honestly, pretty good.
After gaming for a while at 4K, the CPU is quite warm at around 75 to 85 degrees, but it's never thermal throttled.
With the GPU, it's not exactly cool at 70 degrees-ish, but I would give that a passing grade.
This PC could probably use another well-placed fan, though.
What about the sound levels?
Again, pretty good.
Even with the game muted, you can hear the fans, but they're not that loud at all.
Definitely room for improvement, but it doesn't drone on.
And with the game audio playing, you cannot hear a thing.
Dang, I am genuinely so, so happy with how this PC turned out.
Building it was so much more fun and easy than I could have ever expected.
Like, I get the appeal now.
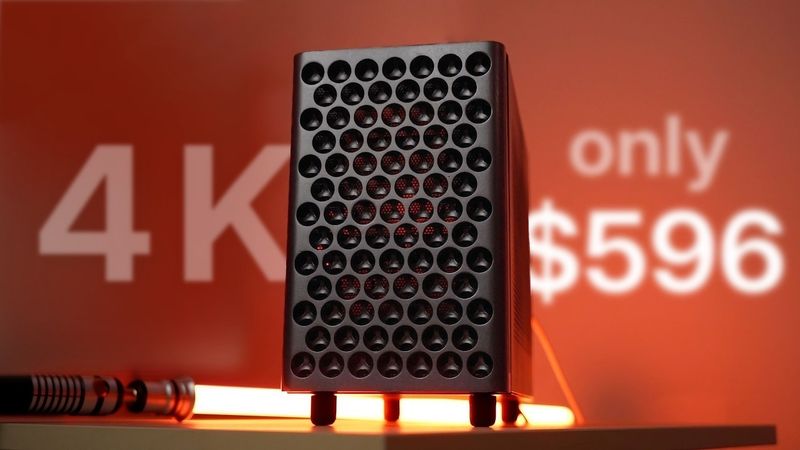
And I came in well under the $700 budget at $596 for just the parts and $642 if you count the customization.
Well under the PS5 Pro and even cheaper than the new M4 Mac Mini.
That leaves me with $58 remaining, so I'd really appreciate it if the experienced PC folks could give me some recommendations on what to spend that on.
Maybe some better cooling?
More RAM?
And again, if you made it this far, maybe just maybe you enjoyed the video.
So only if I genuinely earned it, maybe consider subscribing, because I have a bunch more fun ideas I want to make.
Bye for now!
Similar videos: I made the PC I couldn

I Built My Dream Keyboard from Absolute Scratch

The NEWEST Heavy Metal Hitter RC

Dolby Atmos Demo 5.1.2 SOUNDCHECK

High-End REEL Editing Style You Must Learn in 2026

Is this Budget RC Truck worth a Brushless Upgrade?