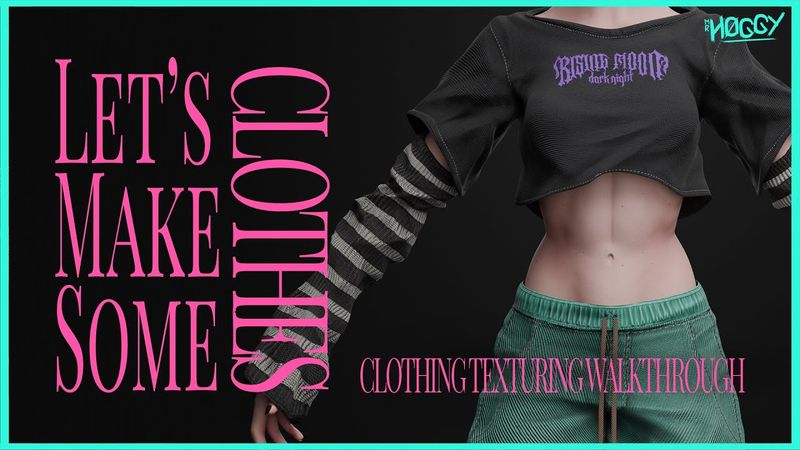
Let's Make Some Clothes - Substance Painter Clothing Texturing Walkthrough
Download information and video details for Let's Make Some Clothes - Substance Painter Clothing Texturing Walkthrough
Uploader:
Mr HoggyPublished at:
11/27/2023Views:
13.1KDescription:
Video Transcription
Hey everyone, I'm Hoggy and this time I'll be showing you the process that I take to texture my clothing.
You can see this is the same character from my previous video where I talk about the skin texturing, so I left a card there and a link in the description just in case you missed it.
But yeah, let's make some clothes.
so this is the model that I have currently and you see there's gonna be like a little variation with the materials and the clothing that I made so this is gonna be pretty fun so yeah at first we'll be starting with the pants which is gonna be like a more denim like texture so yeah let's get started at first I'll create a folder here and I'll call this just pants I'll add a white mask to it and I'll create our base layer so
I feel here a roughness around 0.8 because I don't want it to be too shiny and reflective and I'll pick green bluish kind of color for her pants yeah something like this so at first we'll be giving this a little bit of color variation which is gonna be like the tiny weaving patterns that we have this is not gonna be affecting like height roughness or anything it's just color but yeah
So I'll create a fill layer, use a gesture color, so let's go to my textures and I'll be looking for a weave 02, because you see it's this really neat like woven pattern.
So yeah, I'll create a black mask, add a fill and I'll drag our weave here.
it's far better now bring out tiling to around 12 and the UV tiling maybe 12 as well probably less yeah 12 is way too much so maybe 4 yeah 4 seems nice so rotate this because I want it to be angled like pretty straight
Yeah, like this-ish.
And the position, I'll be changing it so it doesn't do that much.
And I'll bump up the contrast.
And now I'll go back to the color so I can adjust it better.
So this first layer I'll make it a lighter hue of our base color.
Yeah, something like this.
Maybe even... Yep.
And I'll call this color all white.
And since our next layer is gonna be pretty similar to this one, I'll just be duplicating it.
So I'll call it color 02.
And the color for this one is going to be a little darker.
And for our mask I'll take our weave 2 and I'll rotate it so it has like this neat crisscross effect here.
And because of this it almost like washed out my main color so I'll be compensating it with the base here.
Yeah, this seems more like it.
Okay, so now I'll be doing like the actual weaving patterns here.
So I'll go and create another fill here.
I'll make it only height.
And for the height value, I'll plug in fibers.
Yeah, fibers 02.
So let's plug that in.
Make the pattern into 12 again.
And the tiling, maybe 24.
No, that's too much.
8.
Yeah, 8 seems about right and I'll rotate this 45 degrees Cool.
So if we zoom in we can see that the effect is a little bit too strong So I'll add a levels here now make it affect height, you know, okay And let's play around with the sliders until we get something good.
I mostly want like those depth lines
But I also want these.
But I also want this kind of pattern here, but I don't want it being too strong.
Something like this seems fine, yeah.
Cool, we'll call this weave01.
And now we'll be making another weaving layer for this, so let's make a fill layer, only height.
And the one I'll be plugging into this is weave02.
So you can see it's way too big, so let's bump the tiling again.
This seems about right.
And I'm not gonna rotate this one.
So now let's add a levels because the effect is a little too strong for my tastes.
Let's make it height.
Yeah, something that it can like affect the overall pattern, but it doesn't like overwhelm it.
Yes, it's something more like this.
And I'll also right-click here and add a filter.
This filter is going to be Warp, because I want it to feel more noisy and add more variation to it.
And of course, this is way too strong, so I'll use the intensity divider of 100 and play around with this later until I get something I like.
Yeah, something around this.
Cool, so now we have the base of our pants, so...
Now we'll be making it pop out a little more.
So first off, I'll be adding some discoloration here in the middle.
So I'll add a fill here.
I'll keep it white for now for visualization and then I'll be tweaking the color.
So discoloration and I'll add a black mask.
And the brush I'll be using is Smooth Noisy.
So now I'll be like painting some light discolorations here like around the knees and places like that where you would be like naturally losing color.
So it has this like washed out effect.
But yeah, very gentle strokes and just not going too hard in it.
Yep, something like this.
Yeah, something around this.
Alright, now for the next layer, we'll be adding a little bit of ambient occlusion.
So I'll make this color only again.
And the color itself, it's gonna be dark bluish.
I usually like to go with like a colder hue of like your main color.
So because I went light greenish, now I'll be more into like the blue side.
And the blending style I'll set to multiply.
So I'll be adding a black mask here, a fill layer, and a fill going to a project and taking the ambient occlusion from my pants.
And of course this is in the inverse of what we want, so I'll add a levels and I'll invert it.
This is a little bit too strong for me, so I'll play around with the sliders so it's not too overwhelming.
Yeah, something like this seems okay.
We definitely don't want to overdo this.
Now for the next layer, I'll be adding, uh, curvatures.
So, let's add a fill there.
Color, and I want to make, like, some very, like, light edges.
So here I'll make it, like, uh...
pretty light color yeah something around here i'll call this curve and once again i'll add a black mask fill and our curvature it's already pretty close to the effect i want but i'll still add a level so i could play around and actually see better things yeah something like that let's go back to our material view and you can see like how everything is already popping out more
So yeah, this is definitely what I want.
Oh, I also forgot about a thing.
I forgot about creating a mask for our weave 01.
Because I don't want it affecting the elastic bands here.
So I'll add a white mask.
and i'll mask out this part same goes to weave too cool so now we'll be adding the stitches for this i usually really like uh hand painting my stitches instead of using like procedural methods so now i'll be showing my
So now I'll be showing my setup and time-lapsing everything, so you don't get bored to death, but yeah.
So I'll add a paint layer this time, call this Stitches, and I'll go into my brushes, I'll scroll down until I find the stitch brushes, yep.
So this is Stitches Straight, which you can see it's already like a built-in stitching tool, which I really like.
and for this one i'll make the stitches maybe white yeah white really fits and for that i'll use a running double let's decrease the size a little bit and i still think that this is a little too uniform so i'm going back here and i'll be using a little bit of angle jitter not too much or else it becomes like too jagged but yeah i like having this kind of variation from the jittering here and now going back to the advanced parameters
because i think the stitches here are a little bit too close together and a little bit too thick so i change the length and the width so a little lower value yeah this seems about right so now we'll be painting our stitches i'll activate lazy mouse because my hands aren't that steady so yeah
cool now we have our stitches as well so now I think I want to make the pants a little bit darker so I'll go back to my previous colors and tweak things a little bit yeah this seems about right
Cool, so now I'll be texturing this little rope bit here.
So I'll go back to my pants mask and I'll exclude the rope bits here.
There we go.
Now create another folder.
I'll call it rope.
Now give it a black mask so I could include these manually.
Okay, and for the main color of this, I'll be using like an orangey, more like brownish kind of color.
So maybe something around this, yeah.
Now the roughness will be around 0.8 as well.
And now we'll be adding some weaving patterns pretty close to what we did on the base pants.
So I'll add a fill layer, make it only height.
And I'll add a fibers too to it.
The same thing, I'll increase the pattern until it is a value that I actually like.
Rotate it 35 degrees.
This is too small.
Yeah, maybe something around an 8.
So, I'm not gonna do any kind of, like, levels adjusting for this one.
So, I'll just call this rope.
Yeah, that's pretty much it.
I'm not gonna do anything fancy to this.
So, yeah.
so now our pants are done so now let's go to the shirt so the t-shirt will also be a process very similar to what we did with the pants so let's get going i'll create a folder i'll call it shirt and i'll add a black mask this time because i only want the shirt to be masked here now let's create our base layer now it shows like something very dark almost black
that I usually don't like using pure black for anything because it feels like it almost interferes with like the shading you get with the lights so I'd strongly advise to not use either like pure black or pure white usually staying away from like the far edges of our color block so yeah roughness around 0.8 so now we'll start creating our weaving patterns
So for the shirt, I want to use a checker, so checker 01, only height, so let's drag our checker here.
Once again, bring up the tiling, so yeah, that seems about right.
Rotate it 45 degrees, and that will decrease the intensity a little bit, so I'll add the levels, effect height...
And take the slider down a little bit, something like that seems nice.
And I'll also add a warp, so filter and warp.
And once again I'll use our intensity divider to 100, so we have like those nice bumpy noisy parts in here.
And now I'll go straight away to the ambient occlusion and curvature maps.
Cause I won't be doing like that much to the shirt here so I'll make it like a dark purple.
I'll bump this to multiply and I'll create a black mask with a fill thing.
So now I'll go back into project and plug in the ambient occlusion from our shirt.
And once again it's in reverse from what we want so let's add our levels, invert that and I'll tweak the sliders a little bit so we don't get like those super dark spots which is not something I really want.
Yeah that seems nice.
and now let's make the curvature one so a fill layer i'm gonna use color and like a lighter shade let's make it really light for now so yeah black mask fill and our curvature so now let's go to levels again and just tweak things
and tweak the color a bit because I think this is a little too light yeah something like that and now I'll be adding some fake folds here which also helps out a lot with adding to the effect here so I'll create a fill layer make it only height and we'll be looking for the crystal texture so crystal 2 now just
take a look at height here and you can see this pattern is a little too big so i'll make it a little smaller so we can see things better let's go back to our material and you can already see those folds here but also rotate so yeah something like this will do yeah
all this folds and this time i'll add a black mask to this because i want it to be masked by curvature so i'll just look at the mask alone here and i'll add a generator and of course this generator will be our position and you see like i want it to be stronger in the bottom and weaker on the top so i'll go here to position gradient and i'll invert it
yeah and now it's just a matter of tweaking the sliders until i get something that i like yeah something like that so now when we go back to the material we can see the effects of what we done which is pretty neat and now i want to add like a logo here to our chest so um
I'll go into my files and look for my logo I'll drag it inside the substance here and I'll make it an alpha you can see we have the alpha here so now I'll add another fill layer and this fill layer I want affecting color height and roughness so it's just but so far I'll keep it at default settings and tweak it later
so i'll add a black mask with a paint layer now just go back to like a default brush for this so maybe basic hard and i'll go into the alphas and project so you can see like the alpha i just dragged in oh let's adjust it a little bit yeah something like this
And now I'm going back to the settings, so... Make this like a purple-ish color.
Roughness to around 0.5-ish.
Because I want it to...
I want it to stick out of the clothes a little bit, but I don't want it to stick out too much.
And now we're going for the stitches, so... Once again, paint layer.
I already have my stitches... My stitch settings over here.
Okay, so now that we took care of the stitches
we can go to the sleeves now so the sleeves are actually pretty simple kinda texture as this I just want to be like a fluffy almost like sock like pattern so yeah let's create the color for it call it sleeves now make it a mask just for them here we go and now once again let's create our base layer the roughness for this would be around 0.8 as well
So let's make this black-ish.
This I want to be a little warmer so it has like a little contrast with the t-shirt.
But yeah, now let's make our first weaving layer.
So I'll call this weave one.
The process is actually gonna be pretty similar to how we did the pants.
So we're going back to our textures here and I'll plug fiber two into height.
So let's increase the tiling here.
And this time I'm not going to make it 45 degrees.
I'm 1.
And to actually follow along our sleeves here.
So 12, not 12 is too much.
So 6.
Maybe 4.
Yeah, 4 seems nice.
So let's go back to our levels.
And I'll make this a little softer.
Yeah, like so.
And now I'll add a warp.
Once again, divide it by 100 so we can have like the noise and the clumps, but not too much.
And now we'll be adding another weaving here.
So height and the one's going to be weave 02.
So once again, let's increase the tiling, make it 45 degrees.
Yeah, this seems about right.
So let's go to our levels.
Height.
And let's make it lighter.
Maybe a little bigger actually, so... Tiling maybe to 2 notches a little too much, so 3.
Threesome is nice, yeah.
So, let's add our warp filter to this one too.
Yeah, something like this.
And now, this is meant to be like, striped.
Which I already painted in ZBrush, so...
So now I'll be bringing it back as an ID map, so...
I'll make another layer, I'll make it only color.
It'll be this shade of white for now, but I'll be changing later on.
And this will use a mask with color selection.
And I'll go here and pick color.
So now I can pick like the white part of it.
And there you go.
I'm just coming close to actually check if things are alright.
Let me tone down the hardness a little bit because I want the edges to be a little smoother.
And I'll also add a little bit of height to this.
Nice.
I'll change it to a more warmer tone.
There we go.
Now we'll be adding the ambient occlusion and curvature details to this.
Pretty much the same as what we did on the pants and the shirt, so yeah.
Nothing much to comment about here.
So yeah, now that we took care of those, I don't really want to add stitches to this, so let's leave it as it is right now.
And as we see, we are almost done with her now.
Looking good.
So now let's go to her shoes.
which is gonna be pretty much the more complex part of this so let's isolate so we can actually see what's going on and yeah so the shoes here it's gonna have like lots of different materials to it so let's go to the simplest one first that it's gonna be the soles because for the soles like i haven't really thought of like any better way than just using a smart material to be honest so
Here I'll be using a rubber smart material.
And for it I'll be using the rubber dry smart material.
So let's add a black mask and select only the soles here.
And this part on the top too.
Okay so now let's start editing our thing because I don't really want this color here.
Let's make the color here white.
Now once again I'm not using pure white.
I like having a little bit of color here and not going all the way.
So pretty much staying away from the edges.
I'll keep this roughness here but I don't want it everywhere.
So let me make it lower.
And take it away a little bit from this part on top.
So, I'll let it paint.
And I'll paint the geometry itself.
I'll paint it.
And yeah.
So now I'll create another color.
So I'll now create another color layer.
And that'll make it pink.
Which this is gonna be like the second color for this.
So only color.
I'll add a black mask.
And select only the places that I want.
Which will be this little part here on front.
And the actual bottom of the soles.
I'll do some pink.
Because that's what it is.
Now I'll be doing the fabric part of this, which is going to be pretty similar to how we did the pants and the shirt.
So let's go.
I'll make it a random color just so I can see my mask better.
So yeah, I'll just mask in the places that I need.
And leave out the places I don't.
So these are the parts that I'll be using a fabric pattern.
So let's make this our base layer, which will also be white.
and the roughness around 0.8.
So now let's make our weaving pattern again, which I'll be using the checker, so pretty similar to how we did the t-shirt.
Okay, so levels, let's make it a little weaker, and add some noise with the warp filter.
Okay so now I'll add in the different colors that we'll be having here.
So now we'll be having a shade of pink which I'll just color pick from the rubber layer.
okay so now for the other color which is a shade of teal so let's add a teal layer and yeah so now I'll be painting the eyes here so now I'll add a black layer which I'm not even really gonna be like painting because I already did back in Zebra so this is also gonna be a color selection mask
And there we go.
Yeah, and now we'll be adding the ambient occlusion layer here.
Nothing much to say that I haven't already said about it.
Okay, so now I'll be using another smart material for this plastic bit here.
So let's go back to our smart materials and I want some kind of shiny plastic.
So let's go with plastic glossy.
And once again, I'll create a black mask and mask out only these plastic bits.
And once again, I'll change the color from blue to black.
I actually don't really like just how shiny it is.
It's a little too much, so let me bump up the roughness a little bit.
And yeah, it feels better already.
And now I'll be making a texture for the strap here, which would be pretty similar to our rope.
I'll create a folder.
call this strap and make it a black 0.8 roughness now create a mask here and I'll mask out only the strap bits let's cut the space and now make another layer with our fiber pattern so fibers 2 make the size 12 the tiling about maybe 8 no 8 is too much so 4
Yeah fur seems nice so let's make it 45 degrees rotation and there we go.
Our shoes are now fully textured as well.
Okay so we already done everything we had for substance so I'll be exporting the textures and see you in Blender.
And yeah, now we're back to Blender so we could properly see the textures on our character.
And yeah, we can see like how soft her sleeves look and like the patterns on her pants and her shirt.
So yeah, this was how I make textures for my characters.
Hope you enjoyed it.
I'd be really glad if I helped you out somehow.
And yeah, this is Hoggy signing out.
Love you all.
Similar videos: s Make Some Clothes

Uma Jornada Dentro Do Corpo Humano

The Stunning Xfce Customization and How You Can Do the Same

English vocabulary in the kitchen
He Made a Knife Out of Butter!?

Как выглядеть МОЛОЖЕ с помощью одежды? Приемы, которые работают!
