Lightworks — Official Quickstart Guide 2023 — Learn Lightworks in 15 Minutes!
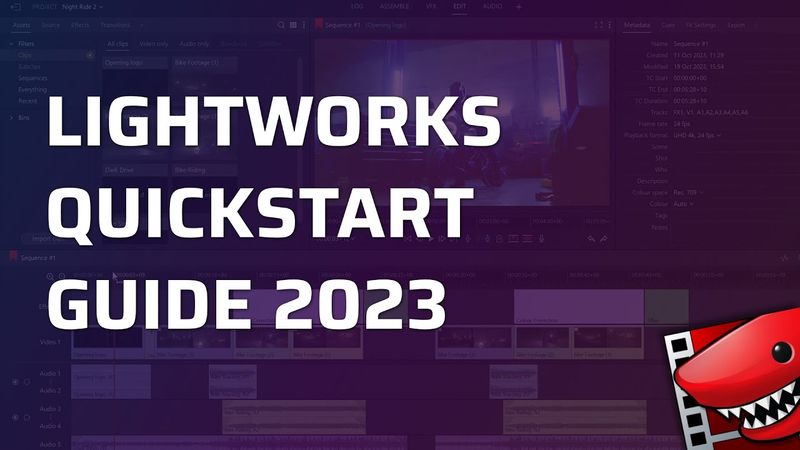
Download information and video details for Lightworks — Official Quickstart Guide 2023 — Learn Lightworks in 15 Minutes!
Uploader:
LWKS - Lightworks Video Editor & QScan AQCPublished at:
11/1/2023Views:
126.9KDescription:
Video Transcription
Hello there, Chris Wells here.
I'm a video editor here at Lightworks and today I'm going to give you a mini overview of how this awesome bit of software works.
And to show that, Future Me has made a short example video that looks something a bit like this.
Well done future me and now I'll show you how I got there from beginning to end.
Let's get started.
When you first open up Lightworks you'll find our project management screen allowing you to view your old projects or in our case create a new one by selecting the create a new project button and giving it a name.
Click create and Lightworks will open up onto your workspace.
There are a handful of workspaces for advanced editing of specific aspects of your video.
But for today, we'll be focusing almost entirely on the edit workspace.
The first thing we need to do is bring some footage into our project.
And for that, we select the import clips button on the left hand side.
In this navigation window, you will see some of our integrations with stock footage and music providers, as well as cloud storage options.
But for today's project, we're just using local files.
Navigate to the appropriate folder and you can either import the whole thing by selecting the import button or if it's only specific files you want just double click to open the folder or click that little arrow as a drop down.
You can switch your view to either a tile or list layout by just clicking up here.
You can double check your clips by just dragging your mouse along that little bar along the bottom or clicking a clip and pressing spacebar.
To select multiple clips, you can just drag along or hold the Command or Control key and click on your desired clips or hold Command or Control plus A to select all.
Once you've made your selection, click Import and there we go.
Your footage has now been imported into your project and now is ready for editing.
and you can also use this button to change views depending on your preference as well as filter the footage types up here.
Now that our footage is imported let's start editing.
For this section I'm just going to focus on the video aspect and then we will worry about the sound afterwards.
This gives us time to really think about each part that we want separately.
As you can see our footage is up here.
We want to start placing it onto our timeline and there are actually multiple ways to get your footage there and I will use each way in this video.
For the first and fastest way just double click your video to open it in the source monitor and then we will select an in point.
This is where we want the clip to start on the timeline and then an out point which is where you want that clip to end.
Once you've done that you can just drag it onto the timeline and as you can see it has placed in the video and the audio of that clip as standard.
To play your timeline you can just press this button up here or hit the spacebar key.
Let's do that again on this clip and find the right moment we want to start and end it and set an in and out point.
And instead of dragging it this time, I'm going to use these buttons here.
The first is replace.
And if I move the play head back a bit and then press it, the clip will be plunked over the footage, replacing it.
To undo this, I can press the undo button here.
Alternatively, press command or control plus Z.
this time if I press the insert button as you will see it will slip into the middle splitting that clip into two and I'll just undo that and insert the clip into the appropriate place.
For the next clip I'm going to use the in and out points again only this time using keyboard shortcuts.
Playing the video I'll press I and
O to set an out point and then I'll press V to insert it onto the timeline.
This is something that as you get more familiar with Lightworks you'll be able to edit it together super fast.
And finally, for the last shot, I'm going to show you yet another way to get clips onto your timeline.
Just drag and drop the clip and you will see the whole thing is there now.
And now we will trim the clip down on the timeline itself.
There's a couple of ways we can do this.
Option one is to hover your mouse over the end of the clip until this bracket appears.
If you click and hold the bracket, you can then drag the end of the clip along to shorten it.
To do this at the start of the clip you can click and hold and then drag that clip into the playhead to shorten it.
You can also do this if you want to expand it again and when you finish trimming just click here to close the cut.
Option two is you can press this button up here and as you can see it has now split this clip into two clips at the playhead.
There is also a shortcut for this which is the C key.
We can then click to highlight and then either press this button to delete the unwanted section or just press delete.
Once we've done that we now have a basic assembly edit of our video.
Now we can use the tools we already know to finesse the timeline to exactly how we want.
And that is that.
You may have noticed that the video is quite pale at the minute and that is because this was shot in a log format, which allows for easier color grading later on.
Right now though, we're just worrying about how the footage works together.
Now that I'm happy with the video part of the video, it's now on to the audio part of the video.
Personally, I think that good audio is at least 65% of what makes a video feel more professional.
So taking time to get it right is important.
The first thing we need to do is create a new audio channel so that we can fit all of the clips on our timeline with room for overlapping.
To do this we right click on the left of the timeline and highlight tracks and then add multiple.
Then we can select how many audio tracks we want in this case two and then click create as stereo pairs.
We need it to be stereo as all of our audio clips are stereo.
Now it's on to placing the audio clips onto the timeline.
Fortunately this is very similar to placing video clips.
You can use in and out points like in the previous section or just drag it on and edit it on the timeline itself.
Personally I prefer to do it this way as it allows me to get the timing just right.
When it's on the timeline you can see the audio waveform for the clip helping you align things visually as well as auditorily.
This first audio clip is of the engine starting on the motorbike so I want to get that in perfect line with when that light comes on.
So let's just use that peak on the waveform to align it up and get it right and hopefully...
Boom!
Perfect timing.
Next, I want to place the running engine sound effect so it looks like it's all part of this footage.
Please don't write in if the motorbike engine doesn't match.
As we can see slash hear, this clip is slightly too long so I'm just going to shorten it to get the timing right.
Now, we need to soften the way these clips intersect with a nice fade.
To activate the ability to edit audio on the timeline in the edit workspace, just toggle this button here, which will allow me to access options to edit these clips.
Just make sure to turn it back off again when you're wanting to do some more trimming.
The first thing I'm going to do is add in a fade.
Simply click and hold on this corner segment here with the mouse and drag it along for as long as you would like that fade to last.
Sounds good to me, let's just add in a little fade at the start of the clip as well.
Okay and now let's just see how all of those clips play together to make sure it sounds like one bike.
Great, next let's add the music onto the timeline and it's quite long so let's shorten that down a bit so I can get the timing just right.
This piece of music has a bit where the beat drops in as you can see by the waveform and what I want to do is time that in with the hard cut from the interior shot to the exterior shot.
Perfect!
Now let's just adjust the music so it's the correct length for this sequence.
All I need to do now is lower the sound levels of the sound effect so it's not so overpowering versus the music and to do that I just need to go to the clip I want to adjust and get my mouse aligned so it will change into this icon and then drag it down to turn it down and drag it up to turn it up.
Great, let's play it back now and see how it all works together.
you
Next we need to make our footage look pretty and by pretty I mean color graded.
On the left hand side we can find a tab called effects which has all of the possible effects we can place onto our video and the one we're after today is, you guessed it, color correction spelt the British way as that's where we're from.
Simply drag that onto the desired clip and you'll see that our effect settings have now appeared on the right hand side.
There are a plethora of settings for you to get into and I would advise for you to just have a play.
Don't worry, you can always undo it with this button here or Ctrl Z and remember that all of these effects are reversible with no permanent changes to the clip itself.
For basic grading though, all you're going to need are these options in the main tab.
Here you can adjust the colors of the shadows, mid-tones and highlights.
Saturation will increase or decrease the intensity of the colors.
Gamma will brighten or darken the mid-tones while leaving the shadows and highlights intact relatively.
Contrast controls the difference between the lighter and darker parts of your image.
Brightness lightens or darkens everything including shadows and highlights.
And finally Gain just adjusts the whites of the image.
We can see the difference the grading mates by pressing this toggle up here on and off.
Now that we've graded it to how we like it for the opening shot let's do the same for the other two only this time let's try and do both clips at the same time.
To do this add the color correction effect on like before only this time making sure nothing is selected right click on the clip you want to extract the effect from and then click unfold.
You will see that the clips have now become a new layer allowing us to trim and expand the effect just like you would any other clip so it covers both of the clips we want graded.
now that we've got it to how we like it all we need to do now is add an exciting and definitely real to be continued title and some finishing touches sometimes we want something different than a hard cut and that's where transitions come in and lightworks has multitudes and don't forget to go onto the lightworks account portal and download those extra free new blue transitions they are available for all plans including free
I think it will be cool to have a nice little dissolve between the opening title and shot in place of that hard cut.
So on top of the left menu select the transitions tab and you'll see an abundance of options.
In the menu just hover your mouse over to see examples of how each of those transitions work with orange being one clip and blue the other one.
Today I just want a classic dissolve so I'm just going to click and drag that onto the timeline between the two clips I want the effect to go on.
I can now adjust this by trimming and moving it like any other clip until I get something I'm happy with.
Remember, when using a transition like this, it will require us to actually have footage to transition over, so you may need to adjust your clips accordingly.
Finally, let's add our definitely cool and totally real to be continued title at the end of the video.
For this, let's go back to the effects tab and find the titles effect and then drag that onto the end of the timeline.
You'll see this has gone on to the effects track of our timeline along with our unfolded color correction effects.
To change the title, just drag your playhead to it and then we can change the text and typeface to how we like it.
There are a load of options to play with, but I'm conveniently going with Tastefully Simple for today's video.
Finally, I think it would be cool to have a little blur transition to that end title.
So let's go along to the effects tab and select blur for the in effect and fade for the out effect.
Then we can have a play for the length of each of these effects in the dropdown.
And there we have it, a full complete little video.
All that's left is to export it.
This newest version of Lightworks allows you to export directly to YouTube with all of your chapter markers and settings right in the app and there is another video available to show you just that but for today I'm just going to export a video file on our computer so I can edit it into the start of the video for past Chris.
To do this we need to go up to the export tab on the top right hand side of the screen and you'll see it will default to whichever settings you had open before.
Instead, we go up to this arrow up here and you'll see a variety of options depending on which subscription tier you're on.
I'm on Pro, so I have all of them available to me.
But for today, I'm just going to choose MP4 slash H264, which is available for everyone.
And the only other setting you need to worry about is what region you export of your timeline, whether that be a marked region, the whole sequence, or whether you want it to just ignore the trailing and leading black.
which you'll see there is currently some on my timeline so I could either delete that blank space or just select that option.
Next all you need to do is give it a name and press start.
This will now run as a background task so you can keep doing some iterations if you want to or just go make yourself a cuppa.
when it's complete you'll get this window with where it's saved and voila our amazing video for me to edit in to the start of this video for past chris thank you so much for watching please feel free to add any suggestions in your comments below or go to our amazing online forum via the lightworks website and you'll find so many other helpful and knowledgeable people there and until next time i've been chris wells keep making movies
Similar videos: Lightworks

Premiere Pro LOG Color Grading INSTANTLY Without LUTs - Color Management Tutorial

Live Reel Editing for My Client | Step by Step Viral Reels Editing | Premiere Pro Editing Tutorial

How to Draw a Cartoon Narwhal: Full Procreate Tutorial!
6 Premiere Pro Tricks to Speed Up Your Editing (2025)
How To Make A New Sequence In Premiere Pro