Mako Total Knee Arthroplasty (TKA) Surgical Technique
Download information and video details for Mako Total Knee Arthroplasty (TKA) Surgical Technique
Uploader:
NewYorkOrthoPublished at:
1/9/2025Views:
2.4MVideo Transcription
My name is Josh Rozelle, and this will be a recording of a mako total knee arthroplasty.
When the patient is positioned on the table supine, we start with a non-sterile u-drape that goes over the proximal thigh.
I don't use a tourniquet.
Two down sheets are placed.
If you'll notice, the foot is hanging by the toes.
This is because the stockinette will come over the incision site, so I like to make sure that the toes are fully prepped.
The next step is to apply a sterile blue u-drape, again crossing the tabs over the top of the knee to seal the proximal skin.
The next step is to apply a split drape in the same direction and in the same manner.
Following this, a bar drape will be applied proximally and handed to the anesthesia staff.
Next, a blue towel and a coker will be used to remove the foot from the web roll and a stockinette will be applied over the foot.
If you'll notice, the stockinette is applied by grabbing the patient's midfoot and then wrapping the stockinette over the toes and then over the heel such that the portion of the stockinette that doesn't come above the incision does not interact with the toes itself.
The stockinette is rolled all the way up to the drape interface, and then Coban is applied around the foot, one wrap around the foot, and then it goes up and over the toes.
Notice that the assistant is never holding the toes themselves, otherwise the Coban will slip off.
And the coband is applied just to the distal third of the tibia to make room for the tibial tracking pins through the mako.
The extremity drape hole is stretched to avoid creating a venous tourniquet.
and the drape is handed to anesthesia.
The leg is put back on the table, and a scissor is used to make a small nick in the stockinette around the knee.
The proximal and distal aspects of the stockinette are folded proximally and distally, and four hash marks are made across the knee without touching the skin.
The assistant at the foot holds the stockinette to prevent it from getting into the incision site.
The eyeband is cut to length.
The eyeband is stretched over the knee and applied like so.
The leg is elevated and the eyeband wrapped around the knee completely to seal the drape interface.
Additional I-band is used to reinforce underneath the thigh particularly.
And once that's complete, the knee is flexed, excess drapes are taken out to avoid slack, and then two non-penetrating clamps are applied to the drapes and stuck onto the mattress to avoid the drapes falling or riding during the procedure itself.
The knee positioner is positioned such that the foot when bent is at 90 degrees and the lateral thigh positioner is positioned at the beginning of the case such that when the leg is left to rest on its own it doesn't fall over to the side.
The lights are adjusted so that the arms are on the opposite side of the patient.
The pulse lavage is handed back first because it takes the nurses the longest time to connect.
followed by the bovie and the suction.
These are clamped to the velcro portion of the drape proximally, and a non-penetrating clamp keeps the pulse lavage secured to the proximal drape.
When doing Mako cases, the instrument pouch and hard canister is positioned on the contralateral side to avoid interaction with the actual Mako robot.
Once that's complete, everybody's outer gloves are changed, range of motion is assessed, and a surgical timeout is performed.
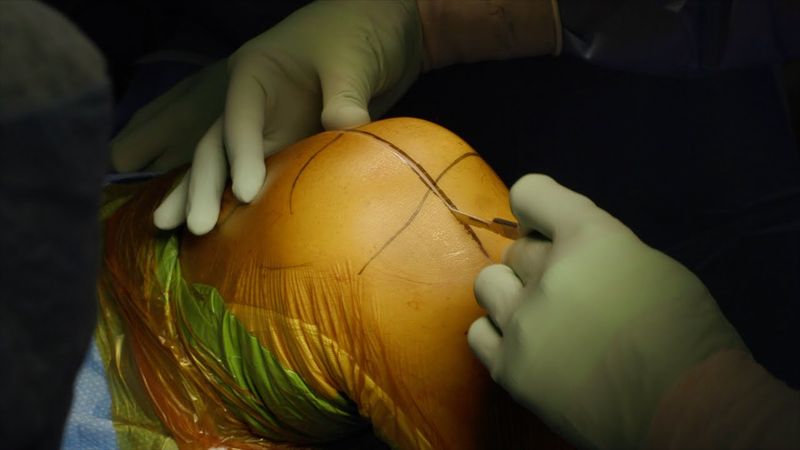
I palpate the tubercle with the pad of my thumb and roll my finger over the tubercle medially, and that's the point of the distal incision.
The proximal point of the incision is about two to three finger breaths above the proximal pole of the patella.
in a straight line so you can see that the incision site is medial to the tubercle distally.
This prevents pain while the patient kneels.
A 10 blade is used to make the first incision very superficially and I'm using tension to open up the soft tissues.
I take it down to the level of the patella first so that I know my depth to avoid going into the tendon.
You can see I was just releasing those transverse fibers there.
and then I'll meet the level proximally and distally.
I'll find the VMO proximally and make sure I don't violate the fascia over the muscle or get into the muscle fibers because that can lead to a lot of bleeding.
I then take a blue marking pen and mark from the muscle to the super medial pole of the patella to help with closure at the end of the case.
I inject 1% lidocaine with epinephrine to aid with hemostasis as the arthrotomy is made.
I'll take the needle
and find the level of the patella as well so I know what kind of cuff to make around the patella.
I'll then take my knife, make sure it's nice and flat.
I'll keep my finger on the edge of the patella, go straight down and gently curve, leaving a millimeter or two of cuff around the quadriceps tendon.
Once I'm around the patella, I'll put my thumb on the other hand on the tibial tubercle.
and slowly and carefully extend my arthrotomy distally so it's just medial to the tubercle.
I'll take one more pass to break up any fibers and then I'll extend the leg to continue the arthrotomy and to pop the anterior horn of the medial meniscus.
Once that's done, I'll take my knife perpendicular to the tibia and create my medial exposure.
I'll create so-called zebra lines on the tibia itself.
So I'm not shearing off the tissue, but creating a nice thick flap for closure at the end of the case.
I'll then flip my knife around and release the fat pad off of the tibia, and then take my knife and remove some of the excessive fat pad to help with exposure.
I'll then take the bovie and create a little bit of a lateral release.
Not a true release, but just enough tissue to help with the aversion of the patella.
I'll avoid doing any suprapatellar synovectomy unless absolutely necessary, because I think that's a pain generator.
Then I'll flex the knee and avert the patella and assess the need to extend my incision based on the tension of the soft tissues.
If I need to extend the arthrotomy, I'll wander it just laterally.
not into a quad snip, but just enough to be able to release tension on those soft tissues of the extensor mechanism.
Then I'll do what's called the filet of fat pad, where I'll go from just inferior to the patellar pole straight down.
You'll see the fat pad kind of fall apart.
Then I'll feel the patellar tendon and then release the remaining fat pad medially.
constantly going back and forth to try to feel the tendon and make sure I'm not violating it, and then straight down onto the lateral femoral condyle so that I have good visualization of the lateral tibial plateau for the registration of the robot.
I'll try to go through the anterior horn of the lateral meniscus here as well, again to aid in visualization.
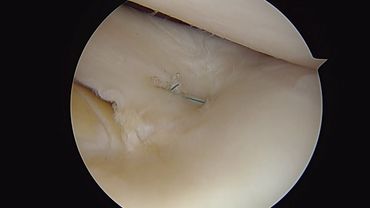
I'll then take the ACL, and if there's ligament or mucosum, that will be taken as well.
I leave the PCL intact.
So I'm just coming across the base of the ACL and removing anything in that area.
We'll then prepare for the registration and insertion of the medial femoral pins.
I'll go proximal to where my cutting surface is going to be with the guide.
We'll use the long pins.
I'll put the distal pin in first, and then I'll rotate
the guide so that it's out of the way of the future cutting surface of the bone.
This is especially important if you're doing a PS knee, because if you drill the pins bicortically, the pins will generally be in the region of the box.
Once the pins are inserted, the femoral array is applied and directed toward the camera.
Another incision is made using an 11 blade, about four finger breaths distal to the tibial tubercle, about one centimeter in length.
A tonsil is used to dilate the soft tissues.
The guide is placed and pressed into the skin so that there's an indentation from the guide so I know where to make my second pin incision.
Again, one centimeter along the medial crest, dilated with the tonsil.
And then two tibial pins are inserted.
perpendicular to the medial tibial crest, bicortically, and it's important to be able to feel when the pin is engaging that second cortex, and then you stop.
The array is then applied, angled toward the camera, and the bolts are tightened, first by hand and then with the screwdriver.
The femoral checkpoint is applied with the probe opening distally to make it easier to use the checkpoint during the surgery.
The tibial checkpoint is then also applied at the inferior most aspect of the tibia through the incision.
The lateral hip positioner is then loosened and the hip is taken through a range of motion to register the hip center.
This is done through small concentric circles.
Once that's done, the positioner is tightened again.
The medial malleolus and the lateral malleolus are then
probed and registered using the foot pedal.
After that the femoral checkpoint is registered and clicked twice as is the tibial checkpoint.
Once that's done the blue probe is exchanged and the anatomy of the femur and the tibia are then registered using the checkpoints.
This is done with the foot pedal for ease of use and efficiency.
It's important not to stick the probe directly through the cartilage down to cortical bone, but to just stay roughly on the surface of the bone itself.
For points that are located, say, medial to those osteophytes, it's sometimes difficult to get the correct angle.
So you can still probe on the actual osteophyte and not behind it.
And it will still give you a good reading.
Once the femur is appropriately probed, I'll pop three bubbles, typically the anterior cortex, the medial condyle, and the lateral condyle, and then move on to the tibia.
The knee is flexed and externally rotated to expose the tibia further.
The tibia is registered starting with the lateral tibial plateau, the medial tibial plateau, and then the anterior surface of the tibia.
Again, three bubbles are popped.
And once the tibia is formally registered, a rongeur can be used to remove any excessive osteophytes around the femur, tibia, and patella.
The knee is brought into full extension to note the resting pose, which is 8.5 degrees of varus and seven degree flexion contracture.
The knee is then flexed 10 degrees and a varus and valgus stress is applied to assess the gapping.
The knee is then flexed to about 90 degrees.
A double angle retractor is inserted on the medial and lateral sides of the femur.
And the flexion gaps are assessed both medially and laterally in the same fashion.
So when we first look at the Mako planning screen, we look at the image on the left and we can see that in extension, we are loose laterally and medially because the bars are above the line, but we're looser on the lateral side.
So we're relatively tight on the medial side.
If we look at the middle portion that shows us our flexion gap, we can see that on the medial side we're tight because the bars are below the line.
So we're tight three millimeters and we're just slightly looser on the lateral side, one millimeter.
So these two scenarios are very common for the varus knee.
So in order to change the gaps to make them even, we're going to pin the tibia in the middle and we're going to apply some varus to the tibia.
So we're going to be taking more medial bone and less lateral bone.
and that will even out our gap a little bit better in extension.
Simultaneously, we're going to pin the posterior condyle on the lateral side and externally rotate the component so that we can loosen up the medial flexion gap.
So we see that went from minus three to zero, and we didn't really change the lateral side because we pinned it on the lateral condyle.
Now we can see that we're loose medial and laterally in extension, but in a similar amount.
So we'll actually bring the femur resection down, take less bone to decrease the size of that gap.
We're still a little bit tighter on the medial side inflection and a little bit looser.
So what we can do is we can raise the
femur anteriorly, and then externally rotate slightly more by pinning it in the middle so that we're simultaneously opening up the medial flexion gap and closing the lateral flexion gap.
And when we do that, now we can see that we have consistent gaps in extension and in flexion with a two degree varus cut on the tibia, three degrees of posterior slope, and six degrees of flexion on the femoral component.
As you can see, we're looking at the posterior condylar axis and it says that we're 6.9 degrees externally rotated to the posterior condylar axis and 3 degrees externally rotated to the transepicondylar axis.
The robot is then brought in and the tibia checkpoint is first registered using the green probe.
The green probe is also applied to the registration hole in the saw blade to register the position of the robot.
The tibia resection is done first.
As you can see, I generally start by making a central tibial cut and then progressing immediately.
I usually put a Z retractor or a sharp Hohmann retractor immediately to protect the soft tissues.
I'm letting the saw do the work.
If there's hard sclerotic bone, you can see I'm putting my fingers on top of the saw to prevent it from kicking up.
And again, I'm doing this very slowly to get through the sclerotic bone to make sure that my resection level is nice and even.
I then progressed the saw over to the lateral side after replacing the retractor to protect the patellar tendon.
There may be areas that you cannot access because of the soft tissue constraints, in which case once the tibia is exposed later, I can use the pituitary rongeur or even a regular saw blade to finish my cut under direct visualization.
The femoral checkpoint is then registered for the remainder of the femoral cuts.
And at this point, the retractor can be inserted to protect the condyles.
And you can actually cover up the tibial array because we're not registering the tibia anymore.
We'll do the poster condyle cuts first.
Again, the medial cut should generally always be larger than the lateral sided cut because the component will be externally rotated.
So that's a good secondary check to make sure that your cuts are appropriate.
The anterior cut is then performed and you notice that the resection depth is more proximal on the lateral side, which again is a good indicator that the component will be externally rotated.
If you notice, I'm generally taking a little bit of bone off the edge as opposed to going directly into the bone.
Here you can see I'm taking a little off the edge each time, which makes the saw much more easily workable.
The anterior chamfer cut is then made and it's important to go nice and slowly here because if you don't resect enough bone or the saw blade kicks up, then the femoral component trial will be in excessive flexion when you apply it and you'll have to go back and take more bone there.
After the anterior chamfer cut, the saw blade is changed out and the new saw blade is registered and the distal femoral cut and posterior chamfer cuts are both made.
In this case, sometimes you have to move the position of the saw blade handle so that it doesn't interfere with the tibial array.
You sometimes also will have to flex the knee a little bit more to be able to get the appropriate angle for the cut.
Once all the cuts are made, the robot is removed from the surgical field.
The bony cuts are removed.
A half inch or three quarter inch curved osteotome is used to remove the posterior condylar fragments.
And a wide flat osteotome is used to remove the tibial resection.
When removing the tibia resection, it's important to boveal across the meniscal roots and then the remaining portion of the ACL and leaving the PCL intact.
Once that's complete, a laminar spreader is inserted first into the medial joint space with the knee at approximately 90 to 100 degrees of flexion.
and the meniscal remnant is captured with a coker and removed with the bovie.
It's important that the bovie does not extend over the tibial cut surface to avoid any injury to the collateral ligaments or soft tissues unnecessarily, and it's important to pull more tension and let the meniscus feather away from the tissues than just continuously bovying around the meniscal rim.
Any excess posterior condylar resection is also removed from the lateral side.
And then the laminar spreader is switched to the lateral joint space and the medial meniscus is removed in a similar fashion.
Again, it's important to leave a rim so that you don't injure the MCL.
I'm never bringing my bovie blade beyond the rim of the tibial bone.
as this could cause injury to the medial collateral ligament.
Excess bone from the posterior condylar section, if it was missed by the robot, can then be removed with a curved osteotome and a mallet, and the bone can be retrieved using a pituitary runger.
The laminar spreader is removed and the knee is brought into full extension, and on the lateral side, you may see some bleeders of the inferior geniculate system, and those bleeders are coagulated with tension applied to the leg,
so that you can really see into that lateral joint space there.
This is especially useful when you're not using a tourniquet because it's very difficult to get those bleeders after the implants are in.
The knee is then flexed and the femoral trial is applied and gently malleted in place.
After this, the tibial base plate with the small polyethylene component trial is then first inserted into the lateral joint space and spun into the medial side.
This gives me a good assessment of my flexion gap.
If I'm not able to put the tibial component floating trial into the flexion space, it feels too tight.
Then my first step is to recess the PCL slightly to open up that flexion space a little bit.
Make sure there's no soft tissue left that's getting in the way.
And then once the base plate is in there, you can extend the leg and remove the insertion handle.
And then we'll assess our gaps, including our extension gap, flexion gap, patellar tracking, and coronal and sagittal plane stability.
So as you can see, we've gone down to four degrees of varus from the original 8.5, and there's now a three degree flexion contracture.
I'm now assessing my gaps medial and laterally in extension.
Again, I'm doing this with about 10 degrees of knee flexion.
I'm seeing whether or not the patella tracks smoothly within the groove of the trochlea.
And I'll also reinsert the double angle retractor into the flexion space to make sure the gaps are equal as well.
Since I'm not resurfacing the patella here, I'll flex the knee and drill the lug holes for the femoral component.
I'll then either reinsert the handle or use a sharp homin to remove the tibial trial.
I'll then reinsert the femoral extraction handle and roll the femur off of the bone.
To complete the tibial preparation, I'll position the double angle retractor posterior to the tibia, either medial or lateral to the PCL, whichever is more accessible.
I'll then subluxate the patella laterally and insert the 90 degree bent homin, just lateral to the tibial bone.
I'll adjust the degree of knee flexion and the amount of force on the retractors to adequately expose the tibia.
I'll then insert a tonsil, which is low profile, into the medial soft tissues to expose the medial edge of the tibia.
Sometimes this is not always necessary.
If there's any excess bone, sort of at the edges, I'll use the regular saw blade and allow it to oscillate into the remaining bone as opposed to going directly into it, such that it's just taking off the bone right at the edge.
Once I'm satisfied with that, I'll apply the tibial base plate jig to the tibia, rotate it appropriately such that it fits in the medial lateral and anterior posterior planes.
I'll pin usually the lateral pin first, and then I'll externally rotate such that the anterior medial portion of the base plate is flush with the cortex.
I'll insert my second pin.
I'll then look to make sure my rotation is appropriate by looking at the center of the tibial tray and the medial tubercle.
I'll insert the tower.
The first step is the drill.
I hold down the jig, go forward first, and then reverse to create a cement plug.
I'll then take the keel punch.
insert it as far as I can by pushing it, and then I'll mallet gently.
In the case of bone that is very sclerotic, sometimes it will kick the tibial tray up.
In those cases, I will use a reciprocating saw in the keel to break up that sclerotic bone and then reinsert the punch to finish my tibial bone preparation.
I'll then remove the long pins from the base plate and remove the base plate trial as well.
gentle suctioning into the canal, not to disrupt the bone plug for the cement.
Make sure there's no soft tissue impingement.
Make sure there's no excessive osteophytes or anything before I open my implants and start mixing the cement.
The knee is thoroughly irrigated with the Pulse Lavage, making sure to include the posterior aspect of the knee.
A lap sponge is placed over the anterior tibia to prevent any excess fluid from getting down into the drapes.
After the knee is thoroughly irrigated, the injection is performed using quarter percent marcaine and 15 milligrams of Toradol in 20 cc syringes.
The checkpoints are then removed.
I do this at the same point in every case to ensure that the checkpoints are removed and they're not left inside the knee.
The medial soft tissues are then injected, including the periosteum.
I subluxate the skin so that I can get into the periosteal tissue on the medial and lateral side.
I like to see the periosteal tissue bubble up.
This is one portion of the painful part of the knee.
The periosteum on the anterior femur is injected as well.
And lastly, the femur is elevated and the posterior medial capsule is injected.
I typically don't inject any more lateral than the medial portion of the lateral notch.
This is to avoid injury to the peroneal nerve, which is about 1.5 centimeters from the posterolateral corner of the plateau.
Retractors are then inserted to re-expose the tibia in a similar fashion as previously with the double angle first.
The 90 degree bent homin is then inserted after subluxating the patella laterally.
Once appropriate visualization of the tibial plateau is appreciated, the canal is gently suctioned.
Any sclerotic areas of the tibial plateau are roughened with a double-sided reciprocating saw as well as on the femoral side.
Occasionally I'll use a guide pin on a wire driver and drill holes to improve the cement interdigitation.
I'll then suction in the canal and gently apply a lap sponge into the canal as well.
This is all occurring while the scrub tech is mixing two bags of low viscosity cement on the back table.
Once the cement is of the appropriate consistency, I pour the cement into the TUMI syringe and apply the cement to the underside of the tibial base plate.
Note the consistency is not too doughy so that it still is able to exit the tumi syringe without too much force.
I then apply cement to the underside of the anterior flange as well as the posterior condyles of the femoral component and then I prepare for cementation of the tibial surface.
Cement is then pressurized into the tibial canal
Suction is used to dry any excessive blood from the tibial surface.
And once the cement is of the appropriate workability, I'll pressurize it into the tibial canal even more and subsequently into the tibial joint surface, into all the interstices of the bone and make sure that the tibial surface is as dry as possible.
I tend to push it in posteriorly and drag my finger anteriorly so that no cement is caught in the back of the knee.
I'll then put the tibial base plate into the canal and mallet it appropriately with gentle taps, making sure that I'm clearing the posterolateral knee and femoral condyle so as not to cause any fracture.
And then I'll use a fine pointed tonsil to remove any excess cement from around the tibial tray.
I'll then remove all the retractors, put my two fingers on the tibial base plate and push it posteriorly so it's under the femur.
I'll have somebody apply pressure on the proximal tibia so that the femur doesn't kick the tibial tray out.
I'll apply cement to the femur and I'll use a thumbprint on either of the posterior condyles.
I'll pressurize the lug holes and then I'll apply the femoral component
and impact it into place.
Excess cement is again removed with a tonsil.
It's important not to use your finger for this step because it can cause the cement to go into the small interstices of the bone on the medial and lateral edges of the femur.
This causes third body wear once the cement hardens.
I call this the ice cube tray effect, where the small pieces of cement can get dislodged from the small interstices of the bone and cause third body wear.
The femur is elevated and excess cement is also removed from the posterior aspect of the knee.
The base plate is then irrigated and the polyethylene component is then inserted and impacted into place using the impactor.
The knee is then brought to extension and the bump is applied underneath the ankle.
Importantly, I use cement as the final balancer so that I extend the knee and apply pressure to the proximal tibia until I feel that the leg is fully straight.
Any excess cement is then removed.
In this case, we did not resurface the patella.
If I had, I'd be applying cement to the back of the patella at this point and applying the patellar button.
After the cement is fully cured, I check my final balancing and extension, and we note that we have about 5 degrees of varus from our residual 8.5 degrees and just a slight flexion contracture at 2 degrees.
The knee is then thoroughly irrigated while the cement continues to fully cure.
A 0.35% dilute betadine solution
is then applied to the knee and gently suctioned so that the betadine allowed to sit in the wound for approximately two to three minutes.
The betadine is then washed out.
I pay particularly close attention not to get the betadine on the native patella if I'm not resurfacing it.
the arrays and the guides and then the tibial and femoral pins are then removed.
When removing the pins, it's important to make sure that the drill is locked onto the pin first, the pin is reversed out, and when you think the pin is out of the bone, continue to reverse it out as it sometimes gets stuck in the soft tissues.
A new sheet is applied, and the cement is allowed to continually fully cure.
I don't flex the knee until the cement is completely hard so as to avoid early tibial loosening rates.
One gram of Vanco powder is applied into the knee.
I don't like to apply it directly to the implant, but more so to the suprapatellar soft tissues.
Once the cement is fully cured, varus valgus testing is then performed to ensure appropriate balance.
Sagittal balance is again tested and found to be appropriate.
The patella is tracking in the central trochlea with no liftoff.
The bump is then applied underneath the popliteal fossa and we prepare for closure.
The synovial fat pad tag on the medial side is then removed, which I find is important for preventing impingement of the soft tissues.
along the implant.
Any bleeders are then coagulated.
There's often a vessel in that area.
The first part of the closure involves two stay sutures of zero-vicryl, one proximal to the patella and one distal, using the previously made arthrotomy mark at the beginning of the case.
At this point, a rake is just gently applied to expose the soft tissue.
And these two stay sutures are hand tied to approximate the perfect tension.
Once the two stay sutures are placed, the number one Stratafix unidirectional suture is then started approximately at the proximal pole of the patella with the tag of the suture on the medial soft tissue and not on the patellar side.
The tissue is gradually tensioned using the stratifex suture, and very careful attention is paid to closing the distal aspect of the arthrotomy to prevent any wound drainage.
At the proximal aspect of the arthrotomy, a rich retractor is inserted.
and the closure is continued, making sure to only grab a very small portion of the tendon and not the vastus muscle.
The suture is extended back downward over itself in between the sutures that were applied on the way up to create Xs and a tight closure.
Next, the 2-0 monocryl suture is applied distally to start closing the distal aspect of the wound, while the assistant also uses
ovicral buried suture up top to close the scarpus fat layer.
Previously to this, we have irrigated the knee again and applied another layer of vancomycin powder.
Once the subcutaneous layer is closed with 2O monocryl, the subcuticular layer is closed with a running 4O monocryl with the knots buried at the proximal and distal aspect of the wound.
The final closure is with pruneo.
There's no wrap, there's no ACE bandage, and no portable x-ray is obtained at the end.
Similar videos: Mako Total Knee Arthroplasty
Как правильно бинтовать ногу после операции на колено #спортмедика #рекомендации #knee
This with no right knee pain please #fyp
ОЗОКЕРИТ | Пример применения | Боль в колене

Быстрое и эффективное лечение повреждения мениска в коленном суставе
удар коленом в пах