The Arcane Workflow (in Blender)
Download information and video details for The Arcane Workflow (in Blender)
Uploader:
SunnyIsOnlinePublished at:
12/30/2024Views:
197KDescription:
Video Transcription
We'll be talking about Arkane today, so I think I need a better avatar that's a little more painterly.
Much better.
Don't judge me for how I look.
Being in a tube for seven months does that to you.
Anyways, let's talk Arkane's strange production pipeline.
Studio Fortiche, the French animation studio that gave us Arcane, follows a fairly unique production pipeline that they slowly reveal over the course of their Bridging the Rift YouTube series.
However, despite how informative this series is on a large chunk of their pipeline, there's a lot of information that gets left out here.
How do they paint the lights?
I cannot tell you.
It's a little frustrating that they gave us every step of the process except for lighting, the one thing I wanted to learn, but I suppose it's a tall order to ask for the greatest animated series ever released and public access to all the technology that made it happen.
And if time has told us anything, it's gonna be another year or so before we get a documentary series.
So I did my research.
The trick here is that there is no lighting department, there's barely a set, and there are no simulated effects.
What you see on the screen in every scene of Arcane is a set of unshaded 3D models, 2D paintings, and hand-drawn visual effects.
all tied together by the mightiest set of compositing artists on God's green earth.
It's a pipeline so unique, controllable, and creatively fulfilling that it only felt right for me to lay it out in a cleaner way for you to apply yourself, without spending thousands on software and employees.
This video will cover each piece of Arkane's pipeline, starting with the methods and technology used by Fortiche, followed by how to recreate the effects with 100% free software.
Using this video as a toolkit, you should be able to create anything just like Studio Fortiche, beginning to end.
Before we move on to my arcane knowledge, I do have to keep the lights on, so allow me to fulfill a contractual obligation.
This video is sponsored by FlexiSpot.
If you're an artist like me, you probably also spend a good chunk of your day rotting in a chair.
And for the longest time, I was rotting in this chair, which is why FlexiSpot's C7 ergonomic chair has been a total game changer for me.
In office mode, the C7's backrest locks at 93 degrees and supports my back while the adjustable headrest prevents my abnormally long neck from taking any unnecessary strain.
The breathable and highly elastic mesh seat cushion allows me to work for incredibly long hours without feeling like I need to constantly get up and readjust.
And if a foam cushion is more your style, don't worry, they have that too.
Don't even get me started on the lumbar support on this thing.
When I first got a taste of that adaptable lumbar support, I tell you, I cannot go back.
No more cramming this giant plushie into my old chair to convince myself I was making my back healthier.
Besides just being healthy, the C7 is an incredibly comfortable option.
The seat on this thing is significantly larger than other chair brands.
You can even tilt it forward to circulate blood through your legs.
Speaking of gaming, the 3D adjustable armrests make sure to provide support to your arms no matter where you game, whether you're typing, drawing...
Whatever you do.
In relaxed mode, the C7 quickly turns into a recliner with a backrest that can lock into up to four different positions, and of course, a comfortable mesh footrest, a feature that makes my workday infinitely more relaxing and is somehow missing from every other chair on the market.
If you're worried about making a commitment, Flexispot offers a 30-day return policy for a completely risk-free trial, as well as a 10-year warranty with direct replacement for any damaged parts.
If you use my code C730 right now, you can slice $30 right off your order of the C7 chair.
And remember that if you don't like it, you can always return it.
I would never promote a product to you guys that I wasn't a fan of, and this one has been a total game changer for me.
One of the impressive feats that Arkane pulls off is not just being an incredible looking show, but also sporting a very robust story with incredible cinematography.
And for that, we have script writing, storyboarding, and design teams to thank.
For your story, script to your heart's content.
There really is no Arkane-style script.
Do your best to cook up something that you enjoy and maybe watch some local script, man.
As for storyboarding though, there are some things to keep in mind.
Because Fortiche is often compositing paintings directly into the scene, complex camera movements need to be kept to a minimum.
Save these crazy, sweeping, rotating shots for your best off-the-wall moments, but other than that, keep your shots subdued with good composition and simple camera movements.
Generally, Fortiche approaches Arkane a lot more like a film than an animation.
These shots occupy real space in the world and tend to shy away from stretching proportions and throwing us into impossible off-the-wall battles, as awesome as those are.
Arcane's frame is also 21x9, so save yourself some drawing time and cut out the top and bottom of the frame.
As for doing it ourselves, I storyboard my scenes in Blender using grease pencil.
Just open up Blender, select the 2D animation workspace, and you're pretty much set to draw whatever you want.
Once you have those images, render them out, and then time them up to your audio of choice in DaVinci Resolve or whatever editing software you use.
On screen, I have the storyboard I've used for my own project.
They're very simple and sloppy, but as a one-person production, you can often take the liberty of leaving your storyboards vague and filling in those gaps during your production.
In a real production like Arcane, we need to effectively communicate every single important character and camera move, as many departments are going to have to interpret our storyboard.
But when we're working alone, time is really the biggest thing to worry about, and trusting your gut is often the solution to that.
Now that we have our storyboard, it is time for some character models.
Models in Arkane are fairly standard but differentiate themselves from other productions in very subtle but powerful ways.
Teaching you how to sculpt a character from scratch would take far too long for this tutorial, but Dicko, the guy who taught me how to model, is currently doing a series on character sculpting.
And Ryan King Art always cooks with beginner tutorials on just about any topic, so I have both playlists linked below.
Arkane's models have a very strong art style.
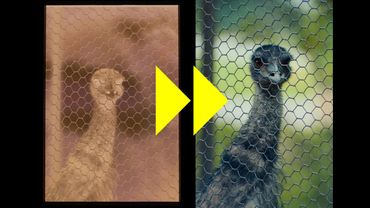
The core of these models is their imperfections.
As the art of Arkane states, a big point in Arkane's modeling is imperfection.
Old models had very basic round eyes with circular highlights.
We wanted to deal with characters as if we had done a real casting.
We wanted them to have a few small flaws.
Everything in Arkane has flaws.
Faces are not perfectly symmetrical, for example.
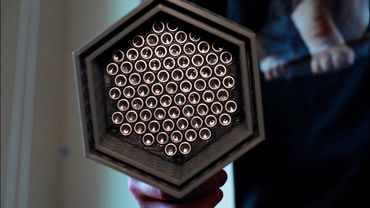
In Arcane, there is not a single object that is a perfect cube, cone, sphere, or cylinder except for the hex gemstones, and this is 100% intentional.
This law extends to just about everything, including character eyes, which often have small imperfections and edges, and while they're often hard to notice, it gives everything a very handcrafted feel that adds up more and more the more you fill your scene with these objects.
Overall, Arcane doesn't have special topology, and you're following a fairly standard workflow and just letting the textures do the heavy lifting, but these principles of design are what drive the looks.
While you're putting together reference or drawing your characters, skew the design and exaggerate important features.
It goes a long way.
When creating assets ourselves, characters should start with a good sculpt in Blender's sculpt mode, and once again, watch some Dicko, watch some Ryan King, and once you have a retopologized model, just start skewing things around.
On my model, I took the head, the cap, the belt, and this little box on the head, and I just warped them enough to no longer be basic primitives.
That's it for modeling, though.
Pretty straightforward for 3D artists.
Time to move on, too.
As you could probably tell, Arkane's models are hand-painted, and that is a task that would 100% be easiest in a program like Substance Painter.
But we don't have that kind of money in this house, so I'll be showing you how to do it in Blender.
I'd recommend getting this free brush pack I have linked below, as well as UCU Painter before you begin.
Arkane's texture team loves square brushes, and you'll often see a lot of blocky shading being applied with this type of brush.
And frankly, the layer system in UCU Paint should just be default in Blender at this point.
For reference, without layers, texturing this model took four and a half hours.
I'm confident I could have done that in half the time if I had more than one single layer to work with.
Use your resources, kids.
For the most part, this is a standard job.
UV unwrap your model as you normally do and lay out your colors and just start painting away.
The biggest thing here is to keep your colors relatively subtle.
You'll notice on Jinx here, image link in the description, it's a great resource,
The value changes on the skin and clothing are relatively tight.
When we paint a static picture, we usually want to utilize strong contrast to avoid a washed-out looking image, but these models still have to go through a lot of processing before the shots are finished, so feel free to use lighter values and stray away from those dramatic shadows and great changes in contrast.
I'd imagine your character in a pretty regular, well-lit indoor area, like a grocery store.
That's the general value range you're shooting for.
Final thing to keep in mind as you paint is to stray away from the line tool for the most part and try to keep things a little messy.
It's very common for us digital artists to keep things very clean, but the magic of painting is the quote-unquote mistakes.
Bob Ross was not lying when he calls them happy little accidents.
Wobbly lines and layered strokes add so much life to your model, so keep them intact and learn to love them.
I know as a technical 3D artist, we often get a little obsessive over these mathematically perfect graphics, but Fortiche is not a fan of that.
Other than that, best thing I can say is to try your best and trust the process.
I'm not a 2D artist and certainly not a painter, but for a beginner, I think this came out pretty well.
It looks a little too much like a Fortnite skin, but overall, I am quite happy with it, and it only took five entire hours.
Damn you, Blender, and your one texture painting layer.
Now that we have our character model and a storyboard, we can dive into what really sells the Fortiche look.
Tangent time.
Okay, here's the deal.
After models and storyboards are created, just about every department at Fortiche works simultaneously to create each scene.
3D animators block the character animations in the scene according to the storyboard,
while 2D artists paint the background behind the character animations, while layout artists are taking those paintings and modeling in the geometry, which will eventually have said painting projected onto it and used in the final render.
The magic of Fortige's workflow comes from the fact that none of these mediums necessarily need to interact with each other until the compositing phase, so everybody can kind of craft their specific piece of the scene and set it in the compositor's lap as an asset later.
All we really need are solid passes of the 3D character animation, the background, and the textured objects.
From there, Fortiche's compositing artists use a software like Nuke to place all the passes together and edit in all the lighting so it feels like the characters are really there.
That is the secret.
It is all a big 2D illusion.
Everyone does their individual part,
and then compositors jam all of those puzzle pieces together into one cohesive scene.
Like I said, no lighting team, barely a set, no simulated effects.
Tangent over.
If you're working alone, as I imagine most of you are, we have the unique advantage of being able to approach scene creation in just about any order we want, but the unique disadvantage of being individuals with strengths and weaknesses.
If you're naturally a 2D artist, I'd personally make paintings according to your storyboard and then build your scene and project the textures.
That workflow is pretty much one-to-one with what Fortiche does, and if you're good enough at painting, often the only 3D work you'll really need to be doing is animation, and that saves a ton of time.
If you're naturally a 3D artist, though, I'd build your scene with geometry first and hand-texture those finished sets like you would on any other scene.
This is what I personally did because I can't paint... yet.
The final thing before we move on is exclusively for 2D artists, and that is camera projection.
It's quite complicated, but luckily Lightning Boy Studios did one of the most in-depth tutorials on it.
Link in the description.
This will allow you to paint your scenes while still retaining the 3D information you can use for parallax and custom lighting later.
I find a lot of tutorials overstate the importance of this step.
If your paintings are convincing enough, you can forgo projection entirely and just use the painting, like this shot for example, which is pretty much all 2D.
But if you want a dynamic camera or more control, give projection a shot.
It will serve you well.
As for myself, you can see me simply going through my scene, unwrapping everything before texture painting all of the light and detail.
The goal of painting like this is to effectively have a finished painting in your 3D scene, light and all.
Because Arkane doesn't use traditional 3D lighting on its characters, the compositing team uses the light that the 2D artists painted in to drive the custom lighting on the character.
If you don't have 2D experience, you might find this step quite difficult, as did I.
The best advice I can give is to stick to that square brush and try using a lower opacity to add some chaos to your textures.
A lot of these assets have big blotches of unique color added to them just to increase the visual charm and mimic a real-world canvas that gets layered over time.
Once you have everything blocked, I like to go in with a soft brush and paint in some of the light, like this green light coming from this giant tube.
Trust the process here and stick to the arcane design rules and I promise whatever you create will look great.
Honestly, this was my longest step, clocking in at about 14 hours, but that is the price of hand painting and why this show costs 250 million dollars.
You can do it.
I believe in you.
Oh boy, after all that we arrive at the fun part, animation.
First things first, frame rate should be 24 frames a second.
Animation in Arcane generally finds a happy middle ground between the hyper exaggerated movement of a cartoon and the grounded movement of a live action film.
We still have snappy, stylized motions, smears, duplicates, all of that, but characters generally obey the laws of physics.
Each movement from regular facial acting to a high speed punch is preceded by proper anticipation, and generally even the fantasy weapons, bionic parts, and machines all function within the laws of the real world.
Continue to use the principles of animation and just make them invisible enough that it doesn't break your own immersion.
And a great way to make sure you're always on model is to act out the scenes yourself.
I know in the beginning of my animation career I was quite camera shy, even though the footage wasn't going to be public.
It can be a little cringe watching yourself act like a cartoon character on camera, but trust me, this is the only way to capture the incredibly complex workings of the human body.
In fact, Riot has an entire room dedicated just to animation reference, with mirrors to correctly capture the action from multiple angles and props so the animators can correctly represent the weight of the objects in their scene.
It's genuinely so awesome the lengths arcane animators go to capture reference, even acting out the scenes together like in this clip.
It's just so rad.
Do this, and do this a lot.
Here for this hand animation, I really did just set up my camera and act out the motion, and with that information I was able to block out the important poses, and once I converted my constant keyframes to bezier ones, it looked pretty on point.
With some tweaking, it's a real-world accurate arm animation with no smears while still being snappy and satisfying.
This is the core of Arkane's style.
Use tons of reference and your scenes will practically animate themselves.
Other than that, standard animation.
Final thing we need to do before we reach the behemoth that is compositing is to compile all of our assets in one place.
In this case, it's 2D effects and properly rendering our animation with passes, which is much more important than you probably think.
There is nothing Fortiche special about this process, so here's a rundown on how to do everything properly.
Let's tackle the 2D effects first.
Blender's grease pencil really is the perfect tool for this, as you can just draw directly on the camera and render that as its own object.
Personally, I like to place a plane right in front of the camera by selecting the camera, pressing Shift-S and then cursor to select it, adding a plane, rotating it 90 degrees to match the camera, and then parenting that plane to the camera and giving it a transparent material like so.
From there, if you set the grease pencil to draw on a surface, it will draw right on top of the camera, so you can create frame-by-frame animation, little dust clouds, stuff like that.
Do remember that to save time, Fortiche animates 2D effects at 12 FPS, half the frame rate of the 3D animation.
So only place your keyframes on every second frame in your timeline.
Now that we have our animation, background, and effects, it's time for a crash course in professional exporting.
First off, the PNG was invented in 1997.
We don't need it anymore.
Set your render format to OpenEXRMultilayer and set the float to half and the codec to DWAA, and then come to your render passes and enable all of the options under data.
This will render our scene as an EXR instead of a PNG file.
Not only does EXR take up less than half the space on your disk compared to a PNG,
but the EXR comes with a ton of crazy features.
It automatically stores your render as an HDR or a high dynamic range image, meaning that it basically saves your image at just about every exposure level and packs all of those into one file.
A PNG will hard code every pixel to be a certain color, meaning that the pure white center of a flame is going to remain white no matter how high or low I set my exposure.
More importantly though,
EXR saves multiple passes of your render inside of the image, including normal and position data, which we can later use in our compositing software to create effects and relight our scene, which as we know is a core component of the Arcane workflow.
Next thing we do is come to color management, override, and set our color space to ACES CG.
This one is complicated, so buckle up.
In short, for those of you who don't even want to approach this topic, we render like this because it gives us a lot of color control and it pairs well with the EXR format in DaVinci Resolve.
For those of you who want to know, prepare yourself.
This triangle represents the colors we can see.
This triangle represents what we call the sRGB color space, which is what our monitors and TVs can display.
It's a whole lot less color than our eyes can comprehend, but it's the most available technology so it is everywhere, and most of the time it looks fine and gets the job done.
However, as technology progresses, displays evolve, and now we have HDR TVs that can display brighter highlights and darker shadows, and the ever-evolving movie theater projector has access to even more colors than a monitor or a TV for a more immersive experience.
So, when creating a cool piece of art that we want to last,
We render in ACES, which stores just about every color we can possibly get our hands on.
While it looks quite ugly on our screens, it's because our screens aren't built for it.
It's great for archival, and it's great for working with, because we have access to so much more color data to both work with in the future and the present.
It's so commonplace now that in fact there's a node in DaVinci exclusively to correct ACES back to sRGB just for you.
All in all, we are storing our image like this,
so that in the future we can use it on better displays and in the present we can use it to color grade.
If you don't get that or you want more, there's a billion videos on aces out there and you should go watch them.
When we finally render our animation, we will get all of these passes neatly laid out with everything ready to be composited and all of that normal data packed into the EXR file.
Alright, time for the big one.
Buckle up.
Arkane, as well as just about every show and movie you see nowadays, is composited in the program Nuke.
Not After Effects, not DaVinci Resolve, Nuke.
There is a very good reason for it.
Despite its quite outdated looking interface,
Nuke is a juggernaut of a program.
There are nodes that reconstruct your scene in 3D based on position data, and incredible 3D tools made for relighting, trackable mats for 3D objects, everything you could ever want.
Nuke is the backbone of Arkane's compositing, as the relighting tools it provides are the foundation for just about every scene.
Fortiche's goal here is creative control, and being able to control the color grade, composite, and lighting all in one singular program is what makes Arkanes such a good-looking show.
Arkanes' compositing pipeline gives you the control of a painter or a charcoal artist, where you're constantly creating chaos in your scene and then adding and subtracting new information until you arrive at a product that may not be realistic, but has a very strong, focused art direction and looks absolutely stunning.
While 2D lighting is based on a very human view of how light works, 3D lighting is mathematically perfect and can often appear clinical and unappealing if not treated with care.
That's why CG in anime often feels so uncanny.
It is literally perfect.
There are ways that it can work, and it often requires you to embrace 3D as a medium, which is the correct avenue.
Beastars, Land of the Lustrous, and Trigun Stampede look absolutely rad, but the moment you try blending these perfect 3D assets with an imperfect 2D environment, things get messy and you start teetering on the edge of unintentional mixed media.
Arcane's solution of leaning into the 3D exclusively for animation is nothing short of genius, and it's what makes the art feel so incredibly cohesive.
The coolest thing is that a non-commercial version of Nuke is completely free, with the only major limitations being a maximum render resolution of 1080p, and obviously it's non-commercial, so no monetized YouTube videos.
I'm guessing a lot of you are planning to post your animations as YouTube videos though, and Nuke literally costs $3,000 a year, so today I will be showing you how to use DaVinci Resolve for this.
If you have a method of acquiring Nuke, do it.
It is worth every penny, and the overall principles I teach here will be the same.
But for us brokies,
Let's do it in DaVinci.
Compositing is a long and complicated process that many of you may be unfamiliar with as 3D artists, so for simplicity's sake I will be compositing this cute little Minecraft animation into this painting I found on Riot's website.
The first thing we want to do is to get our footage into the compositor, and to do this we will use the Loader node.
Simply add the node, select the first image in your EXR sequence, and voila!
The reason we use a loader node instead of a media in is that the loader node is a lot less intensive on our machine, and from what I've heard, media in actually handles footage very poorly, so loader node always on top, always.
You'll notice that our footage looks awfully different compared to when we created it, and that is because of our ACES CG color space that I mentioned earlier.
To fix it, place an Aces Transform node in front of any Aces footage, set your source color space to Aces CG, and set the output to either sRGB or Rec.709, depending on your monitor.
Just give both a try, and whichever looks correct, you can keep.
Now that we have this in here, it is time for the EXR magic.
Come to file, extend this dropdown on your footage, and come to the normal XYZ area.
So long as you enabled the normal pass, you should have a view layer .normal in each of these dropdowns, so match up the normal X, Y, and Z to their respective panel, and now the magic can begin.
If you add a shader node, DaVinci is now effectively shading your model with a 3D light in 2D.
It's a far cry from Nuke's entire custom 3D workspace with position data, but we make do.
Using this data, you can not only light your entire model, but also adjust how they're ambiently lit when they're not in harsh daylight.
And if you want, you can even turn down the ambient light all the way and use this black and white image as a mask for other effects.
In my Minecraft scene, I add both a shader node for the white light hitting the model, as well as a second shader node for this orange light that I blurred out and composited over my scene.
The other lighting trick I've used is taking my background painting, blurring it, and compositing it over the whole scene using a merge node set to screen.
It gives all the highlights a really nice warm glow and places some of that color information on the character as they walk from right to left.
Finally, the most important thing to do is duplicate your background image and use the polygon tool to mask out any foreground objects you want in front of your character.
Like this table, for example.
Once we have these elements, the shot is pretty much ready to ship unless we want to go above and beyond and add some special detail.
In my case, I duplicated the animation, distorted it, and multiplied it over the floor to create this fake reflection.
I also rendered the foreground separately and had it move a little faster than the background to create a parallax.
When I was done, I took the whole scene and keyframed it to slowly move to the side as if we have a big sweeping camera.
In DaVinci, there is so much you can choose to do, too much to even cover in a video, but that's the magic of this workflow.
The possibilities are literally infinite, and you have total control over what the final product looks like in your fusion space.
If I wanted to right now, I could throw a color grade onto my painting, add some effects, and then change the direction of the lighting, and all of a sudden I have a big green glow coming from the inside of the room.
The fact that we can do all of this with just a 3D render and a painting is incredible, but it really is just the ultimate way to use all the technology you have around you to create a product that looks cool and also is easy to put together in compositing software.
Once you're done with this composite, just throw in some regular old sound effects and that's it.
The ever-elusive, arcane workflow.
laid-out bear for all to gaze upon.
I think this looks quite nice.
Only time will tell whether Fortiche will release this first or we will find a one-to-one match ourselves, but I'm excited to see what the future holds for this workflow, and I have absolutely fallen in love with it.
Thank you to my four wonderful active patrons, Nakbient, Jizzer, Gil, and Forosis, for keeping food on this poor, starving artist's table.
Once again, thank you to FlexiSpot for sponsoring my video.
Make sure to use this totally sick C730 code and try out that 30-day free trial to see if the C7 chair is right for you.
I will see you in the next one.
Probably not a tutorial, but the next one.